Have you ever been caught off guard by the price tag of something you really need? It’s a familiar feeling we can all relate to. Window screens are one such item. Who would have thought that a seemingly simple thing could put such a dent in your wallet? According to Yelp, replacing a single screen can soar to over $700. Yes, you read that right—each!
As an exterior contractor based in Colorado, we find our team replacing screens annually after our typical summer hail storms. The damage is often strong enough to require repairs to the window screens but does not warrant window replacement. Additionally, to reach the top end of the price range on screens, you are likely referring to custom materials or specialty installations. That being said, in our area, a screen replacement will likely exceed $100.
Custom Exteriors is here to rescue your savings account. Because of our extensive knowledge and experience with screen replacement, we are confident we can teach you the art of DIY screen replacement—a surprisingly simple task. We’ll guide you through the process and provide a list of essential tools. Spoiler alert: the total cost can be kept well under $50.
When replacing a window screen, it’s important to be aware of common mistakes often made. One common error is not taking the time to gather and record accurate measurements. Even an error of less than a quarter of an inch can result in a replacement screen that doesn’t fit properly.
That can then lead to a lack of a tight seal or a screen that is too loose. When a screen is too loose, it can allow bugs and debris to enter. If you are replacing the screen frame as well, it’s important to measure the dimensions of the window frame within an eighth of an inch. You want your new screen frame to be an exact replica of the damaged one. By doing so, you ensure a snug fit for the replacement screen.
Completing an exterior remodeling project can be stressful because there are many important choices. You have to choose the right paint color, roof materials, shingle colors and styles, and many other considerations. An often overlooked option that can drastically affect the indoor air quality of your property is the material chosen to replace your window screens. Different window screens are designed for specific purposes. While metal screens are more durable, they come with a higher price tag and can cause poor visibility or reduced airflow. Fiberglass mesh is more affordable; however, it provides a decreased level of durability.
To ensure the best results, choosing a screen material based on your specific needs is essential. That could include fiberglass, aluminum, or stainless steel. In Colorado, the most common material is fiberglass mesh. While we do encounter metal screens in residential settings, they are slowly being replaced by their fiberglass counterpart. This is partly due to fiberglass mesh being more manageable to work with and more affordable.
We still find stainless steel and bronze screens in more high-end applications. As part of a high-end exterior remodel, metal screens can make a huge impact. They are also corrosion-resistant, more durable, and can be customized. With that in mind, their thicker composition can cause reduced visibility and airflow.
Achieving the correct tension when installing a replacement screen is crucial. Overstretching the screen can lead to warping or tearing. On the other hand, under-stretching can result in a loose and ineffective screen. But what is the right tension? Custom Exteriors has provided comprehensive video instructions teaching you how to rescreen a window screen. Mike walks you through the replacement every step of the way.
If you watched the DIY video, you can see that we take our time when replacing screens. Skipping steps or rushing through the process is a common mistake. Installing a replacement screen requires patience and attention to detail. If you rush, you’re more likely to make mistakes. When mistakes are made, you may have a screen that doesn’t function properly. Take time, carefully follow the instructions, and double-check your work.

The frame is the outer structure that holds the entire window screen together. It is usually made of lightweight materials like aluminum, vinyl, or wood. When replacing your window screen, you must ensure that the new frame matches the dimensions of your existing window frame. Measure the length and width accurately to get the right fit. A properly fitted frame ensures the screen stays securely in place. It also provides a tight seal against bugs and debris.
The spline is a thin, rubber-like cord. It fits into a groove (known as the spline channel) along the edges of the frame. Its primary purpose is to hold the screen mesh securely in place within the frame. When replacing a window screen, you'll need to remove the old spline. So be sure to inspect its condition and thickness. This will help to determine the appropriate size for the replacement spline. A well-fitted and intact spline ensures that the screen mesh doesn't come loose or sag over time.
Retainer clips are small, often plastic or metal components. They are used to hold the screen frame firmly within the window or door frame. They are typically found at the corners and sides of the frame. When replacing your window screen, make sure to check the condition of the retainer clips. You will want to take this opportunity to replace any damaged or missing ones. Secure retainer clips help keep the window screen stable. It will also prevent it from being dislodged due to wind or pressure.
The screen mesh is the actual material that provides the barrier against insects and debris. It does this while allowing airflow and visibility. It is usually made of fiberglass, aluminum, or other durable materials. When replacing your window screen, select a mesh material that suits your needs. Fiberglass mesh is commonly used due to its affordability. In addition, it is resistance to corrosion. Aluminum mesh, on the other hand, is more durable and suitable for areas with pets or where there is a higher risk of damage.
Pull tabs are small tabs or handles attached to the bottom edge of the screen. They serve as convenient aids for removing the screen from the window frame. This may be necessary for cleaning or replacement. Before replacing your window screen, check the condition of the pull tabs. If they are worn out or broken, consider replacing them for easy maintenance in the future.
Window screens might seem like a minor detail, but they play an important role in enhancing your space’s overall comfort and functionality. It impacts various aspects of comfort, aesthetics, and functionality. By understanding the parts of a window screen, you can make informed choices that align with your specific needs and goals.
The anatomy of a window screen includes elements such as mesh material, frame, and spline. Collectively, these components contribute to better temperature regulation within your living or working spaces.

By selecting the right mesh material and ensuring a proper fit, you can allow fresh air to circulate. And at the same time, you can keep out insects and dust. This reduces the reliance on air conditioning and heating systems. This then leads to potential energy savings and a more sustainable environment.
An understanding of the anatomy of a window screen allows you to select screens that allow for optimal airflow. Proper ventilation is essential for maintaining indoor air quality and reducing stuffiness.
From energy efficiency to allergen reduction and enhanced visual appeal, a well-chosen window screen has the potential to transform your indoor environment for the better. Explore the options available and elevate your space with the power of well-designed window screens.
Starting on a DIY project is an exciting task. But it’s not uncommon to encounter the frustrating realization that you lack the necessary tools to get the job done. To avoid unnecessary hiccups and make your project run smoothly, gathering all the essential tools beforehand is crucial.
So whether replacing a window screen or tackling any other home improvement task, having the right tools at your disposal is important. It can save you time, effort, and frustration. Here’s a comprehensive list of the must-have tools we use on a window screen replacement project.
Duct tape is the Swiss Army knife of DIY projects. It's versatile and can serve multiple purposes during a window screen replacement. We will use it to temporarily secure the screen frame. This will hold the screen mesh in place while you fit the spline. Duct tape can also help you mark measurements. It can also hold pieces together during the assembly process.
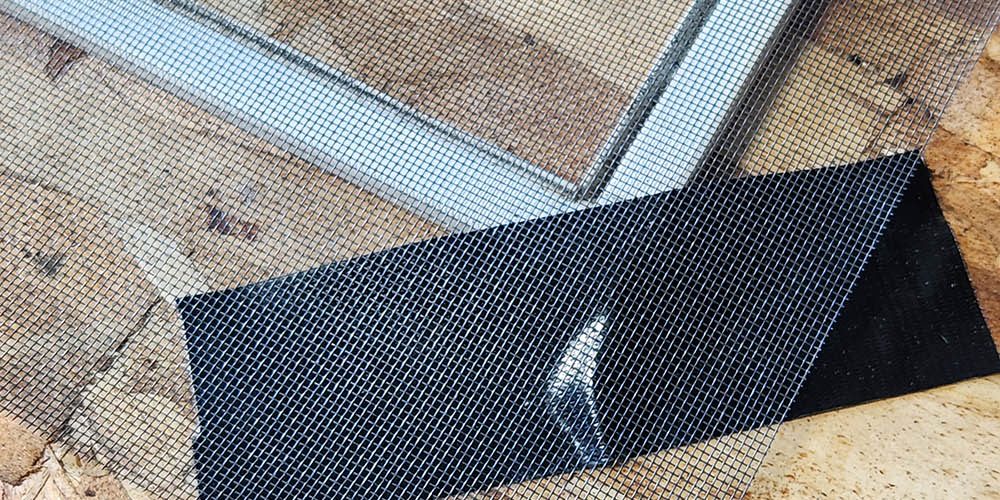
The screen mesh is the crucial element that keeps insects out. It does this while allowing fresh air to flow through. When replacing your window screen, choose a new mesh screen that suits your needs. Opt for materials like fiberglass or aluminum. They are known for their durability and resistance to wear and tear.
The spline is a rubber-like cord that secures the screen mesh in place within the frame. If the existing spline is in good condition, you can reuse it. But it's always wise to have a new spline on hand in case the old one is damaged or doesn't fit snugly anymore.
Quality scissors are indispensable for any DIY enthusiast. They come in handy for cutting the screen mesh to the required size. By doing so, you are ensuring a perfect fit within the frame. Sharp scissors make the job more manageable and give you clean, precise cuts.
A spline roller is a specialized tool designed to press the spline into the window frame groove effectively. It helps you achieve a tight, secure fit between the screen mesh and frame. This then ensuries the screen won't come loose easily. But, before installing a new screen, you must remove the old spline from the frame.
A spline-removing pick, also known as a spline tool, is specifically designed for this task. It allows you to safely lift and extract the old spline without damaging the frame.
A sharp utility knife is indispensable for various DIY projects. Rescreening is no different! Use it to trim excess screen mesh and cut the spline to the required length. You can also make precise adjustments as needed.

The first step in a rescreen is making sure the frame is stable and removing any old, damaged materials. After you determine that your screen frame is still in working condition, you can begin the process of replacing the screen mesh. In this step, we’ll guide you through securing the frame using duct tape or clamps, safely removing the old spline with a spline removal hook, and removing the damaged screen, leaving you with a clean, prepared frame for reinstallation.
To begin, inspect the window screen frame for any looseness or instability. If you find the frame shaky or anticipate difficulties during the replacement process, consider using duct tape or clamps to secure it temporarily. Applying duct tape to the frame’s corners or using clamps along the edges will keep the frame steady and prevent any accidental shifts while you work on it.
Securing the frame and removing the old materials are critical first steps in replacing your window screen. Using duct tape or clamps to stabilize the frame, carefully removing the old spline with a spline removal hook, and removing the damaged screen, you’re left with a clean and prepared frame ready to install the new screen mesh. Proceeding with these initial steps ensures a smooth and efficient process as you move forward with your window screen replacement project.
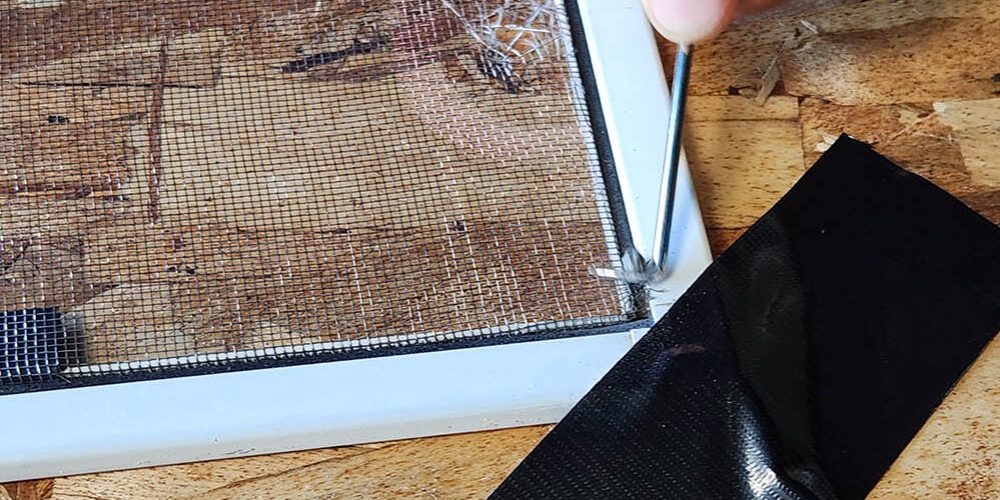
Next, it’s time to remove the old spline. The spline is the rubber-like cord that holds the screen mesh in place. You’ll need a spline removal hook, also known as a spline tool, to do this. Carefully insert the hook into the frame groove where the spline sits and gently lift it. Work around the entire frame, not damaging the frame or the screen mesh. If the old spline is in good condition and fits securely, you may choose to reuse it later in the process.
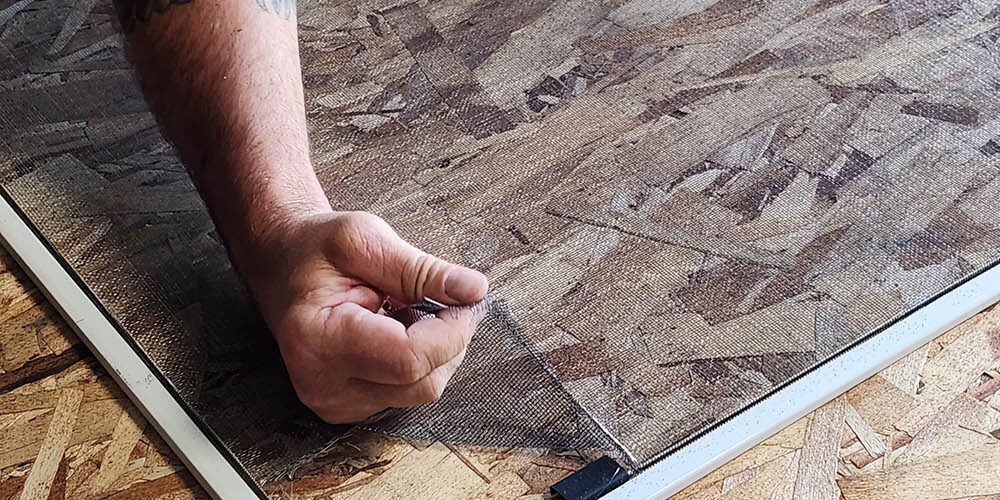
Once the old spline is removed, inspect its condition. If the spline is intact, pliable, and shows no damage or wear, it can be reused during the reinstallation. However, if you notice any signs of wear, cracking, or brittleness, it’s best to opt for a new spline to ensure a tight fit for the new screen mesh. With the spline removed, it’s time to remove the old, damaged screen. Carefully pull the screen mesh away from the frame, starting from one corner and working your way around.
Be gentle to avoid any tears or additional damage to the frame. Dispose of the old screen appropriately, or if it’s still in decent condition, consider recycling or repurposing it if possible.
After securing the frame and removing the old materials, the next crucial step in replacing your window screen is to measure and cut the new screen mesh. A precise fit ensures a seamless and effective replacement. This section’ll guide you through measuring the screen dimensions accurately. This includes cutting the new mesh to size and preparing it to install the spline.
Start by measuring the dimensions of your window frame accurately. Use a tape measure to determine the length and width of the frame from the outer edge to the outer edge. Measure both horizontally and vertically, as some frames may not be perfectly square. Record these measurements for reference when cutting the new screen mesh. When cutting the new screen mesh, adding a few inches of extra margin on all sides is essential beyond the actual frame dimensions. This additional margin ensures that you have enough material to fit securely within the frame and allows room for adjustments during installation.
Before installing the spline, double-check that the screen mesh is appropriately aligned within the frame. The mesh should be taut but not overly stretched. Then, ensure it sits evenly along all edges of the frame. This step is crucial as it establishes a secure and visually pleasing window screen. Measuring and cutting the new screen mesh is vital in the window screen replacement process.
You then ensure a perfect fit by accurately measuring the frame, adding extra margin, and carefully cutting the mesh. This is essential for a functional and aesthetically pleasing window screen. With the screen mesh laid out and ready for spline installation, you’re one step closer to completing your DIY project. You’ll enjoy the benefits of a refreshed window screen in no time.
After measuring, cutting, and laying out the new screen mesh, the next critical step in replacing a window screen is reinstalling the spline. This process involves securing the screen mesh firmly within the frame to ensure it stays in place and functions effectively. In this section, we’ll provide you with some useful tips to make reinstalling the spline easier and achieve professional-grade results.
A spline roller is an indispensable tool for this step. The rounded edge of the spline roller helps you press the spline firmly into the groove of the frame, ensuring a tight fit. When using the spline roller, apply even pressure along the entire length of the spline to avoid any gaps or loose areas. This will keep the screen mesh securely in place and prevent any potential sagging over time.
It is important to distribute the tension evenly as you work your way around the frame. Press the spline into the groove on one side and then move to the opposite side to create balanced tension. Proceed to work your way around the screen, repeating the process on each side until the spline is fully installed.
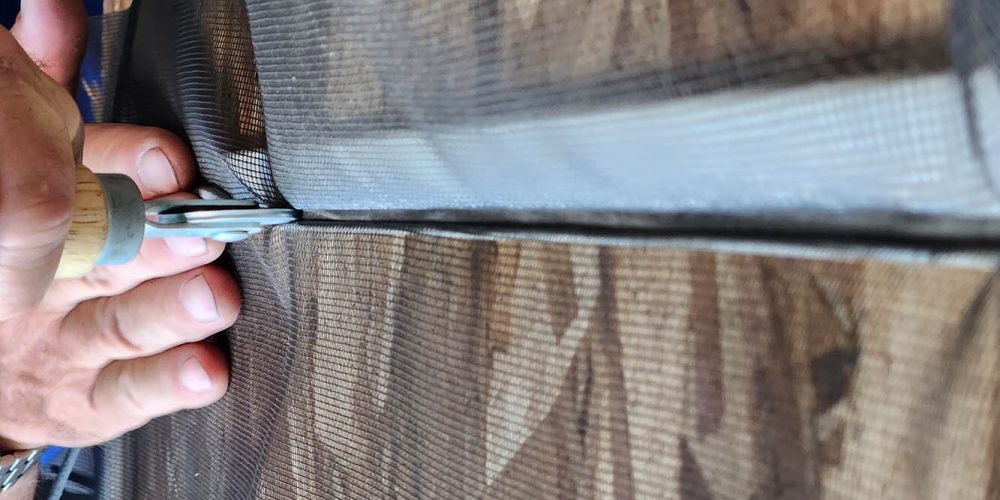
After installing the spline all around the frame, you may have some excess screen mesh extending beyond the frame’s edges. Use sharp scissors or a utility knife to trim the excess carefully. Be cautious not to cut too close to the spline, as you want to ensure a secure hold without compromising the tension of the mesh. Once the spline is in place and the excess mesh is trimmed, inspect the screen for any gaps or loose spots. If you find any, use the spline roller to press the spline more securely into the groove or adjust the screen mesh slightly to achieve a snug fit.
Reinstalling the spline is a crucial step in the window screen replacement process. By using a spline roller, starting in the middle, keeping the screen taut, and trimming excess mesh carefully, you can achieve a professional-looking result and enjoy a fully functional window screen. These tips will make the process easier and help you achieve a successful window screen replacement that enhances the comfort and functionality of your home.
Congratulations! You’ve successfully completed all the essential steps to replace your window screens. By securing the frame, removing old materials, measuring and cutting the new screen mesh, and reinstalling the spline with precision, you’ve revitalized your window screens and improved the comfort of your home. If you prefer a visual guide, we’ve got you covered with a helpful how-to video. Additionally, we’ve provided links to purchase the required items from Amazon to make your window screen replacement project a breeze.
Follow along with our expert instructions and tips to ensure you get the job done efficiently and effectively.
If you need to stock up on the necessary tools and materials for your window screen replacement project, these are the items we use when replacing screens:
You’ve now mastered the art of replacing window screens! By following the steps provided by Custom Exteriors, you’ve enhanced the functionality and appearance of your window screens. If you prefer a visual guide, our how-to video will be invaluable for your project. So get started, enjoy the satisfaction of a job well done and the benefits of your refreshed window screens!
In conclusion, replacing your window screens is a rewarding and straightforward DIY project that can significantly improve the comfort and functionality of your home. By following the steps outlined in this guide, you can achieve professional-grade results without needing costly professional services.
Remember, having the right tools is critical to a successful window screen replacement. Investing in essential items like duct tape, a new mesh screen, spline, scissors, a spline roller, a spline-removing pick, and a sharp utility knife will make the process smoother and more efficient.