Infographic designed by Custom Exteriors explaining the path of rainwater on your roof and how gutters serve to direct it

The Essential Guide to Gutter Cleaning: Protecting Your Home in Every Season

The essential guide to gutter cleaning:
Protecting your home every season

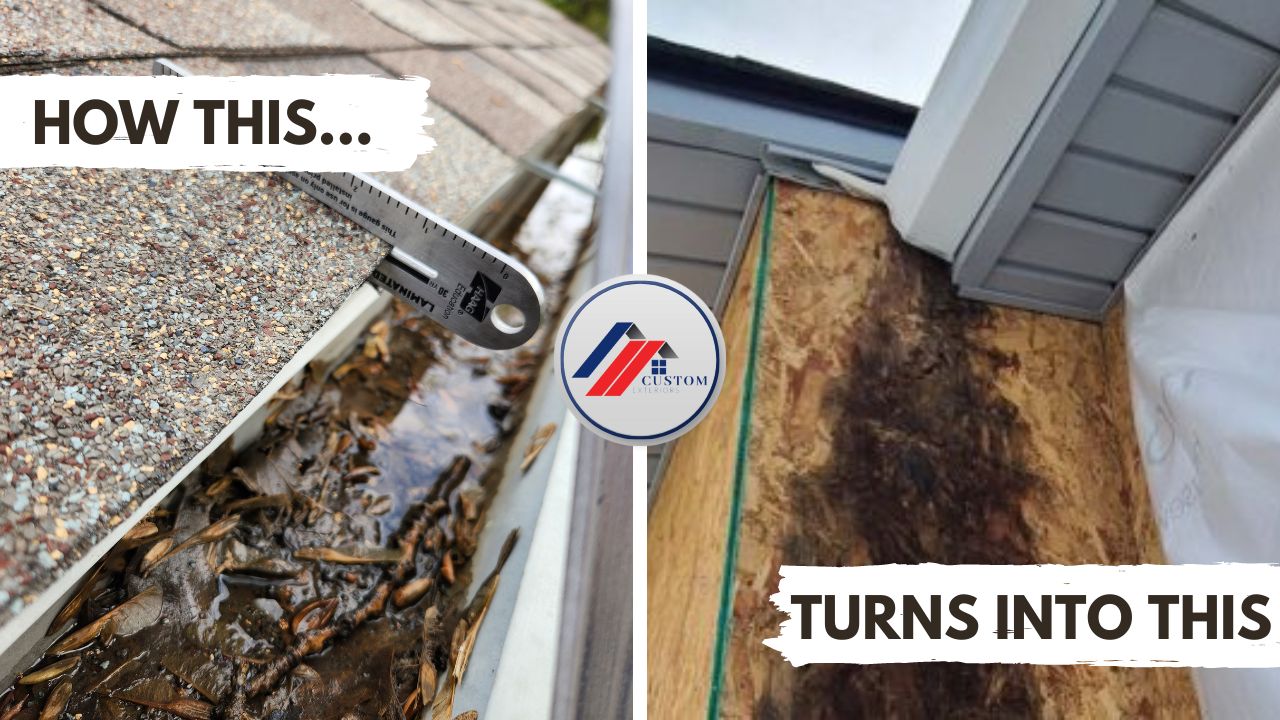
The pictures above were both taken by our inspectors on Northern Colorado homes. If that doesn’t highlight the importance of proper gutter maintenance, I don’t know what does. From our experience as exterior contractors and homeowners, we’ve seen that poorly maintained gutters can cause significant and costly damage to your home. It’s easy to overlook gutters; they are designed to blend in! But they protect your home by directing water away from the foundation and walls. Neglecting gutter cleaning can lead to water damage, mold, and even structural issues. 

In Northern Colorado, gutters need the most attention during spring and fall. In spring, heavy rains can overwhelm clogged gutters, causing water to seep into your home. In fall, leaves and debris can block gutters, leading to ice dams and water damage when winter arrives. Keeping your gutters clean and properly maintained is essential for safeguarding your home.

Why Gutter Maintenance Is Important

Through our years of service, we’ve seen the costly and often preventable damage that comes from neglected gutter maintenance. From mold taking hold in the damp recesses of a home to water undermining the foundation of the property, the consequences are real and can be severe. That’s why we stress the importance of regular gutter cleaning not as just a recommendation but as an important part of your home maintenance routines. In this guide we will cover: 

Custom Exteriors aims to provide you with the knowledge and skill to keep your home looking beautiful while protecting it. So, grab your ladder (metaphorically speaking), and let’s talk about your gutters, leaves, and debris and the simple measures that can save you a world of hassle and expense. 

Why gutters matter

Infographic designed by Custom Exteriors explaining the path of rainwater on your roof and how gutters serve to direct it

Imagine your home during a heavy rainstorm. Where does all that water go? On to the largest exterior surface of your home, your roof. Your gutters are the primary path to take all the rainwater gathered across your roof and safely guide it away from your home. But you’re not alone if you aren’t sure what gutters do or why they’re so important. 

Gutters, those long channels that run along some edges of your roof, play a crucial role in protecting your home. Their job is simple but incredibly important: they catch rainwater as it runs off your roof and direct it away from your home. This might not sound like a big deal at first, but without gutters, your home is at real risk for water damage. 

Here’s why gutters are important: 

1. Protection from water damage:

Gutters are an important part of your home’s defense against water damage. Possibly the most important part. They work by channeling rainwater away from your roof, walls, and foundation, preventing it from seeping into areas where it can cause serious issues. Without properly functioning gutters, water can pool around your foundation, leading to cracks, leaks, and structural problems. Water that isn’t properly directed away can also damage your roof and siding, leading to costly repairs. Maintaining your gutters ensures they effectively protect your home from these risks, keeping your property safe and secure.

2. Preventing mold and mildew:

Gutters are essential in preventing mold and mildew from forming on your siding and other surfaces. By efficiently directing rainwater away from your home, gutters stop water from lingering on your exterior walls. When water is allowed to sit, it creates the perfect environment for mold and mildew to grow, which can not only damage your siding but also lead to health concerns. Keeping your gutters clean and functional ensures that water flows away from your home, protecting your siding and surfaces from the harmful effects of mold and mildew.

3. Saving your landscaping:

Gutters also play an important role in preserving your landscaping. When gutters are working properly, they direct rainwater away from your home and prevent it from overflowing onto your flower beds, shrubs, and other landscaping features. Without gutters, heavy rain can cause soil erosion, wash away plants, and even create puddles (or mosquito breeding grounds) in your yard. By keeping your gutters clean and well-maintained, you help protect your landscaping from water damage, ensuring it stays beautiful and intact.

4. Avoiding pest problems:

Maintaining your gutters is key to avoiding pests around your home. When gutters are clogged with leaves and debris, they create a perfect breeding ground for insects like mosquitoes and can attract rodents and other pests looking for shelter. Standing water in clogged gutters can also draw in pests that thrive in damp environments. By keeping your gutters clean and free-flowing, you eliminate these potential nesting sites, reducing the risk of pest infestations and keeping your home’s exterior safer and more comfortable. By keeping your gutters clean, you’re not giving mosquitoes a perfect place to breed right outside your front door

Your gutters might not get all the attention that other parts of your house do, but they’re working hard behind the scenes to prevent potential problems. However, they need care to function correctly, so cleaning them out regularly is so important. Stick with us, and we’ll show you how to take care of your gutters, ensuring they continue to protect your home season after season. 

According to Architectural Digest, The average cost to have your gutters cleaned is $207.  The average cost for mold mitigation is $2230. Exterior maintenance is an investment in both your home and your peace of mind.

The consequences of ignoring gutter maintenance

Neglecting gutter cleaning can create issues that may not be noticeable until they are serious and expensive. Examples of damage we have encountered due to lack of routine maintenance includes: 

We have seen firsthand roof decks, siding, and drywall damage due to the lack of gutter maintenance. Because of this, ignoring gutter cleaning is not a risk we are willing to take. Inadequate gutter maintenance can result in the hassle of scheduling repairs and facing unexpected, significant costs. By regularly maintaining your gutters, you can easily avoid these problems and protect your home from potential damage. This simple, proactive step ensures your home stays safe and secure, giving you the peace of mind that comes with knowing you’ve done everything you can to protect your investment.

The importance of gutter cleaning in the fall and spring

Unfortunately, cleaning your gutters isn’t just a once-a-year job. Like other exterior components like your roof and siding, you need to perform regular maintenance. To really protect your home, it’s crucial to focus on gutter maintenance, especially in two key seasons: fall and spring. Let’s find out why these particular times are so important. 

Custom photo created by Custom Exteriors to illustrate the reason it is important to clean your gutters in both the spring and the fall

Spring Cleaning:

Rainy season Prep:

We’ve all heard the term “spring showers,” and those showers need somewhere to go. In certain parts of the country, these spring showers regularly turn into spring downpours. After winter, your gutters might be filled with leftover leaves, debris from ice and storms, or even nests that animals make during the colder months. If your gutters are clogged with debris, all that rainwater has nowhere to go except back into your home. Cleaning out your gutters ensures spring rains have a clear path away from your home, keeping your basement dry and your foundation safe. 

Damage inspection:

Spring is also a great time to check for any damage that winter might have caused to your gutters. Freezing and thawing, heavy snow, and ice can all lead to cracks in your gutter system. We have also seen gutter systems collapse or pull away from the house under the sheer weight of the ice built up in them over the winter. So, catching and fixing these issues before your first torrential downpour can save you a lot of trouble and money down the road. It’s also a great time to check over your roof and do a brief roof inspection for any signs your roof might need maintenance before the rain starts falling. 

Fall Cleaning:

Leaves and Debris:

In Colorado, in the fall, trees shed their leaves like crazy. Our yards are shades of orange and brown, and everyone in the neighborhood dedicates a few days each fall to cleaning up their yards from the mess made by shedding trees. But guess where else those leaves landed? In your gutters! These falling leaves, twigs, and other debris can quickly fill up your gutters, blocking water from flowing through. If water can’t flow, it can cause all the problems we’ve discussed, like leaks and foundation damage. 

Preparing for winter:

By cleaning your gutters in the fall, you’re preparing your home to face the winter storms and snow we see in the winter in Colorado. Clogged gutters can lead to ice dams which cause water to back up and damage your roof, ceilings, and walls. Clear gutters mean a smoother path for snow and ice to melt and drain away, preventing this damage. 

Based on our team’s experience, regular gutter maintenance in these two seasons can significantly reduce the risk of water damage and expensive repairs. So, grab that ladder and those gloves. If your physical limitations prevent safe ladder use, call in the professionals and give your home the care it deserves. 

Your step-by-step guide to gutter cleaning

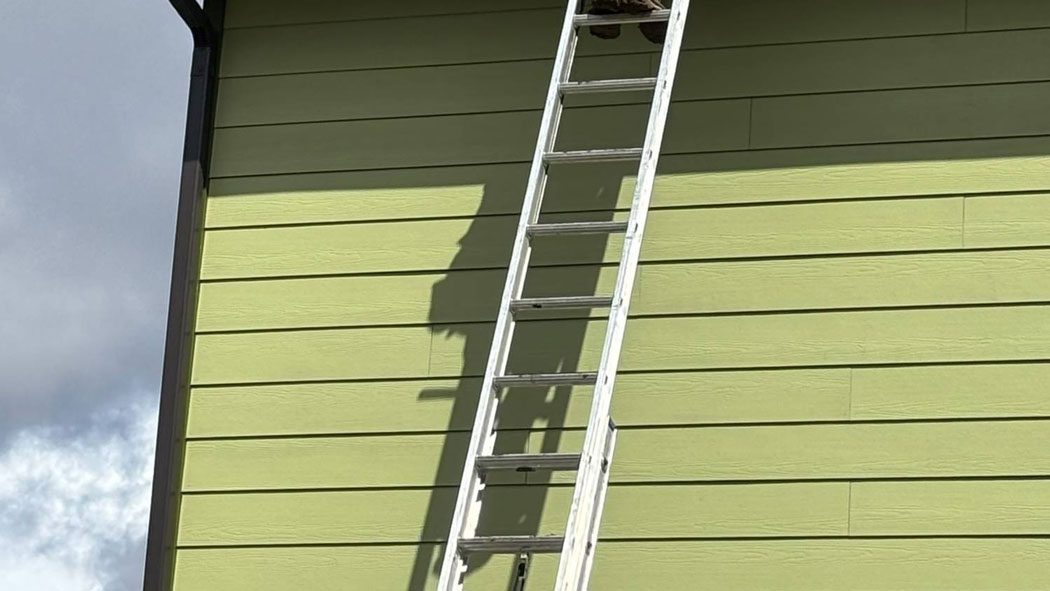
Cleaning your gutters might seem like a big task, but it’s actually something most homeowners can do on their own with a little bit of guidance. Before anything else, safety is key. Consider your physical limitations before beginning. If, for any reason, you can not safely climb a ladder or have questions about your ability to do so with a bucket full of tools, call in a professional. Your safety should be your first concern; gutter cleaning is a reasonably affordable service. 

If you are comfortable with heights and safe ladder use, ensure you have a sturdy ladder that can reach your gutters comfortably. Always place it on solid, level ground. Having someone with you to hold the ladder steady while you work is a good idea. Never lean over the ladder’s sides, and don’t forget to wear gloves to protect your hands from sharp objects and a pair of goggles to keep your eyes safe. 
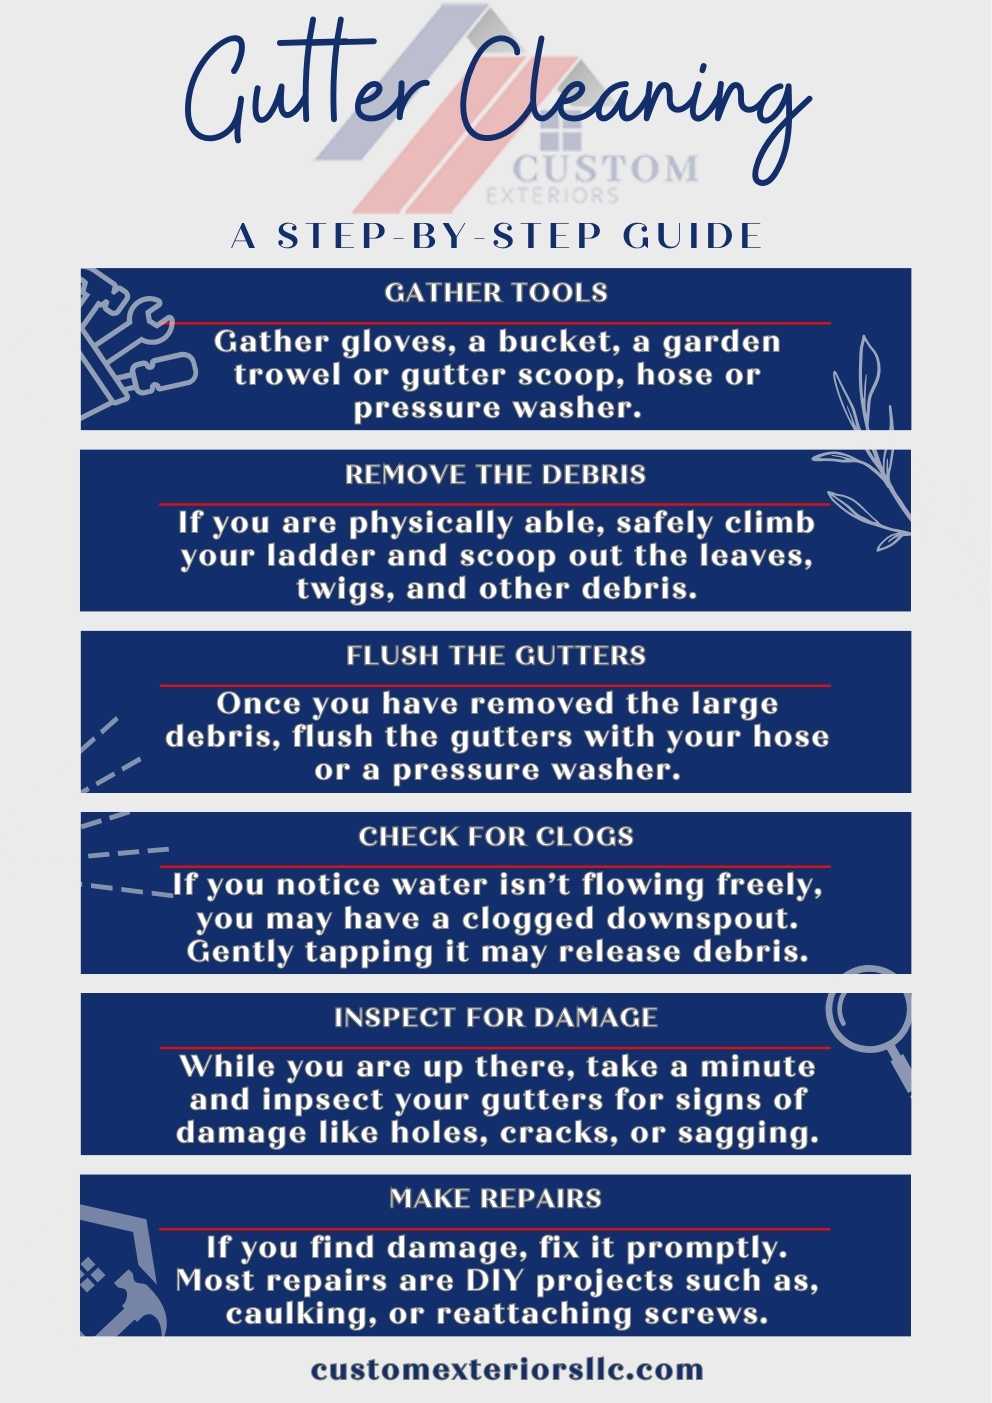
Infographic created by Custom Exteriors that shows each step required to clean your gutters

Step 1: Gather your tools

You’ll need a few basic tools before you start that will make the job smoother and quicker:

Step 2: Remove Debris

Following appropriate safety guidelines, climb up your ladder and start scooping out the leaves, twigs, and any other debris you find in your gutters. You can use your gloved hands, a garden trowel, or a gutter scoop to do this. Gutter scoops are a tool made to fit in and clear your gutters perfectly. They are available online and at your local home improvement store for under ten dollars. Put your debris in your bucket or the tarp you have laid below your work area. This is a messy job, so be prepared to get dirty. If the leaves are dry and loose and you are comfortable getting onto your roof, a leaf blower is a quick and effective method to clear the leaves. 

Step 3: Flush the gutters

Once you have cleared your gutters of all the visible pieces of debris, it’s time to flush out the gutters with your hose or pressure washer. If you use a pressure washer, start with low pressure and gradually increase your pressure to the lowest setting required to verify the water drains properly and flows freely. High-pressure water can cause extreme damage to your home. Flushing your gutters will help clear out any smaller bits and check that water can flow freely through your gutters and downspouts. If water backs up, there might be a clog in the downspout that you need to clear. 

Step 4: Check for Clogs in Downspouts

If you notice that water isn’t flowing freely, you may have a clog in one of your downspouts. Sometimes, tapping gently on the side of the downspout can loosen the debris. In tougher cases, you might need to use a plumber’s snake or high-pressure water to clear the blockage. 

Step 5: Inspect for Damage

If you are already on your roof, it’s a great time to take a moment to look over your gutters and downspouts for any signs of damage, like holes, cracks, or sections that are pulling away from the house. These issues can lead to bigger problems if they’re not fixed. It’s also a good time to do a brief roof inspection while you have a closer look at the components. 

Step 6: Make repairs as needed:

If you find any damage, it’s important to fix it as soon as possible. Some repairs might be simple enough to do yourself, like sealing small holes or reattaching parts of the gutter that have come loose. For bigger repairs, you might need to call in a professional. 

Pro Tips for easier and safer Gutter cleaning

Tip 1: Use the Right Ladder: Invest in a sturdy, extendable ladder that reaches safely beyond the edge of your gutters. Another wise addition is a standoff stabilizer (also known as a ladder “horn” or “arm”). This keeps the ladder from resting directly on the gutters, which can cause damage such as denting or scratching. 

Tip 2: Wear Protective Gear:  Always wear gloves to protect your hands from sharp debris and edges inside the gutter. Safety glasses or goggles are also a must to protect your eyes from any flying debris. Also, depending on your level of comfort with heights, a harness can guard against injuries from falling. 

Tip 3: Use a Gutter Scoop: A plastic gutter scoop is the best tool for removing gunky debris. It is designed to fit perfectly inside most gutter systems and is nearly a foot long, making short work of clearing gutters. It’s also tough enough to scrape out compacted material but soft enough not to damage the gutter. 

Tip 4: Get a Garden Hose With a Spray Nozzle: After scooping out the debris, use a garden hose with a spray nozzle to flush the gutters. This helps you make sure water is flowing freely and draining away from your home properly. It also presents the opportunity to find any leaks that may need to be fixed before the rain/snow seasons. 

Tip 5: Clean from the Ground When Possible: Consider using gutter cleaning tools that can be operated from the ground, such as gutter cleaning wands or a shop vac with gutter attachments. This reduces the risk of falls. 

Tip 6: Secure Your Debris Bucket: Attach a bucket with a handle to your ladder with a lanyard or a hook for an easy way to keep debris close without having to go up and down the ladder too many times. You can also lay tarps under your work area instead of using a bucket and gather all debris at once.

Tip 7: Check the Weather: Plan your gutter cleaning on a day when the weather has been dry for a few days. Wet and soggy debris is heavier and messier to deal with. 

Tip 8: Work Safely and Methodically: Move the ladder frequently rather than overreaching. Overreaching can destabilize your ladder and lead to falls. Take your time and work in sections to stay safe. 

Tip 9: Inspect and Repair as You Go: Keep an eye out for any signs of damage or wear, such as cracks, holes, or rust. Small issues can often be repaired on the spot with gutter sealant or patches. 


Protecting your home with gutter cleaning

Regular gutter maintenance, along with routine exterior maintenance, offers long-term benefits that go far beyond curb appeal. Some of the immediate benefits of maintaining your home are: 

Lastly, keeping up with gutter and exterior maintenance gives you peace of mind. Knowing that you’ve taken proactive steps to protect your home means one less thing to worry about. You can rest easy during heavy rains and storms, confident that your home is well-prepared to handle whatever the weather throws its way. 

Just remember, the effort you put into maintaining your home’s gutters and exteriors pays off in the long run. Not only does it save you money by preventing costly damage, but it also maintains, and potentially increases, your home’s value, contributes to a healthier living environment, and provides peace of mind. So, take the time to schedule regular maintenance checks – its and investment in your home’s future and your own well-being. 

Exterior maintenance services in Loveland

Spring Forward: The Ultimate Guide to Exterior Home Maintenance

Spring Forward: The ultimate guide to exterior home maintenance

As the days get longer and the weather warms up, many homeowners start thinking about spring cleaning and taking care of the exterior of their homes. Exterior maintenance is crucial for maintaining or increasing your home value and protecting it from damage. In Colorado, our homes face tough conditions like intense sunlight, strong winds, and heavy hail. Without regular upkeep, minor issues can quickly become expensive repairs. For example, clogged gutters can lead to water damage and mold, and neglected roofs can develop leaks that cause interior damage.

Beyond protection, the exterior of your home is the first thing people notice, creating their first impression. Regular cleaning and maintenance boost your home’s curb appeal and contribute to the overall look of your neighborhood, keeping your home from being “that house.” It shows pride in your home and reflects the care you put into it.

Spring is the ideal time for exterior maintenance, offering milder weather and longer days to get things done. After a harsh winter, spring cleaning lets you tackle any damage caused by the cold and prepare your home for the warmer (and, in our area, hail-prone) months ahead. By making this a yearly habit, you can catch potential problems early, keep your home structurally sound, and even increase its market value.

This guide will cover essential maintenance and cleaning tasks to ensure your home looks great and stays in top condition. Our experience shows us that you need the following items on your exterior spring cleaning list: 

Plus, we’ll touch on ten additional outdoor maintenance tasks that are key for springtime care. 

Whether you’re a long-time homeowner or new to home maintenance, we have taken the experience our team has gained in decades of exterior construction and compiled a guide that covers most exterior maintenance issues. With prices of just about everything on the rise, we want to help you save some of your hard-earned cash by handling these tasks yourself! And by being proactive about maintenance, you are more likely to prevent costly repairs down the line. So, let’s get your house ready for those summer BBQs!

According to Thumbtack, the average home maintenance costs in 2023 rose to $6548. This is up $400 from just one year prior, which makes saving on home maintenance costs a must for today's homeowners. 

Gutter care 101: Preventing damage with routine gutter maintenance

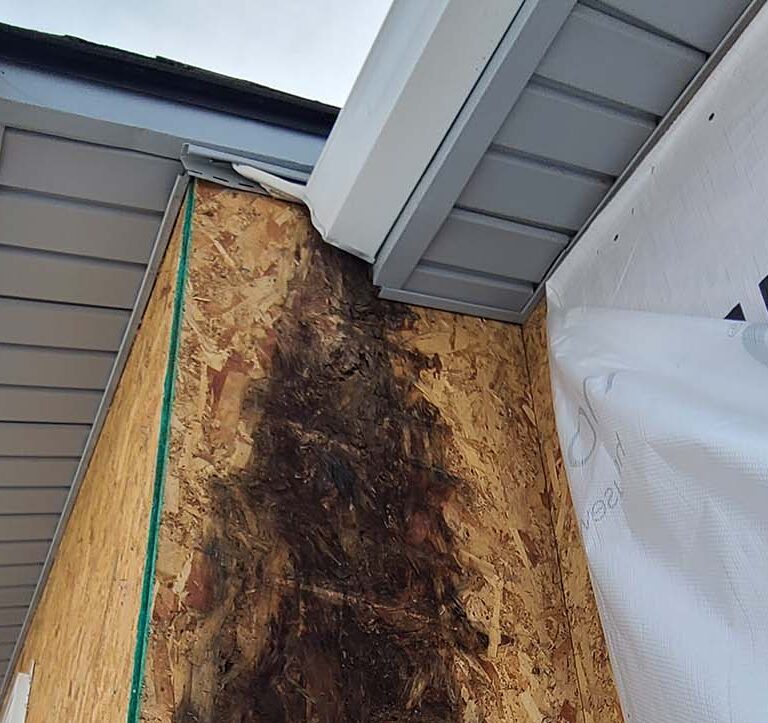
Gutter cleaning is a task that shouldn’t be overlooked in your spring maintenance. Yes, it is a chore. It requires you to practice ladder safety, is messy, and is one of our least favorite exterior chores. However, it’s a vital step in protecting your home. Take a look at the picture below. One of our crews found this during a recent siding replacement job. If this doesn’t explain why keeping your gutters clear is so important and what could happen if left neglected, I don’t know what will. 

Lack of gutter maintenance creating mold issues discovered by Custom Exteriors during a siding replacement

Your gutters play an essential role in directing the rainwater on your roof away from your home. If they are clogged with leaves, twigs, and debris, this water won’t be able to flow freely. This can lead to serious problems, like water damage to the roof, walls, and your home’s foundation. In extreme cases, overflowing water can create damp conditions ideal for mold and pests. If you live in an area with cold winters, clogged gutters are one of the main culprits of ice dams. Regular gutter cleaning can prevent these issues, ensuring water is efficiently channeled away from your home. 

So, let’s talk about how you can clean your gutters. Here are three of the top methods: 

Hand Cleaning:

Let’s start by saying this is the most disgusting method. You will be digging hands first into your gutters full of debris, rotting leaves, and possibly worse. However, it is also an easy and straightforward way to get the job done. Grab a ladder, gloves, and a bucket. Carefully set up your ladder and remove the debris by hand. While this approach is straightforward and requires no tools, it can be more time-consuming and requires a basic knowledge of ladder safety

Gutter Scoop or garden trowel:

A gutter scoop is a small, shovel-like scoop designed to fit perfectly in your gutters to remove debris. Its flexible PVC design, which is just over a foot long and close to four inches deep, allows you to scoop large sections of debris at once. You can purchase one at most local home improvement stores for under five dollars. You will still need to climb a ladder, so consider your physical limitations prior to purchasing a gutter scoop. However, if you are comfortable at heights, its design allows you to increase the speed at which you complete the project due to its size.  

Leaf Blower or Hose:

If the debris is dry and you are comfortable at heights, a leaf blower is the fastest and easiest way to clear your gutters. Alternatively, using a hose with an extended spray attachment or a power washer allows you to clean your gutters from the ground if you are uncomfortable with heights. That being said, this is the messiest of all of the techniques, so be prepared to get a little wet! Because of its efficiency, this method is the one used by our maintenance technicians. With the strategic use of buckets and tarps, gutter cleaning with a leaf blower or power washer is fast and effective. 

It’s important to remember that while gutter cleaning seems like a hassle, it is essential to keeping your home in good shape. Keeping your gutters clean and water directed away from your home will save you from costly repairs down the line and help keep your home looking great. So, roll up your sleeves and give your gutters some love this spring! 

Window Cleaning and Maintenance: A Clear View to Home Care

According to Angi, hiring a professional to clean the exterior of your windows averages $219, with project pricing ranging from $150 to $302, depending on many factors, including size and the number of windows in your home. 

No one likes cleaning windows. Most homeowners rarely clean the inside of their windows, much less the outside. This is often because they are more challenging to get to and substantially dirtier. Also, it seems difficult to avoid streaks and smudges, and it often feels like it’s just not worth the effort. However, professional window cleaning is expensive, with prices going nowhere but up. Also, there are many benefits to including your windows on your spring cleaning list, including: 

While all of these benefits are great, from a Colorado roofing contractor’s perspective, adding bi-annual window cleaning and inspection to your maintenance list can detect damage that could create larger problems down the line. Take a look at photos from a recent job where we encountered serious damage from a basic lack of maintenance. So, let’s break down the easiest ways to wash your windows and what else to look for during the process. 

The progression of water damage located by the maintenance team at Custom Exteriors

Easy ways to wash windows

1. Soap and Water:

Sometimes, the simplest methods are the best. Mix a mild detergent with warm water. Use a soft sponge or cloth to clean the glass gently. 

2. Squeegee Method:

Most professional window cleaners use a mix of methods, one and two. After washing with soap and water, use a squeegee for a streak-free finish. Wipe the squeegee blade with a clean cloth between strokes. Pro tip: Work your squeegee from the top of the window to the bottom and use your clean cloth to remove any residual water from the bottom of the frame, helping to reduce streaks. A clean and dry squeegee works best for reducing smudging and streaking. 

3. Vinegar Solution:

For those looking for a more natural or DIY cleaning solution, mix equal parts white vinegar and water. It’s excellent for removing tough grime, and, as a bonus, it’s eco-friendly! 

Checking for damage

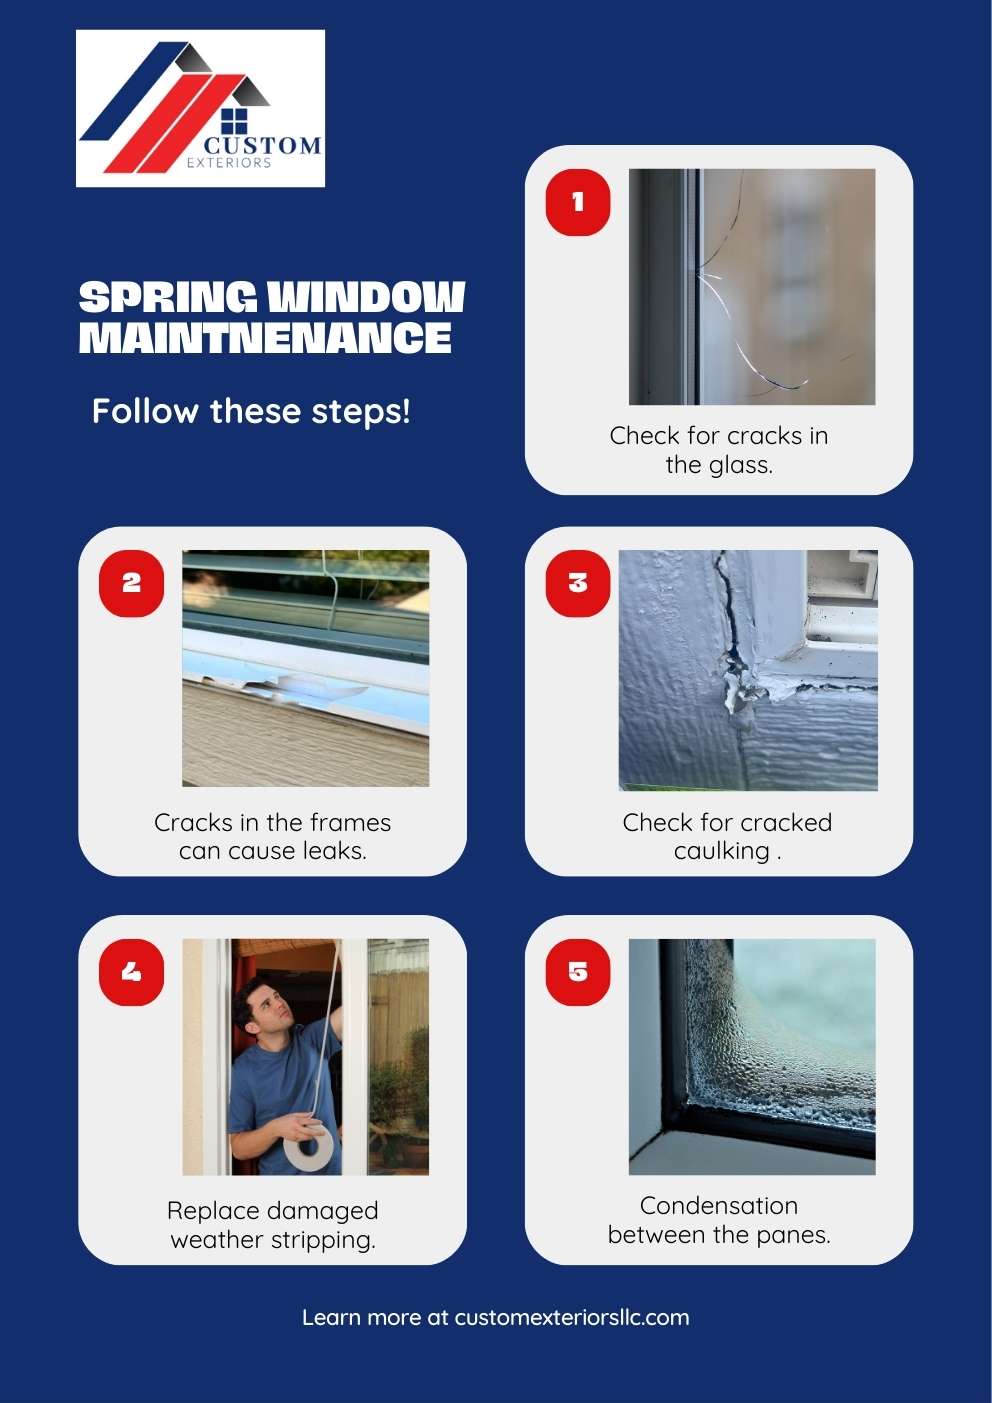
While cleaning your windows, it’s a perfect time to inspect your windows, frames, and surrounding trim for any damage. Even if you choose to skip the window cleaning, a basic inspection of your window glass, frames, caulking, weather stripping, and surrounding trim is recommended. 

Infographic created by Custom Exteriors with the five inspection points for window maintenance

Condensation between panes

If you notice condensation between the panes, it indicates a broken seal. This is not a DIY project and means the window is no longer as energy-efficient as it should be. This requires repairing or replacing and will likely require the services of a professional window replacement company

It’s wise to take this time to assess the conditions of your window screens as well. With summer approaching, functioning, intact screens are a must for fresh air flow in your home. Repairing damaged screens is another project that can be expensive when completed by a professional and is a fairly easy DIY. One of the owners at Custom Exteriors made a step-by-step how-to video to help our customers take on this project confidently. 

At the end of the day, window cleaning and maintenance are about much more than just sparkling glass. It’s also about ensuring the function and efficiency of your home. So, while we recommend adding window cleaning to your exterior spring cleaning checklist, at the very least, take a moment to inspect the elements we discussed. Your home will thank you for it. 

Why caulk sealing is important

Caulking is used to seal the gaps and joints in your home – around windows, doors, siding joints, the roof, and even corners where different materials meet. It is a barrier to prevent air, water, and insects from entering your home. Keeping caulking in good condition helps maintain your home’s energy efficiency and prevents water damage, which can lead to more expensive repairs. You can quickly increase the energy efficiency of your windows with this simple and inexpensive task. 

Where to inspect your exterior caulking

Removing Damaged Caulk

If you find old, damaged, or cracked caulking, it’s important to remove it before applying new caulk. You can easily do this with a caulk removal tool or a simple utility knife to carefully scrape away the old caulking. Be gentle to avoid damaging the surface underneath. After removing the old caulking and before replacing it, clean the area with some soapy water to remove any residue or dirt. Let it dry completely before replacing the caulking. Recaulking too quickly can trap moisture behind your caulking and cause mold or rot in the long run.

Replacing the Caulking

A silicone-based caulk is best for most exterior jobs as it is weather-resistant and flexible. Caulking comes in a variety of colors, so matching your existing caulking color should be simple with a trip to your local home improvement store. 

Once you have the correct caulking, cut the tip of the caulk tube at a 45-degree angle. This makes it easier to apply in a smooth line. Hold the caulk gun at a consistent angle and gently squeeze the trigger to apply the caulk in a steady line. Try to keep the motion consistent for an even application. Once you have applied a thin line of caulking, wet your finger and run it along the caulk line to smooth it out. This also helps push the caulking into the gap for a better seal. 

Pro Tips For Exterior Caulking:

Remember, maintaining the caulking on the exterior of your home is a relatively simple and cost-effective way to protect your home from the elements and keep it energy-efficient. Plus, it keeps your home looking neat and well-kept, so take a little time to inspect and fix up any old caulking. 

Cleaning and Maintaining your exterior paint and siding

It’s obvious why your siding and exterior paint are on this list. They make up the largest portion of your home’s facade and have the most impact in regards to the curb appeal of your home. Unfortunately, with time, they start looking dirty and dingy. In Colorado, long, snowy winters create dirty messes that can impact the appearance of your siding. The areas directly surrounding our homes are often exposed to dirt. Combine this with water, and your siding will likely need a good cleaning come spring. 

Siding replacement and maintenance by Custom Exteriors, a local exterior maintenance company

Routine Cleaning of Paint and siding

When cleaning your siding and paint, the key is to give it a gentle wash. Whether you use a soft brush and garden hose or a power washer depends on your preference.

If you go with the brush method, use a soft brush and a mix of mild detergent and water to clean your siding and painted surfaces. After scrubbing, rinse everything off with a garden hose. Avoid harsh chemicals or abrasive tools that could damage the paint or siding. While hand scrubbing is thorough, it takes more time and can be challenging at higher elevations, often requiring ladders or special tools.

Using a pressure washer can save a lot of time while still effectively cleaning your home’s exterior. If you choose this method, start with the lowest pressure setting and gradually increase it as needed. Be careful not to use too much pressure, as it can damage the siding or strip away paint. High-pressure water can cause serious damage, like breaking holes in vinyl siding or denting wood or engineered siding.

When using a hose or pressure washer, be careful not to spray water behind the siding. Newer homes usually have a moisture barrier, but older homes might not. Either way, be mindful of the direction you spray to avoid forcing water into gaps between the siding panels.

Inspecting and maintaining Paint and siding

While cleaning, it’s the perfect time to inspect your siding and painted areas for any issues. The main concerns to look for are: 

Look for areas where the paint is peeling or chipping. The elevation of the house that receives the most direct sunlight is also most susceptible to peeling paint or fading caused by UV rays. Faded or peeling paint is nearing the end of its useful life. While it can be unsightly, the protection quality paint provides to your siding should be the primary consideration. If it has peeled off or is significantly faded, your siding is at risk for damage, and the paint should be repainted or touched up. 

Check for cracks, warping, or damage to siding panels, which can lead to more significant problems like moisture intrusion. Some types of siding, such as fiber cement siding products, are more prone to cracking. If not installed properly, they can crack over time, exposing your home to possible water damage. The urgency of this task cannot be overstated, as the risks of not maintaining the exterior are significant. 

Damaged paint and siding can lead to water damage. Watch for signs of mold and mildew, especially in shaded or moisture-prone areas.

The best practice for maintaining your exterior paint and siding is to clean them at least once a year to remove grime and built-up dirt. If you find any issues during this time, call a professional siding replacement company and address them quickly with high-quality replacement products. 

Pro Tips For siding and paint maintenance

Remember that regular exterior maintenance of your home’s exterior paint and siding keeps it looking beautiful and protects it from wear and tear. By following these simple steps and staying vigilant for any signs of damage, you can keep your home in excellent condition for years. 

Roof Maintenance: keeping your home's top in tip-top shape

When you think of spring cleaning or even exterior maintenance, your roof often doesn’t make the list. However, taking care of your roof is a big part of maintaining your home’s health. Let’s talk about how to keep your roof in great condition, what to look for during a roof inspection, and some important things to remember. When we talk about “cleaning the roof,” many picture the same process that was used for the siding on the home. However, cleaning and maintaining your roof looks very different from most of the exterior components of your home. Cleaning and maintaining your roof consists of 3 crucial steps. 

Remove Overhanging Branches and organic growth

If you have trees or shrubs near your home, make sure the branches don’t hang over your roof. Overhanging branches can drop leaves and debris, leading to clogs in your gutters. Additionally, during severe wind storms, we have seen many large branches fall and severely damage the roof and exterior of the home. When trimming overhanging branches, be aware of your surroundings, as power lines can be buried in the branches of the tree, making them difficult to see. Depending on your skill level, this may be a project for which you hire a skilled roofing professional

Not often in Colorado, but in more humid climates, you might see green moss or other growth on your roof. It’s important to gently remove these, as they can trap moisture on your roof and cause interior damage. 

Conducting a roof inspection

It’s wise to check the overall condition of your roof twice a year by performing a thorough roof inspection. Check if any shingles are cracked, bent, or missing. These are signs your roof might need some repairs. Take note of the condition of roof flashing (the metal surrounding the penetrations in your roof and along any walls that meet your roof) to check for rusting or damage. This flashing is the first line of defense towards redirecting water off the roof and through the gutters and not into your home in the form of water damage. It’s also a good time to inspect all of the parts of your roof and the vents, soft metals, and drip edge for signs of damage. 

It’s also a good time to look inside your home for signs of leaks like water stains on your ceiling. This could be an issue with a traditional leak due to water intrusion or improper roof ventilation. Either way, it’s best to catch it quickly to prevent water damage, roof sagging, and rot. 

Cleaning your asphalt shingle roof

It’s important not to wash asphalt shingle roofs with high pressure, particularly because they are coated with small granules that can be dislodged with high water pressure. “Cleaning” your roof is more about removing larger debris and inspecting for vulnerable areas that could allow water intrusion. 

If your roof needs cleaning, use the gentlest method possible. Sometimes, a light spray with a garden hose is all you need. Never use harsh chemicals or heavy pressure, as you may ruin your roof in the process. 

Your roof is by far the most challenging system regarding exterior maintenance. If you are unsure about the safety of the inspection process, it’s best to call a professional roofing company. If you decide to inspect your roof, be very careful. Some customers have told us they use binoculars from the ground to quickly overview the roof’s condition. Whether you are doing it yourself or calling in a local roofing company, it’s good to look at your roof regularly and catch any issues promptly. 

Deck and patio furniture: Keeping your outdoor spaces inviting and safe

Your deck and outdoor furniture are important parts of enjoying your home. Let’s go through some simple steps to keep them looking great and staying safe for you and your family. 

Deck Maintenance

Patio Furniture care

Additional areas in need of spring maintenance

Wrapping it up: Your guide to a well-maintained home exterior

And there we have it! We’ve covered a lot, from the importance of gutter cleaning to keeping your windows, roof, and deck in top shape. Taking care of your exterior isn’t just about making it look good. As we have discovered, it’s the key to protecting your home and ensuring it stays solid and safe for years. 

Keeping up with these maintenance tasks can seem like a lot, but it’s really about small, regular checks and fixes. This way, you avoid big problems and expensive repairs later on. 

Don’t be afraid to call in the professionals when you need to, especially for tasks that might be too big or dangerous to do on your own. And always remember, your safety should always be your primary concern. While DIY projects are nice due to a sense of accomplishment and money savings, your safety is more important than any money saved. 

By following these simple tips and keeping an eye on your home’s exterior, you’re taking care of a place full of memories and special moments. So, grab that ladder, that bucket of paint, or just your garden hose, and give your home the love and care it deserves. Here’s to a home that looks as wonderful on the outside as it feels on the inside. 

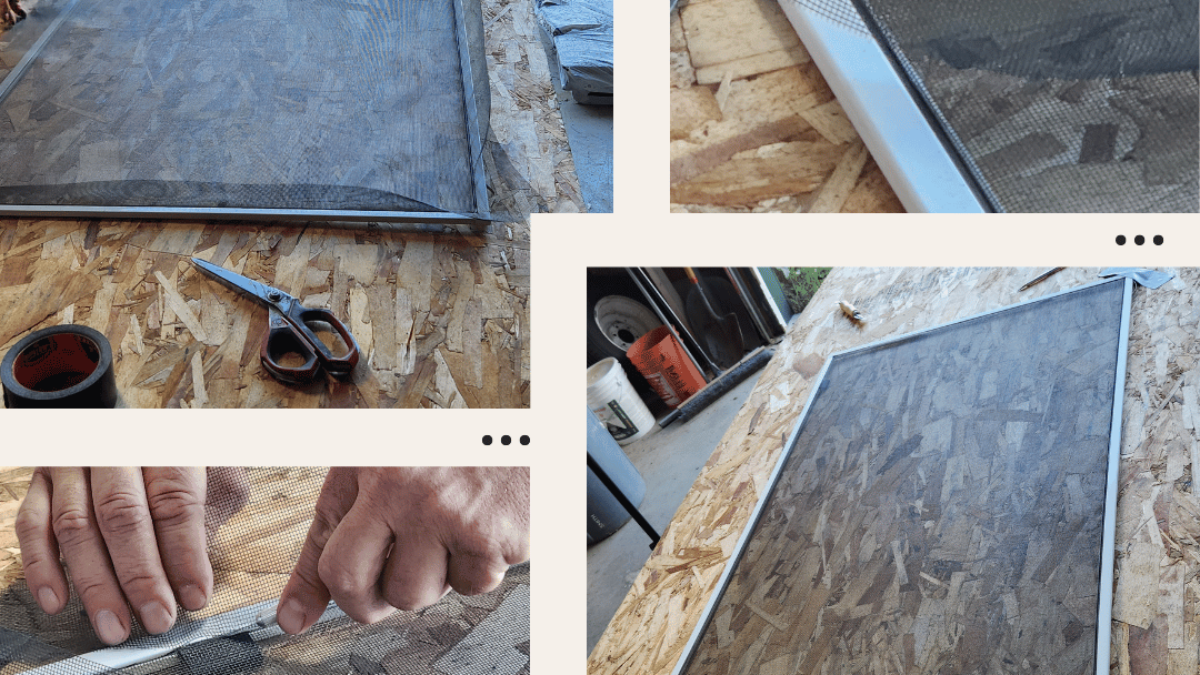
trim screen when replacing screens

How to Replace Your Window Screen

Learn how to replace window screens yourself

How to replace your screens on a budget

Have you ever been caught off guard by the price tag of something you really need? It’s a familiar feeling we can all relate to. Window screens are one such item. Who would have thought that a seemingly simple thing could put such a dent in your wallet? According to Yelp, replacing a single screen can soar to over $700. Yes, you read that right—each! 

As an exterior contractor based in Colorado, we find our team replacing screens annually after our typical summer hail storms. The damage is often strong enough to require repairs to the window screens but does not warrant window replacement. Additionally, to reach the top end of the price range on screens, you are likely referring to custom materials or specialty installations. That being said, in our area, a screen replacement will likely exceed $100.  

Custom Exteriors is here to rescue your savings account. Because of our extensive knowledge and experience with screen replacement, we are confident we can teach you the art of DIY screen replacement—a surprisingly simple task. We’ll guide you through the process and provide a list of essential tools. Spoiler alert: the total cost can be kept well under $50. 


Home window sizes vary widely, so the national average cost to install a new window screen covers a wide range as well, from $80–500. Larger screens in premium materials (such as stainless steel or bronze), or screens with moving parts (such as retractable screens), are the most expensive, at $200–750, installed. ~ Yelp

Common DIY Mistakes When Replacing Your Screens

When replacing a window screen, it’s important to be aware of common mistakes often made. One common error is not taking the time to gather and record accurate measurements. Even an error of less than a quarter of an inch can result in a replacement screen that doesn’t fit properly. 

That can then lead to a lack of a tight seal or a screen that is too loose. When a screen is too loose, it can allow bugs and debris to enter. If you are replacing the screen frame as well, it’s important to measure the dimensions of the window frame within an eighth of an inch. You want your new screen frame to be an exact replica of the damaged one. By doing so, you ensure a snug fit for the replacement screen.


Materials matter

Completing an exterior remodeling project can be stressful because there are many important choices. You have to choose the right paint color, roof materials, shingle colors and styles, and many other considerations. An often overlooked option that can drastically affect the indoor air quality of your property is the material chosen to replace your window screens. Different window screens are designed for specific purposes. While metal screens are more durable, they come with a higher price tag and can cause poor visibility or reduced airflow. Fiberglass mesh is more affordable; however, it provides a decreased level of durability. 

To ensure the best results, choosing a screen material based on your specific needs is essential. That could include fiberglass, aluminum, or stainless steel. In Colorado, the most common material is fiberglass mesh. While we do encounter metal screens in residential settings, they are slowly being replaced by their fiberglass counterpart. This is partly due to fiberglass mesh being more manageable to work with and more affordable. 

We still find stainless steel and bronze screens in more high-end applications. As part of a high-end exterior remodel, metal screens can make a huge impact. They are also corrosion-resistant, more durable, and can be customized. With that in mind, their thicker composition can cause reduced visibility and airflow. 

Tension And Time

Achieving the correct tension when installing a replacement screen is crucial. Overstretching the screen can lead to warping or tearing. On the other hand, under-stretching can result in a loose and ineffective screen. But what is the right tension? Custom Exteriors has provided comprehensive video instructions teaching you how to rescreen a window screen. Mike walks you through the replacement every step of the way. 

If you watched the DIY video, you can see that we take our time when replacing screens. Skipping steps or rushing through the process is a common mistake. Installing a replacement screen requires patience and attention to detail. If you rush, you’re more likely to make mistakes. When mistakes are made, you may have a screen that doesn’t function properly. Take time, carefully follow the instructions, and double-check your work.

how to replace your screen

The "Need To Know" Parts Of Your Window Screen

What Is This? The Anatomy Of A Screen

Window screens might seem like a minor detail, but they play an important role in enhancing your space’s overall comfort and functionality. It impacts various aspects of comfort, aesthetics, and functionality. By understanding the parts of a window screen, you can make informed choices that align with your specific needs and goals.

The anatomy of a window screen includes elements such as mesh material, frame, and spline. Collectively, these components contribute to better temperature regulation within your living or working spaces. 

components of a screen

Why You Need To Know

By selecting the right mesh material and ensuring a proper fit, you can allow fresh air to circulate. And at the same time, you can keep out insects and dust. This reduces the reliance on air conditioning and heating systems. This then leads to potential energy savings and a more sustainable environment.

An understanding of the anatomy of a window screen allows you to select screens that allow for optimal airflow. Proper ventilation is essential for maintaining indoor air quality and reducing stuffiness.  

From energy efficiency to allergen reduction and enhanced visual appeal, a well-chosen window screen has the potential to transform your indoor environment for the better. Explore the options available and elevate your space with the power of well-designed window screens.

Gathering your tools: Don't start without the screen replacement essentials

Starting on a DIY project is an exciting task. But it’s not uncommon to encounter the frustrating realization that you lack the necessary tools to get the job done. To avoid unnecessary hiccups and make your project run smoothly, gathering all the essential tools beforehand is crucial. 

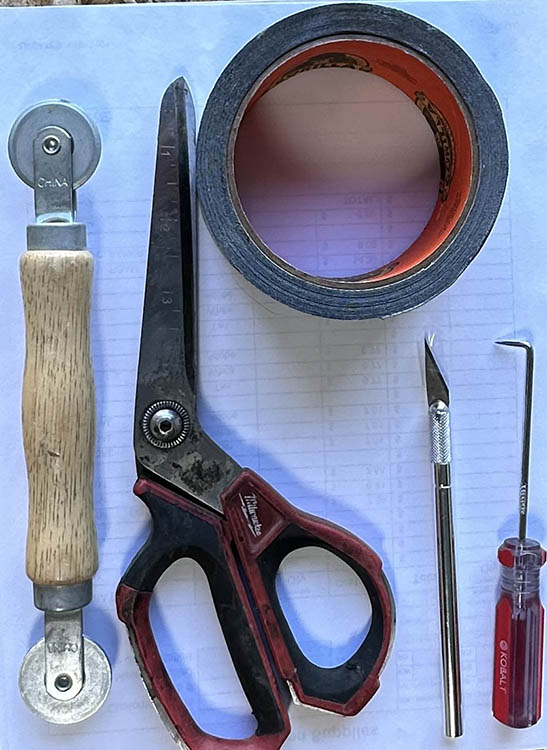
So whether replacing a window screen or tackling any other home improvement task, having the right tools at your disposal is important. It can save you time, effort, and frustration. Here’s a comprehensive list of the must-have tools we use on a window screen replacement project.

Your Tools

Tools needed for replacing your window screens

Secure the Frame and remove the old materials

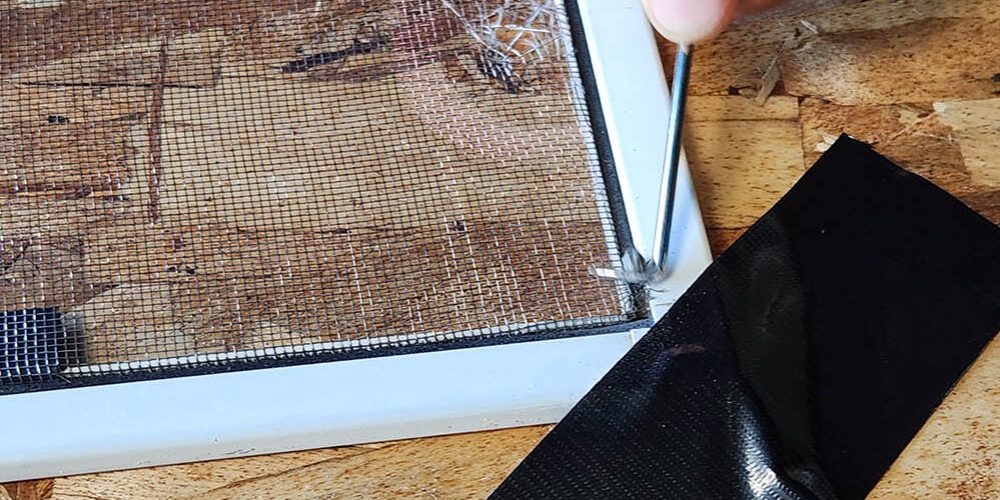
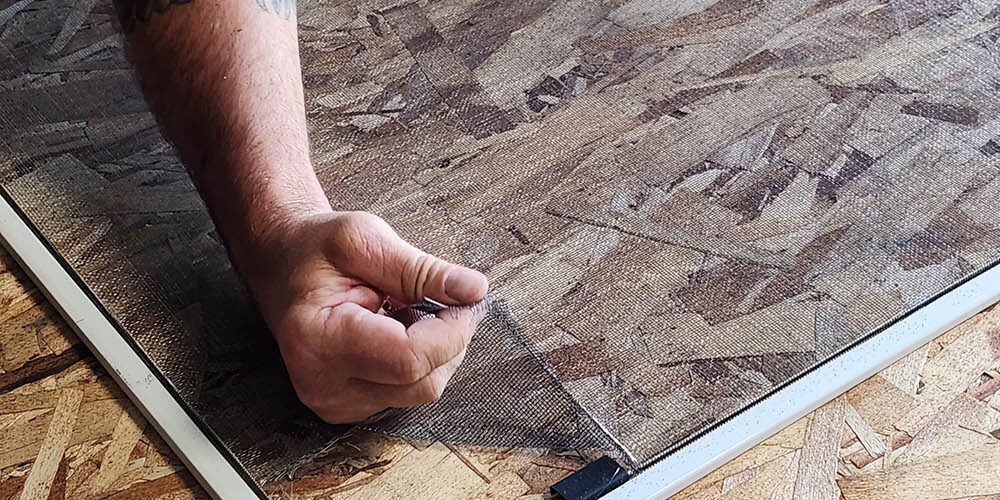
Removing old screen materials when replacing a screen

The first step in a rescreen is making sure the frame is stable and removing any old, damaged materials. After you determine that your screen frame is still in working condition, you can begin the process of replacing the screen mesh. In this step, we’ll guide you through securing the frame using duct tape or clamps, safely removing the old spline with a spline removal hook, and removing the damaged screen, leaving you with a clean, prepared frame for reinstallation.

To begin, inspect the window screen frame for any looseness or instability. If you find the frame shaky or anticipate difficulties during the replacement process, consider using duct tape or clamps to secure it temporarily. Applying duct tape to the frame’s corners or using clamps along the edges will keep the frame steady and prevent any accidental shifts while you work on it.

Securing the frame and removing the old materials are critical first steps in replacing your window screen. Using duct tape or clamps to stabilize the frame, carefully removing the old spline with a spline removal hook, and removing the damaged screen, you’re left with a clean and prepared frame ready to install the new screen mesh. Proceeding with these initial steps ensures a smooth and efficient process as you move forward with your window screen replacement project.


Spline Time

Next, it’s time to remove the old spline. The spline is the rubber-like cord that holds the screen mesh in place. You’ll need a spline removal hook, also known as a spline tool, to do this. Carefully insert the hook into the frame groove where the spline sits and gently lift it. Work around the entire frame, not damaging the frame or the screen mesh. If the old spline is in good condition and fits securely, you may choose to reuse it later in the process.

Once the old spline is removed, inspect its condition. If the spline is intact, pliable, and shows no damage or wear, it can be reused during the reinstallation. However, if you notice any signs of wear, cracking, or brittleness, it’s best to opt for a new spline to ensure a tight fit for the new screen mesh. With the spline removed, it’s time to remove the old, damaged screen. Carefully pull the screen mesh away from the frame, starting from one corner and working your way around. 

Be gentle to avoid any tears or additional damage to the frame. Dispose of the old screen appropriately, or if it’s still in decent condition, consider recycling or repurposing it if possible.

 
Remove all of the old screen materials before starting to rescreen your screen

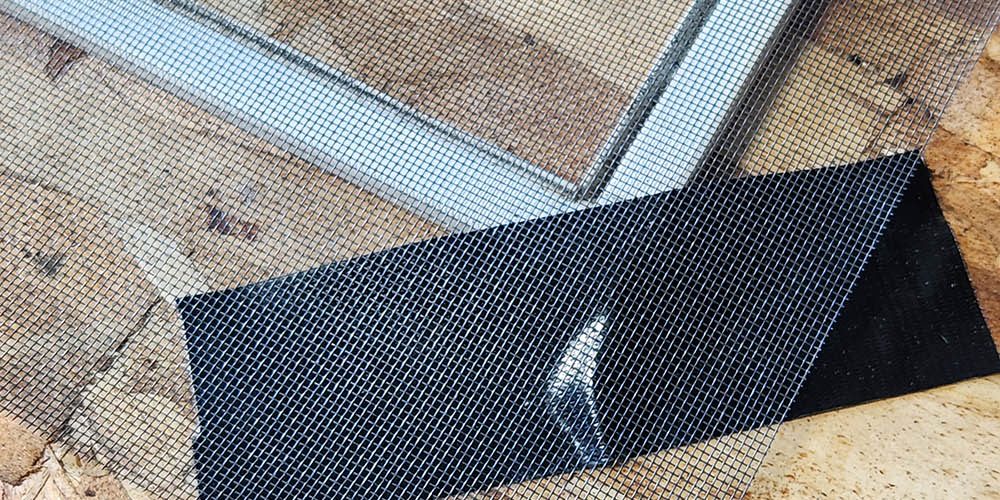
Measure and cut your new screen material: Precise Preparation

After securing the frame and removing the old materials, the next crucial step in replacing your window screen is to measure and cut the new screen mesh. A precise fit ensures a seamless and effective replacement. This section’ll guide you through measuring the screen dimensions accurately. This includes cutting the new mesh to size and preparing it to install the spline.

Start by measuring the dimensions of your window frame accurately. Use a tape measure to determine the length and width of the frame from the outer edge to the outer edge. Measure both horizontally and vertically, as some frames may not be perfectly square. Record these measurements for reference when cutting the new screen mesh. When cutting the new screen mesh, adding a few inches of extra margin on all sides is essential beyond the actual frame dimensions. This additional margin ensures that you have enough material to fit securely within the frame and allows room for adjustments during installation.

Measure the screen so there is excess on each side of at least an inch

Before installing the spline, double-check that the screen mesh is appropriately aligned within the frame. The mesh should be taut but not overly stretched. Then, ensure it sits evenly along all edges of the frame. This step is crucial as it establishes a secure and visually pleasing window screen. Measuring and cutting the new screen mesh is vital in the window screen replacement process. 

You then ensure a perfect fit by accurately measuring the frame, adding extra margin, and carefully cutting the mesh. This is essential for a functional and aesthetically pleasing window screen. With the screen mesh laid out and ready for spline installation, you’re one step closer to completing your DIY project. You’ll enjoy the benefits of a refreshed window screen in no time.

Reinstall the spline

After measuring, cutting, and laying out the new screen mesh, the next critical step in replacing a window screen is reinstalling the spline. This process involves securing the screen mesh firmly within the frame to ensure it stays in place and functions effectively. In this section, we’ll provide you with some useful tips to make reinstalling the spline easier and achieve professional-grade results.

spline roller is an indispensable tool for this step. The rounded edge of the spline roller helps you press the spline firmly into the groove of the frame, ensuring a tight fit. When using the spline roller, apply even pressure along the entire length of the spline to avoid any gaps or loose areas. This will keep the screen mesh securely in place and prevent any potential sagging over time.

It is important to distribute the tension evenly as you work your way around the frame. Press the spline into the groove on one side and then move to the opposite side to create balanced tension. Proceed to work your way around the screen, repeating the process on each side until the spline is fully installed.


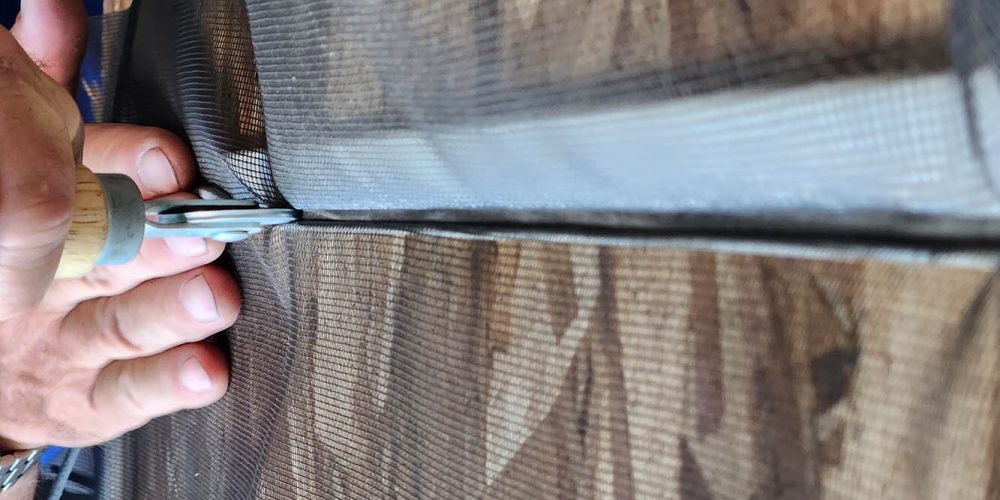
Installing the spline to keep the mesh screen in place when replacing your window screens

Trim Time: Remove The Excess Mesh

After installing the spline all around the frame, you may have some excess screen mesh extending beyond the frame’s edges. Use sharp scissors or a utility knife to trim the excess carefully. Be cautious not to cut too close to the spline, as you want to ensure a secure hold without compromising the tension of the mesh. Once the spline is in place and the excess mesh is trimmed, inspect the screen for any gaps or loose spots. If you find any, use the spline roller to press the spline more securely into the groove or adjust the screen mesh slightly to achieve a snug fit.

Reinstalling the spline is a crucial step in the window screen replacement process. By using a spline roller, starting in the middle, keeping the screen taut, and trimming excess mesh carefully, you can achieve a professional-looking result and enjoy a fully functional window screen. These tips will make the process easier and help you achieve a successful window screen replacement that enhances the comfort and functionality of your home.

And That is all it takes to replace your screens!

Congratulations! You’ve successfully completed all the essential steps to replace your window screens. By securing the frame, removing old materials, measuring and cutting the new screen mesh, and reinstalling the spline with precision, you’ve revitalized your window screens and improved the comfort of your home. If you prefer a visual guide, we’ve got you covered with a helpful how-to video. Additionally, we’ve provided links to purchase the required items from Amazon to make your window screen replacement project a breeze.

 Follow along with our expert instructions and tips to ensure you get the job done efficiently and effectively.

Purchase the required items:

If you need to stock up on the necessary tools and materials for your window screen replacement project, these are the items we use when replacing screens:

You’ve now mastered the art of replacing window screens! By following the steps provided by Custom Exteriors, you’ve enhanced the functionality and appearance of your window screens. If you prefer a visual guide, our how-to video will be invaluable for your project. So get started, enjoy the satisfaction of a job well done and the benefits of your refreshed window screens!


DIY Made Easy

In conclusion, replacing your window screens is a rewarding and straightforward DIY project that can significantly improve the comfort and functionality of your home. By following the steps outlined in this guide, you can achieve professional-grade results without needing costly professional services.

Remember, having the right tools is critical to a successful window screen replacement. Investing in essential items like duct tape, a new mesh screen, spline, scissors, a spline roller, a spline-removing pick, and a sharp utility knife will make the process smoother and more efficient.

Additional Resourses:

The screen replacement process