Exterior upgrades for rental properties showing a roof being replaced on a multi-family buidling

Educating Tenants on Exterior Maintenance: A Property Managers Guide

Commercial roof maintenance being completed by Custom Exteriors

Educating Tenants on Exterior Maintenance:
Tips for Property Managers

My husband and I own an exterior maintenance company and a handful of rental properties. Because of this, we understand firsthand the role exterior maintenance plays in maintaining property value and keeping tenants satisfied. This unique perspective provides us with the knowledge to help address property managers’ challenges in educating tenants on exterior maintenance and the important role it plays in keeping their properties in top shape. 

When a clogged gutter caused water damage to the ceiling of one of our rental’s front porches, it not only cost us thousands of dollars in repairs but also consumed a significant amount of our time. 

For us, this experience showed us the importance of proactive maintenance and effective communication between property owners, managers, and tenants. If we had conducted routine maintenance on that property, we would have never encountered the issues we did. They could have also been avoided if our tenants had a clear line of communication with us about anything that seemed out of the norm for the property, i.e., overflowing gutters. These simple steps could have helped us avoid both the financial burden and the inconvenience of extensive repairs. 

We aim to share our expertise and experience in hopes of helping owners and property managers educate their tenants on the role you both play in a properly maintained exterior. By implementing the tips and strategies we have put into place personally, property owners can not only save money on costly repairs but also streamline the maintenance process. Ultimately, this will improve the overall experience for both you and your tenant. 

Why exterior maintenance matters for rental properties

As business and rental property owners, we completely understand that busy schedules and work obligations take up much of our time. They can certainly take precedence over tasks like cleaning the gutters of your rental property. After all, with just our family and work obligations, it sometimes feels like there isn’t enough time in the day. This doesn’t even consider the time it takes to manage rental agreements, maintenance requests, and everyday property management tasks.

However, neglecting exterior maintenance can have serious consequences, including: 

Damage due to failing caulking discovered by Custom Exteriors while painting their home

The Cost of Neglect: why Exterior Maintenance Matters

As exterior remodeling contractors, we have seen the severe consequences of neglecting exterior maintenance. A common but dangerous issue we often encounter is mold or mildew. This can happen when the caulking used to seal the seams around your windows or other penetrations fails, as shown in the photo above. When caulking around windows, doors, and siding begins to deteriorate, it allows moisture to penetrate the property’s exterior. 

Over time, this moisture can cause wood to rot, mold growth, and even damage the siding. The danger in this situation is that mold often grows under the siding. In extreme cases, entire sections of siding and OSB may need to be replaced, resulting in significant expenses for property owners. 

We have also witnessed similar damage caused by neglected gutter maintenance. Without regular maintenance, gutters become clogged with debris and cannot properly channel water away from the property. This can result in water seeping into the walls and foundation, creating an ideal environment for mold to thrive. This lack of gutter maintenance then compromises the property’s structural integrity and creates health risks to the occupants. 

Proactive Protection: How exterior maintenance can save you money

Because of the many potential issues created by neglecting exterior maintenance, it should be a top priority for property owners. Your tenant also plays an important yet straightforward role in exterior maintenance: communication. By setting clear expectations and encouraging open dialogue, property managers can help tenants play an active role in identifying and reporting maintenance issues. Whether it’s loose shingles, a dripping faucet, or a crack in the siding, tenants should feel comfortable notifying their landlord or property manager of any irregularities they notice on the property. 

We sense the collective sigh that every landlord just let out. We know it isn’t realistic to expect a tenant to notify you or even notice many times. So, in addition to tenant communication, property owners should also take proactive measures to ensure the ongoing maintenance of their exterior systems. Conducting biannual inspections during the shoulder seasons of severe weather can help identify potential issues before they escalate. 

According to the NAHB, about 10.8% of a home's total operating expenses are associated with regular maintenance and routine repairs. By specifying average annual operating costs across the county, the NAHB can provide a reasonable idea of projected maintenance costs for your area. 

Clear communication tips for owners and property managers

Effective communication is an important part of successfully managing a property. However, with our busy lives, our property managers’ busy schedules, and our tenants’ schedules, communication can be difficult. If you expect effective communication with your tenants, you need to make it easy for them. For instance, some tenants may not want to have a conversation on the phone, whereas other tenants may prefer a phone call as their method of communication. 

We learned this from a local marketing company we used for Custom Exteriors. What stood out to me right from the start was their approach to communication. At the beginning of our relationship, they took the time to ask me about my preferred method of communication. I chose text messaging as I am a bit of an introvert, and I find texting convenient. I also like that it allows for quicker communication than some other methods. This simple act of asking for my preference made the entire communication process better. It also highlighted the importance of understanding and accommodating people’s communication preferences. 

Similarly, when managing rental properties, it’s important to recognize that tenants may have different communication preferences. Because of this, communicating with them may be easier if you utilize their preferred method. By asking tenants about their preferred communication method early on, you can use this method to tailor your communication and hopefully encourage communication. 

Protect your property with clear expectations

Setting clear expectations that your tenants contact you if anything changes about how the property looks or works is important. Whether it’s a leaky faucet, a cracked window, or a loose shingle, tenants should understand the importance of letting you know quickly. The best way to accomplish this is by having an easy and effective way to do so. When tenants move in, explain to them the importance of timely communication. This information often helps prevent minor issues from escalating into costly repairs. 

Additionally, property managers and owners should provide tenants with multiple ways to report maintenance issues. This may include providing contact information for emergency situations, creating an online portal for non-urgent requests, or posting signage with instructions for reporting issues. By making it easy for tenants to communicate maintenance concerns, property managers can ensure that issues are addressed promptly and efficiently. 

Educating tenants on seasonal maintenance tasks

While some tenants may be experienced in home maintenance tasks, it’s important to recognize that not everyone possesses the same level of knowledge or expertise. Many tenants simply may not be aware of how to keep the property in good condition. In our experience, a significant number of tenants are willing to work with you to help maintain the property if they are informed and know how to do so. 

By providing them a list of expectations for exterior maintenance and who is expected to complete the task (you, them, or an outside contractor), you significantly increase your chances of preventing neglect. A basic example of some important tasks looks like this:

1. spring Maintenance

2. Summer Maintenance

3. Fall Maintenance

4. Winter Maintenance

Every list will be unique, based on your particular property and the level of maintenance it requires. But, by providing tenants with a comprehensive list of seasonal maintenance tasks and clear instructions on how to perform them, you can significantly increase the chances they will actually get done.

Depending on your circumstances, this may translate into an outside company doing your exterior maintenance, or maybe you have the time and ability to complete the tasks personally. We are of the opinion that it is irrelevant who completes the tasks as long as they are getting done. On that same property with the leaking gutter, routine maintenance on our part would have also noticed the large sheets of OSB on the grass in the backyard before it killed it. Remember, in addition to protecting your home, it provides you the opportunity to personally lay eyes on the property and possibly save yourself some expenses down the line. 

Ultimately, the success of seasonal maintenance efforts relies on effective communication, clear expectations, and a collaborative approach between landlords and tenants. By working together, we can ensure that rental properties remain safe, well-maintained, and a place that tenants are proud to call home. We encourage you to continue prioritizing exterior maintenance for the benefit of everyone involved. Whether that looks like an exterior maintenance plan or dedicating a Saturday to your rental once a quarter, your bottom line will reflect your efforts! 

Signs you need to paint your home include peeling paint like this home that Custom Exteriors recently repainted

5 Warning Signs It’s Time To Repaint (And How To Make It Last Longer)
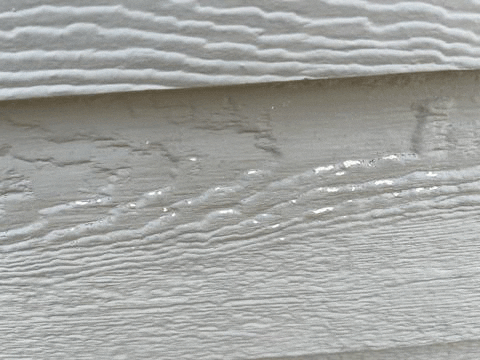
Table of Contents

5 warning signs it's time to repaint (And how to make it last longer)

When my husband and I were young, we bought a home built in 1891. Saying it was a fixer-upper is an understatement. It needed just about everything refurbished or replaced. In other news, we had no money and were unknowingly starting the sometimes frustrating and always lifelong journey of home improvement. So, with a limited budget and a lack of any tangible skills, we debated how we could make the most significant impact with the smallest financial implications. We landed on an exterior paint job. Through a lot of trial and error and many mistakes made, the end result was beautiful. It also made all the difference in the world in regards to the first impression our home made. 

That being said, your home’s exterior does more than make up that coveted term “curb appeal.” It also protects your interior from everything the severe Colorado weather has to offer. While your exterior paint is a great way to personalize your home with your unique style, it also protects many essential systems, including your siding. Over time, even the best paint job will show signs of wear and tear, indicating it’s time for a refresh. 

Recognizing these signs early can save you money on costly repairs down the line. In this article, we’ll guide you through five clear indicators that your home’s exterior needs repainting: 

Our aim is to provide you with expert advice to help you identify these signs and understand the best steps to take next. Whether you’re a first-time homeowner or have been managing properties for years, the guide will help protect your investments. Our goal is to provide beautiful and functional exteriors and protect you against future damage. 

Fading exterior paint

1. Fading Exterior Paint

With an average of 300 days of sunshine a year, Colorado residents are familiar with the issue of fading paint. Particularly on the south side of our properties which are hit with those strong rays all year round. 

Fading paint is a common issue that most homeowners will have to deal with eventually. Including sun exposure, there are a variety of reasons your paint may be fading. Some of the causes of fading exterior paint include: 

Sun exposure:

Our experience shows that sun exposure is the leading cause of fading exterior paint, at least in Colorado. The UV rays from the sun can be incredibly harsh. For the elevation of your home that receives direct sunlight for the majority of the day, they are particularly damaging. 

UV light has the power to break down the chemical bonds in paint, causing it to lose its color and vibrancy. Fading is most noticeable in darker shades of paint, which tend to absorb more light and heat than lighter colors. Over time, this continuous exposure can result in a noticeably uneven appearance. Typically, sun-facing sides fade faster than those in the shade. 

Quality of Paint:

When choosing an exterior paint, the quality of that paint plays a significant role in how well it withstands the elements, including sunlight. As an added benefit, higher-quality paints are also known to withstand impact better. Most of us have experienced a hail storm in our area in the last few years. Our inspectors find that some homes’ paint is substantially more impacted than others, and we attribute this to quality exterior paint. 

Lower-quality paints may not have been formulated with the necessary UV-resistant chemicals or high-grade pigments designed to combat the sun’s damaging effects. As a result, these paints fade sooner. On the other hand, high-quality paints are specifically designed with UV inhibitors and superior pigments that help maintain their color and resist fading over time.  

Color Choice:

As we briefly touched on, the color of paint you choose for your home’s exterior also affects how quickly it fades. Darker colors, such as deep reds, blues, and blacks, are more prone to fading than lighter shades. This is because dark colors absorb more light and heat, accelerating the breakdown of paint pigments and leading to fading. While these colors may offer a bold and striking appearance initially, they require more maintenance and frequent repainting to keep them looking their best. 

Pro Tip: If you want the darker colors without the extra maintenance, consider using them as an accent in shaded areas such as your front porch. It’s a great location for a black entry door or dark-colored window shutters. 

Weather Conditions:

Exterior paint is not only battling the sun but also all the other weather conditions experienced in your area. Extreme weather, including heavy rain, snow, and high humidity, can wreak havoc on paint. Water penetration is particularly damaging, as it can break down the adhesive bond that paint has to the surface beneath it. This not only leads to fading but can also cause the paint to peel, blister, and crack, compromising it and possibly causing expensive water damage. 

Incorrect Application:

How paint is applied to your home will significantly impact its lifespan and resistance to fading. Incorrect application methods, such as failing to properly prepare the surface, not allowing adequate drying time between coats, or paining during unsuitable weather conditions, can all lead to a weaker both. This lack of adhesion makes the paint more susceptible to the effects of UV light and weather, leading to faster fading. Proper application is crucial for a durable and long-lasting finish that protects your home for years to come. 

Tips to Minimize Exterior paint fading:

Keep in mind that fading paint isn’t just an eyesore. It can also be a sign that your paint is starting to deteriorate. As the paint fades, it may also become less effective at protecting your home’s exterior from moisture. This can lead to moisture intrusion and lead to issues like wood rot, mold, and mildew. Addressing exterior fading early can prevent more significant and costly damage in the future. 

Cracking or peeling exterior like this is a sign you need to paint your home. This was discovered during an exterior inspection by Custom Exteriors

2. Peeling or Cracking Paint

By the time your exterior paint is peeling or cracking, your exterior paint is failing. This issue is not only ugly but also a definitive sign of underlying problems that need your immediate attention. This is because one of the most common culprits behind peeling or cracking paint is moisture. Sure, other issues can cause it (aging paint often cracks and peels), but often, it results from water seeping under the paint. Water can seep under the paint layer through cracks, gaps, or untreated areas, causing the paint to lose its adhesion and start to peel off. This moisture can also lead to mold and mildew growth, worsening the issue. 

While moisture is a common cause of peeling paint, it can also peel due to improper installation. You risk peeling and cracking if your paint is applied over a dirty or glossy surface without proper preparation. Skipping surface prep and ensuring a clean, dry surface can lead to expensive repairs. When we are working with a customer who is replacing their home’s siding, we often recommend beginning the life of your siding with a pre-finished siding product to ensure the perfect foundation for a lifetime of exterior paint.

Over time, all paint will age and, if not maintained and refreshed, will eventually start to peel or crack. As paint ages, it loses its elasticity, making it unable to withstand normal expansion and contraction due to temperature changes. You can help prevent cracking or peeling paint by: 

According to Angi, water damage restoration costs an average of $3,643 but can be as high as $15,000, depending on the source and extent of the damage. 

Addressing peeling or cracking paint quickly not only improves your home’s appearance but also protects it from the damage that moisture can cause. By taking the time to both replace the aging or damaged paint and address any underlying moisture issues, you are ensuring the protection of your home and creating a durable and lasting exterior paint job. 

Chalking from faded exterior paint

3. Chalking

If you run your hand along your exterior surface and it looks like you have chalked your hands for rock climbing, your paint is experiencing a condition called chalking. Chalking is a condition that occurs on the exterior surface of buildings where the paint has degraded to the point of forming a fine, powdery substance on the surface. This powdery residue can easily rub off on your fingers when you touch the surface. Chalking is a natural part of the paint’s aging process, but excessive chalking can indicate your paint failure needs to be addressed. 

Causes of chalking infographic created by Custom Exteriors

Chalking is primarily caused by these five factors: 

How to Prevent Chalking

Because chalking is a natural stage in your paint aging, you can’t really prevent it. However, there are ways to prolong the life of your paint, putting this condition at bay for as long as possible, starting when you paint your house to begin with. Choose a high-quality paint designed to resist UV radiation and environmental degradation. These paints contain higher-quality binders and pigments that are less likely to break down into a chalky residue. It also helps to follow the manufacturer’s paint preparation and application instructions. Avoid contractors who thin your paint, and ensure you apply the recommended number of coats to create a durable finish.

Additionally, the value of regular exterior maintenance can not be overstated. Periodic cleaning of painted surfaces can help remove accumulated dirt and reduce the impact of environmental factors on the paint. This can slow the chalking process. 

Recognizing the early signs of chalking and repainting before the condition becomes severe can prevent extensive surface degradation. The early signs of chalking include: 

By catching these early signs of chalking, you can take steps to clean and maintain the surface, potentially extending the life of future paint jobs. Chalking is a natural occurrence that can’t be avoided as it is caused by environmental factors. However, choosing the right paint and following best practices in application and maintenance can significantly reduce the likelihood and severity of chalking. It will play a role in keeping your home’s exterior looking better for longer. 

Water stains on wood

4. Stains or Water marks

Stains or water marks on your home’s exterior are indicators of potential problems that can compromise the integrity of your paint and cause much more significant issues. Water stains are often signals that the paint is not correctly repelling water. This can lead to water damage, mold, mildew, and other serious issues. 

You will often see water marks or stains for many reasons, including: 

Why it matters

Persistent stains and water marks not only have an immediate impact on your curb appeal, but they are also a good indication that your paint is failing. This failure can lead to an abundance of issues, including rot, significant repair costs, and lowered curb appeal and value. 

High-quality exterior paint provides a waterproof barrier that repels water and prevents moisture penetration and the resulting stains. After addressing the underlying moisture issues, a new paint job will cover those old stains and degraded areas, significantly improving the appearance of your home. 

Stains and water marks should be seen as red flags, prompting immediate action. If you can not identify and correct the moisture issues, it’s time to call in a professional exterior maintenance contractor. 

Damage due to failing caulking discovered by Custom Exteriors while painting their home
Water damage caused by lack of caulking

5. Wood rot or shrinking caulking

The pictures above are from a job that Custom Exteriors was called in on. As you can see, the side of the window with damaged and rotted wood has a significant amount of mold. However, notice that the other side of the window (which just had cracked caulking) also presents clear signs of water damage and mold. A lack of regular maintenance and paint/caulking caused significant additional repair costs. 

Wood Rot

Wood rot occurs when water breaks the wood down, reducing its strength and structure. Unprotected wood is particularly susceptible to wood rot. 

  1. Causes: Wood rot is primarily caused by persistent moisture exposure, often due to failing paint that no longer repels water effectively. Poorly maintained gutters, downspouts, and flashing can also contribute by allowing water to gather on wooden surfaces. 
  2. Signs: Look for discolored patches that may be softer to the touch, flaking, or crumbling wood. Sometimes, the wood may appear darker or have a spongy texture. 
  3. Consequences: If left untreated, wood rot can spread, compromising the structural integrity of your home. It can lead to expensive repairs, especially if load-bearing structures are affected. 

Shrinking/Cracked Caulking

When siding is installed, caulking is used to seal gaps. That includes around windows, doors, and any other openings to prevent air and moisture from entering your home. Over time, caulking can dry out, shrink, and crack, leading to several problems. 

  1. Causes:  Exposure to the elements, particularly UV light, and temperature, can cause calking to lose its elasticity and contract. 
  2. Signs: Visible gaps, cracks, or shrinkage in the caulking around windows, doors, and other seams are clear indicators. You might also notice drafts or moisture in affected areas. 
  3. Consequences: Besides leading to water damage, deteriorating caulking can affect your home’s energy efficiency by allowing heat to escape in the winter and enter in the summer, resulting in higher energy bills. 

Addressing the Issues with a new paint job

A new paint job, when done correctly, can address and prevent further wood rot and damage to caulking. Before painting, inspect your home for signs of wood rot and replace any compromised wood. Remove old, failing caulking, and reapply a high-quality, flexible caulk to seal gaps effectively. 

Once the underlying issues are addressed, choose a high-quality exterior paint and apply it using exterior painting best practices. 

By taking these signs seriously and investing in a comprehensive exterior paint job that includes proper surface prep and the use of high-quality materials, you can protect your home from further damage and make it beautiful at the same time! 

A home that stands the test of time

Maintaining the exterior paint of your home is a crucial step. It’s important for the curb appeal of your home and also for its structural integrity. The signs of needing a new paint job – ranging from fading and peeling paint to more severe issues like wood rot and damaged caulking are clear indicators that it’s time to act. Ignoring these signs can lead to more significant, costly repairs down the line. 

Your home is one of your most significant investments. Taking proactive steps to maintain its exterior will ensure its performance for years to come, improve your curb appeal, protect against structural issues, and contribute to overall energy efficiency. 

Infographic made by Custom Exteriors to explain the steps to choosing the right front door

Front Door Styles That Will Instantly Update Your Home
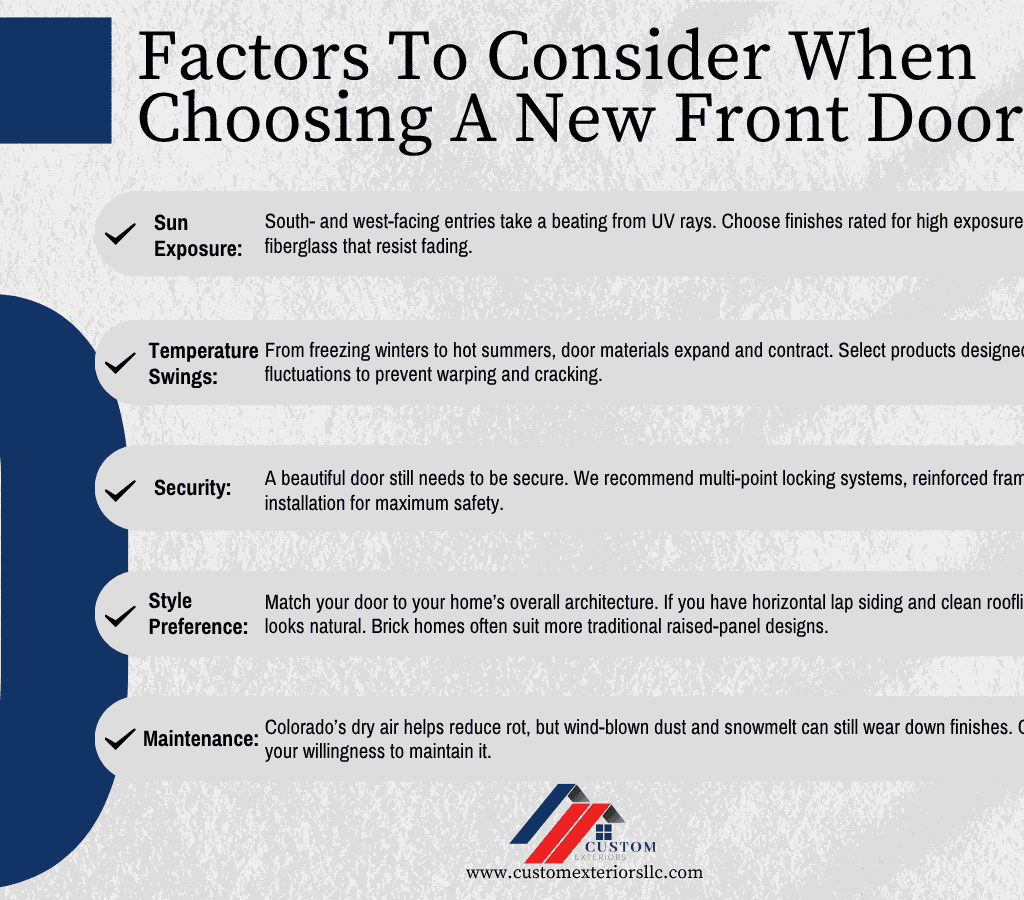
Entry door styles that will instantly update your home

Have you ever thought about the fact that the exterior of your home is the first impression of every visitor you get? And your front door serves as a focal point of that exterior. Whether you like it or not, your front door plays an important role in creating a positive first impression. Your front door can genuinely redefine the character of your home’s exterior. It’s the first thing your guests see when they arrive, setting the tone for what’s to come inside. So, whether you want to improve your home’s curb appeal or simply want to make a stylish statement, choosing the right front door is key. 

But with so many options out there, it can be overwhelming to know where to start. That’s where we come in. In this guide, we’ll walk you through a variety of front door styles, from classic to modern to statement-making options. We’ll break down the features of each style and give you tips on choosing the perfect door for your home. We also provide some exterior maintenance advice to keep your door looking its best for years to come. 

So sit back, relax, and let’s get deep into the world of entry door styles. By the end of this guide, you’ll be equipped with all the knowledge you need to make a confident decision. Let’s give your home an instant upgrade!

Classic front door styles

When it comes to a classic front door style, a certain style comes to mind. It has a timeless elegance that never goes out of style. Some of our favorite classic entry door styles include: 

Let’s explore the classic door style options:

Panel style door

Traditional Panel Doors

When working with our customers on an exterior remodel, the traditional panel door is what we see most often. Because of this, panel doors often give us a sense of familiarity. They are the most common style of entry door but still manage to provide a sense of sophistication. Characterized by their rectangular panels, these doors offer a versatile option for homeowners to express their personal style. 

Whether designed with decorative molding or kept sleek and simple, traditional panel doors seamlessly blend into most architectural styles. They are easy to customize and come in endless colors. Additionally, the can also be customized with moldings, iron accents, and windows. Because of this versatility, they are a consistent favorite among homeowners looking for a timeless look. 

Craftsman style front door with a unique exterior paint job

Craftsman-Style Doors

You often see Craftsman-style doors at the entry of a historic home. It can be beautifully aged wood or painted a vibrant color as part of a carefully considered paint scheme. Craftsman-style doors pay homage to the Arts and Crafts movement, renowned for its emphasis on craftsmanship and natural materials. Featuring clean lines, sturdy construction, and occasionally adorned with intricate detailing such as vertical groves of decorative glass inserts, the craftsmanship, and attention to detail in these doors are easy to see. These elegant doors are a perfect choice for entry door replacements in Craftsman, Bungalow, or Prairie architectural styles.

Victorian style entry door

Victorian-Style Doors

Oh, so fancy! Victorian-style doors are filled with the grandeur and luxury of the Victorian era. You can spot a Victorian-style door by its elaborate embellishments and ornate detailing. These doors often feature intricate carvings, decorative or stained glass panels, and elaborate hardware. They are a perfect fit for a Victorian or Queen Anne-style home as they often create a striking focal point. With their intricate beauty and historical charm, Victorian-style doors add a touch of romance and nostalgia to any home’s exterior. Unfortunately, finding an original Victorian-era door that is in good working and physical condition can be challenging. While modern-day replicas are much more energy-efficient, they can be substantially more expensive than a traditional entry door. 

Traditional Colonial style front door

Colonial-Style Doors

Colonial-style doors draw their design from early American architecture. While similar in style to the panel door, you can recognize a colonial-style entry door by its symmetrical design, six-panel configuration, and understated elegance. Colonial-style entry doors are often larger, double doors. These doors seamlessly complement Colonial, Georgian, and Federal-style homes best but are a fairly flexible choice for many architectural styles. Colonial-style doors manage to offer a timeless yet modern look, making them a popular choice even for commercial exterior remodeling

Transitional front door

Transitional-Style Doors

Transitional-style doors bridge the gap between classic and contemporary design. Because of this unique feature, they offer a seamless blend of traditional elements with modern sensibilities and styles. With clean lines, subtle detailing, and versatile finishes, these doors perfectly balance old-world charm and modern flair. Transitional-style doors are ideal for homeowners looking for a timeless but modern style. This makes them a popular choice for a wide range of architectural styles. 

So, whether you prefer the timeless elegance of a traditional panel door or the intricate detailing of Victorian-style doors, there’s a classic front door style for almost every taste and home style. 

Infographic created by Custom Exteriors to explain which home styles work best with which front door styles

Modern Front Doors

When you think of a modern front door design, sophistication and sleek styling come to mind. Let’s take a look at some options that may be just the bold statement you are looking to make! These include: 

Let’s find out which option is right for your modern masterpiece.

Minimalist entry door

Minimalist Doors

Minimalist doors, as their name implies, prioritize simplicity and clean lines. Somehow, their understated elegance manages to make a pretty bold statement. You can spot a minimalist door with sleek, smooth surfaces, straight edges, and subtle hardware. This look completes a modern exterior makeover and pairs well with metal roofing, panel siding, and bold accent color statements. They have a very unassuming design that blends seamlessly into minimalist and contemporary architectural styles. This refined entrance will effortlessly emphasize your home’s simplicity and functionality. 

Modern glass panel entry door

Contemporary Glass Doors

A personal favorite of ours, contemporary glass doors blend indoor and outdoor spaces seamlessly. As a Colorado-based exterior contractor, there is a lot to see outside our homes. Modern glass doors flood the inside of your home with natural light and create a seamless transition between the comfort of your interior and the beauty outside its walls. Featuring expansive glass panels, sleek frames, and minimalist hardware, these doors add a touch of transparency and openness to modern homes. Ideal for homes with a focus on open floor plans and expansive views, contemporary glass doors add a natural sophistication to any space. 

Pivot style front door

Pivot Doors

Pivot doors are pretty rare, but when you do see them, they are almost always associated with a luxury home. They have a unique and innovative design that is visually striking. Rather than swinging on a hinge, like a traditional door, a pivot door pivots on a central hinge. These statement-making doors demand your attention. They are a dynamic, oversized door that creates a dramatic impression on anyone who visits. Pivot doors are a popular choice for modern and contemporary homes seeking to make a bold architectural statement while maximizing space and functionality. However, they are often priced higher than many entry doors. 

Steel Doors

Steel doors or doors with steel accents combine an industrial look with a contemporary design. They offer an unmatched blend of durability and style. Featuring industrial-style lines and smooth surfaces, steel doors give a sense of chic and modern sophistication. Steel doors with sleek finishes are a perfect fit for modern loft-style homes. They can also be a great choice for a commercial door replacement. When steel accents are combined with natural wood or aged glass, you create a perfect match for an industrial-inspired home looking for an entrance with an edge. 

Mid-Century Modern Doors

Mid-century modern doors get their design from the mid-20th century. These doors are easily spotted by their clean lines, geometric shapes, and bold statement-making designs. Mid-century modern doors feature horizontal grooves, bold design patterns, and vibrant colors, capturing the essence of the mid-century look. Retro-inspired doors add a touch of charm like no other style of door can. Opt for a color that complements your home’s architectural styles. This is a great way to make a statement that reflects your personality and your home’s style. 

Make a statement with your front door

As we discussed earlier, your front door has a huge impact on the overall curb appeal of your home. There are many other ways to make a statement using your entry. A few examples include: 

Exterior painting on front doors

Bold Color Choices

The simplest way to make a huge impact on your exterior is to paint your front door with bold color choices. This small choice injects just a touch of vibrancy and personality into your home’s exterior. A bold-colored front door is an attention grabber, perfect for those wanting to make a memorable first impression. Whether you thinking about a fiery red, a royal blue, or even sunny yellow, bold color choices add an element of excitement and individuality to your home’s exterior. With the right paint choice, your front door can create a focal point that sets your home apart in the neighborhood.

According to Zillow, black doors are associated with the highest offer price. Buyers showed they would pay up to $6550 more for a home with a high-contrast, black front door. The least desired entry door? Pink, which was described as "shabby looking" by participants. 

Intricate front door design

Intricate designs, carvings, and unique hardware

Front doors can come with intricate designs and carvings that turn the door into a true work of art. From intricate patterns to elaborate scrollwork, these add a touch of luxury and elegance to your entry. These doors complement a variety of architectural styles and truly make a statement. 

Unique hardware and accessories add the perfect finishing touch to your front door. We have seen everything from decorative doorknobs to ornamental hinges to unique door knockers, hardware, and accessories, which offer endless possibilities for customization. Whether you prefer a vintage look or a modern, sleek design, there are hardware options available to suit every style and taste. Some of these features provide not only an interesting exterior appearance but can also increase your home’s security. 


Custom-made Double Doors

Custom doors offer unmatched customization and personalization options. Whether you prefer sleek and modern or traditional and ornate, there is a door for you. Double doors, in particular, make a grand entrance. Double doors are perfect for homes with expansive entryways or those looking for a dramatic statement piece. Modern doors are available in a variety of styles and materials, from classic wood to sleek metal to contemporary fiberglass. With their impressive size, double doors create a memorable first impression that sets the tone for your home.

Choosing the right door for your home

If your exterior remodeling plan includes replacing your entry door, the importance of choosing the perfect door for your home can’t be overstated. Some important factors to consider when choosing a custom entry door replacement include:

Infographic made by Custom Exteriors to explain the steps to choosing the right front door

Installation and maintenance tips

Once you have selected the perfect front door, proper installation and maintenance are essential to ensure a long life with optimal performance. Here are some installation and maintenance tips to keep in mind. 

It is so important to ensure your front door is installed properly. You will likely need to hire a professional contractor with experience in door installations. The professional installer should provide you with a portfolio of completed jobs. This helps ensure that your new door is properly aligned, sealed, and insulated to prevent drafts, water infiltration, and security issues. 

After installation, regular maintenance is the key to preserving the beauty and performance of your front door. Make sure to follow the manufacturer’s recommendations for cleaning and maintenance based on the material of your door. A wood door and a fiberglass door are going to have different maintenance needs, so research your door before proceeding with any type of maintenance. When cleaning your siding, windows, and front door, always use a gentle cleaning agent and the lowest water pressure possible to get the door clean. 

Final impression: the importance of selecting the perfect front door

Your entry door is a reflection of your home’s personality and style. So, whether you choose a minimalist door or merely a bold color choice that makes a statement, each option can transform your home’s exterior and elevate its curb appeal. Explore your options, consider your preferences, and find the perfect front door that will add to your curb appeal and make a unique and inviting statement. 

Infographic created by Custom Exteriors explaining 3 top things to look for in a commercial painter

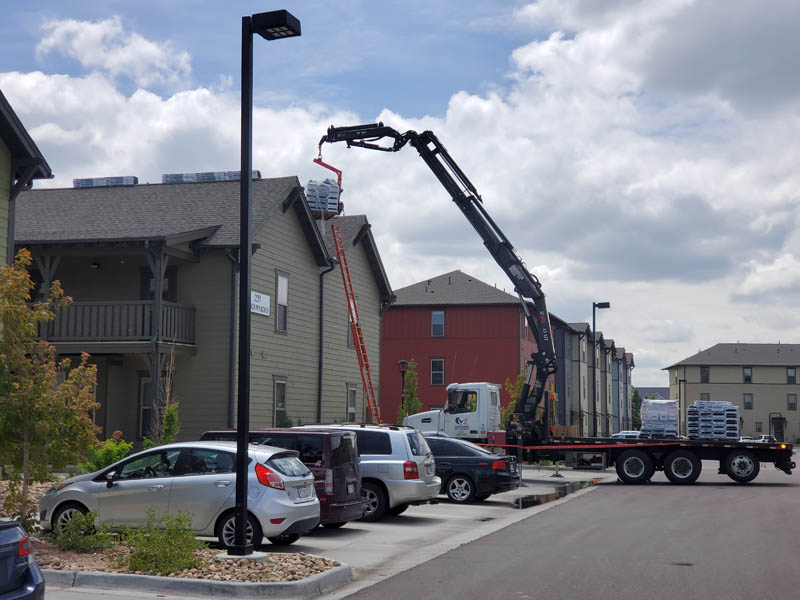
The Essential Guide to Exterior Painting for Commercial and Multi-Family Buildings
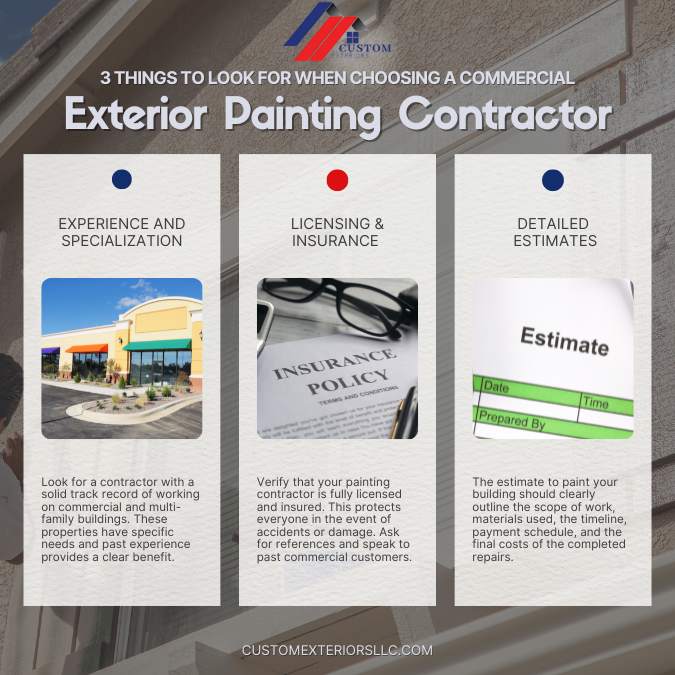
The Essential guide to exterior painting for commercial and multi-family buildings

Protection against the elements

As the owner or manager of a commercial or multi-family building, you know the value of a good first impression. The exterior of your building is the first thing anyone sees when they arrive. You don’t need the reminder that a good-looking exterior or a freshly painted building can significantly enhance the appeal of your property to prospective tenants and customers alike. In addition to looking great, a properly maintained building sends a message that you care about your property and, by extension, about your tenants and visitors. A well-maintained exterior can attract more customers or tenants, making your property a place where people want to live, work, or shop. 

If you have owned your property for any amount of time, you also understand the need for exterior maintenance for your multi-family or commercial building. When left unchecked, even the smallest of issues, like a clogged gutter, can result in severe and expensive damage to your property. 

Beyond appearances, there’s a practical side to exterior painting that plays a huge role in the health of your building. Quality exterior paint serves as a shield to protect your building. It keeps severe weather, pests, and moisture at bay and can prevent costly repairs down the line. Keeping your building’s exterior in good condition should be viewed as a small investment that can and will save you from larger expenses down the line. 

Long-term costs savings

Because we are talking about commercial properties, the bottom line matters. So, let’s talk about the financial sense it makes to keep your building’s exterior painted and maintained. Ignoring peeling paint or the buildup of dirt and grime can lead to problems that become more expensive to fix over time. For instance, water damage from lack of proper sealing and maintenance can lead to costly repairs in both the interior and exterior of your building. By investing in regular upkeep, you are proactive about preventing future issues, leading to significant cost savings in the long run. Plus, a building that looks good and is well-maintained increases its value over time, which is good for your bottom line. 


Choosing the right painting contractor

Selecting the right painting contractor for your commercial or multi-family property isn’t about finding just any contractor. It’s about partnering with a professional who understands the unique needs of your property and can deliver results that enhance its value and visual appeal. It’s about finding a company with the experience required to complete the remodeling tasks at hand with minimal impact on tenants or visitors. From our experience, there are key factors you should consider to make sure you are making the best choice for your property. 

Infographic created by Custom Exteriors explaining 3 top things to look for in a commercial painter

1. Experience and Specialization

First and foremost, look for a contractor with a solid track record of working on commercial and multi-family buildings. These types of properties have specific challenges and requirements, from the scale of the project to the need for durable materials that can handle high-traffic areas. An experienced contractor will not only provide insights into the best practices for your project but also anticipate and manage any potential issues that may arise during the process. Experience also allows a contractor to complete exterior repairs and improvements with minimal impact on the tenants and visitors. 

2. Licensing, Insurance, and references

It’s essential to verify that any contractor you are considering is fully licensed and insured. This protects your property in the event of accidents or damage. Even the best contractors have accidents from time to time. So, ask to see proof of insurance and check that their licensing is up to date. 

Additionally, ask for references and follow up on them. Speaking to other commercial property owners or managers who have worked with the contractor can give you a clearer picture of what to expect. They can share insights on the contractor’s reliability, quality of work, and ability to complete the project on time and within budget. A reputable contractor will be proud to show off their work and provide references without hesitation. 

3. Detailed estimates and contracts

A professional painting contractor should provide you with a detailed estimate outlining the scope of work, the materials that will be used, the timeline, and the cost. This document is crucial because it sets the expectations for both parties and helps avoid misunderstandings later on. Make sure everything you’ve discussed is included in the proposal and that you completely understand each part of it. Don’t hesitate to ask questions if anything isn’t clear.

The contract should also specify the payment schedule, warranty information, and how changes to the project scope will be handled. A clear, comprehensive contract is the foundation of a successful project. It ensures that you and your contractor are on the page from start to finish. 

Choosing the right painting contractor for your commercial or multi-family property is a decision that shouldn’t be taken lightly. By focusing on experience, verifying licensing and insurance, and requesting detailed estimates and contracts, you can select a partner that will not only meet but exceed your expectations. Remember, the goal is to increase the value of your investment, and the right contractor is an important step to achieving that outcome.  

Selecting the right paint for your building

When you think about choosing the paint for your building, your first thought is likely, “What color?” However, choosing the right paint for your building is much more than picking colors that look good together. You need to consider finding the right paint to make your building look great while protecting it for years to come. Based on our experience, there are several key factors you need to consider to make the best choice for your property. 

Infographic made by Custom Exteriors to explain three steps in choosing the right paint for your exterior painting project

1. Types of exterior paints

  1. Acrylic Paints: These are water-based paints known for their durability and flexibility. They work great for most exterior surfaces because they can expand and contract with the building materials during temperature changes, reducing the risk of cracking. Acrylic paints are commonly seen on stucco surfaces or areas that need increased durability. 
  2. Latex Paints: Also water-based, latex paints are the most commonly used paint. They are popular for their ease of application and clean-up. They dry quickly and offer good coverage. This makes them a practical choice for larger projects. 
  3. Oil-Based Paints: Known for their robust and durable finish, oil-based paints are excellent for high-contact areas because they’re resistant to wear and tear. However, they take much longer to dry and require more effort to clean up. 

Choosing between these paint types depends on the specific needs of your building, including the materials of the exterior and the climate of your area. Your painting contractor will assist you in determining which paint will best serve your needs. 

2. Considerations for Climate and Building material

Your local climate plays a significant role in selecting the right paint. For example, properties in areas with high humidity need paint resistant to mold and mildew. Similarly, buildings in regions with intense sun exposure, like Colorado, require UV-resistant paint to prevent fading and deterioration. 

The material of your building is also a determining factor. Wood, masonry, stucco, and metal each have different requirements for adhesion, durability, and protection. A knowledgeable painting contractor can advise you on the best type of paint for your building’s material and the environmental conditions. 

3. Color Selection and Curb appeal

While functionality should be your primary concern, the aesthetic appeal of your paint selection can’t be overlooked. The right color can transform your property, making it more attractive to tenants and customers. Did you know that according to Zillow, homes with black front doors can sell for up to $6,000 more than similar homes? With this in mind, consider colors that reflect your brand image or blend well with the surrounding environment. Additionally, many areas have regulations on the colors you can use, so it’s important to be aware of these guidelines before making your final decision. 

According to Zillow, 77% of realtors recommended their customers repaint the exterior of their homes before a sale. A newly painted property can boost your curb appeal and selling price for a relatively low installation cost. 

When selecting paint colors, also think about longevity and maintenance requirements. Darker colors might fade faster in sunny areas, while lighter colors can help hide dust and reduce heat absorption, making them a great eco-friendly choice. 

Choosing the right paint for your commercial or multi-family property is a critical decision both in protection and increased curb appeal. Remember, consulting with a professional painting company can provide valuable insights and help you make the best choices for your property. 

Exterior Paint Maintenance: Ensuring durability and Curb Appeal

Maintaining the exterior paint of your property is a crucial part of property management that protects your investment and ensures its continued value over time. Based on our firsthand experience, we can speak to the fact that regular maintenance can significantly extend the life of your paint and your property and prevent costly repairs down the line. Here is what we recommend to keep your building in its best condition with exterior paint maintenance. 

Regular Cleaning and inspection:

Dirt, grime, and pollutants can gather on your building’s exterior over time, not only distracting from its appearance but also potentially damaging the paint. Regular cleaning, at least once a year, can help preserve the paint’s integrity and appearance. This can be done by hand for smaller projects or with a low-pressure wash to remove dirt without damaging your paint. 

informational pro tip to use the lowest setting when using a pressure washer to clean your building

Equally important is the regular inspection of your building’s exterior. Look for signs of wear and tear, such as cracking, peeling, or fading paint. These can be early indicators of potential problems. Pay special attention to areas exposed to harsh weather conditions like direct sunlight, as these are more likely to show signs of deterioration. 

Touch-up Strategies:

When you notice minor issues during your inspections, such as small cracks or chips, it’s important to address them promptly. Touching up these areas can prevent water infiltration and further damage, extending the life of your paint job and the investment you made in it. Matching the original paint color, type, and sheen is crucial for a seamless repair, so always keep records of the paint used on your property. Your painting contractor should be able to provide these details for your records. 

Professional Maintenance and Repainting:

Even with diligent maintenance, exterior paint will eventually need to be repainted. The frequency of repainting depends on several factors, including the quality of the previous paint job, the type of paint used, and the local climate. Typically, a well-done exterior paint job can last in excess of 10 years. 

When it’s time to repaint, consult with a professional painting contractor. They will be able to assess the condition of your existing paint, prepare the surface properly, and apply the new paint in a way that maximizes its lifespan and curb appeal. 

Wrapping it up: The lasting benefits of quality exterior painting

The appearance of your commercial or multi-family property is significantly influenced by the quality of its exterior paint job. Each step is crucial in protecting your investment, from the initial selection of the right paint and contractor to the ongoing maintenance and eventual repainting. A well-chosen and maintained exterior not only creates a positive first impression but also serves as a protective barrier against environmental elements, extending the lifespan of the building itself. 

Regular cleaning, inspections, and touch-ups play a vital role in maintaining the building’s curb appeal and structural integrity. By promptly addressing minor issues, you will avoid more significant repairs. 

Ultimately, the effort and resources invested in selecting the right paint, hiring the right contractor, and maintaining the exterior of your property pay off by increasing its value, attracting and retaining tenants, and projecting a professional image. As a commercial building owner, your proactive approach to exterior maintenance is a testament to your commitment to excellence and the long-term success of your property. By following these guidelines, you can ensure that your property remains a desirable and profitable asset for years to come. 

Infographic designed by Custom Exteriors explaining the path of rainwater on your roof and how gutters serve to direct it

The Essential Guide to Gutter Cleaning: Protecting Your Home in Every Season

The essential guide to gutter cleaning:
Protecting your home every season

If I told you that, in our experience, the system that causes the most and costliest damage when left unmaintained isn’t your roof but your gutters, would you be surprised? Well, don’t be. Decades of experience in exterior remodeling has taught us one thing. The health of your home hangs in the balance of your exterior maintenance, specifically gutter cleaning and maintenance. We have seen firsthand the silent havoc your gutters can cause with a lack of maintenance. Our experience has shown us the critical role gutters play in maintaining the integrity of your house! This is why we want to share our knowledge and experience with you, emphasizing the importance of keeping those gutters clean and properly sloped for the protection of your home. 

The need for gutter maintenance is especially high in two seasons: spring and fall. Why, you might ask, do these two seasons need special attention? The answer lies in the unique challenges they present. In many places throughout the US, and certainly here in Colorado, spring often comes with heavy rains that can push your home’s ability to manage the excess water effectively to the limit. Without a clear pathway, that water can find its way inside your home, leading to mold, water damage, and many other problems, including structural issues. Fall, on the other hand, fills your gutters with leaves, twigs, and debris, clogging up the pathway and setting the stage for ice dams and further water damage once winter arrives. 

A necessity, not an option

Through our years of service, we’ve seen the costly and often preventable damage that comes from neglected gutter maintenance. From mold taking hold in the damp recesses of a home to water undermining the foundation of the property, the consequences are real and can be severe. That’s why we stress the importance of regular gutter cleaning not as just a recommendation but as an important part of your home maintenance routines. In this guide we will cover: 

So, please let us guide you through the why, the when, and the how of gutter cleaning. Custom Exteriors aims to provide you with the knowledge and skill to keep your home looking beautiful while protecting it at the same time. So, grab your ladder (metaphorically speaking), and let’s talk about your gutters, leaves, and debris and the simple measures that can save you a world of hassle and expense. 

Why gutters matter more than you think

Infographic designed by Custom Exteriors explaining the path of rainwater on your roof and how gutters serve to direct it

Imagine your home during a heavy rainstorm. Where does all that water go? Your gutters are the primary path to take all the rainwater gathered across your entire roof and guide it safely away from your home. But if you aren’t quite sure what gutters do or why they’re so important, you’re not alone. 

Gutters are the long channels that run along some edges of your roof. Their job is simple but incredibly important: they catch rainwater as it runs off your roof and direct it away from your home. This might not sound like a big deal at first, but without gutters, your home is at real risk for water damage. 

Here’s why gutters are important: 

1. Protection from water damage:

Without gutters, rainwater would just pour right off your roof, down the walls, and accumulate around the foundation of your house. Over time, when the ground becomes saturated, water can fill window wells and seep into the home. This can lead to basement flooding, causing damage that can be expensive to fix. 

2. Keeping the foundation strong:

Your foundation supports your entire home and every system within it. If water pools around the foundation because there are no gutters or they are clogged, it can weaken the structure. Over time, this constant moisture can lead to cracks or even more serious damage. 

3. Preventing mold and mildew:

Mold thrives in damp places. If water constantly drips down your home’s sides because the gutters aren’t doing their job, it creates the perfect home for mold and mildew. This isn’t just a problem for your home’s structure; it can also affect your family’s health. 

4. Saving your landscaping:

Do you take pride in your yard and landscaping? Gutters help protect your landscaping from being washed away or damaged by heavy rains. As the water is directed off the roof and through the gutters, it reaches your downspouts and is drained away from your home and its landscape. 

5. Avoiding pest problems:

In addition to all of the physical damage standing water causes to your home, it can also attract pests. By keeping your gutters clean, you’re not giving mosquitoes a perfect place to breed right outside your front door

These are the reasons it is so important to understand the role gutters play in keeping your home protected from water damage. They might not get all the attention that other parts of your house do, but they’re working hard behind the scenes to prevent potential problems. However, they need care in order to function properly, which is why cleaning them out regularly is so important. Stick with us, and we’ll show you how to take care of your gutters, ensuring they continue to protect your home season after season. 

According to Architectural Digest, The average cost to have your gutters cleaned is $207.  The average cost for mold mitigation is $2230. Exterior maintenance is an investment in both your home and your peace of mind.

The consequences of ignoring gutter maintenance

Neglecting gutter cleaning can create issues that may not be noticeable until they are serious and expensive. Examples of damage we have encountered due to lack of routine maintenance includes: 

We have seen firsthand damage to roof decks, siding, and drywall due to the lack of gutter maintenance. Because of this, ignoring gutter cleaning is not a risk we are willing to take. The consequences of inadequate gutter maintenance come with the hassle of scheduling and living through repairs and significant costs. Regular gutter maintenance is a simple and effective way to protect your home from these potentially devastating problems and have the peace of mind that comes with that knowledge. 

The importance of gutter cleaning in the fall and spring

Unfortunately, cleaning your gutters isn’t just a once-a-year kind of job. Just like the other exterior components like your roof and siding, you need to perform regular maintenance. To really protect your home, it’s crucial to focus on gutter maintenance, especially in two key seasons: fall and spring. Drawing from our team’s decades of experience, let me tell you why these times are so important. 

Custom photo created by Custom Exteriors to illustrate the reason it is important to clean your gutters in both the spring and the fall

Spring Cleaning:

Rainy season Prep:

We’ve all heard the term “spring showers,” and those showers need somewhere to go. In certain parts of the country, these spring showers regularly turn into spring downpours. After winter, your gutters might be filled with leftover leaves, debris from ice and storms, or even nests that animals make during the colder months. If your gutters are clogged with debris, all that rainwater has nowhere to go except back into your home. Cleaning out your gutters ensures spring rains have a clear path away from your home, keeping your basement dry and your foundation safe. 

Damage inspection:

Spring is also a great time to check for any damage that winter might have caused to your gutters. Freezing and thawing, heavy snow, and ice can all lead to cracks in your gutter system. We have also seen gutter systems collapse or pull away from the house under the sheer weight of the ice built up in them over the winter. So, catching and fixing these issues before your first torrential downpour can save you a lot of trouble and money down the road. It’s also a great time to check over your roof and do a brief roof inspection for any signs your roof might need maintenance before the rain starts falling. 

Fall Cleaning:

Leaves and Debris:

In Colorado, in the fall, trees shed their leaves like crazy. Our yards are shades of orange and brown, and everyone in the neighborhood dedicates a few days each fall to cleaning up their yards from the mess made by shedding trees. But guess where else those leaves landed? In your gutters! These falling leaves, twigs, and other debris can quickly fill up your gutters, blocking water from flowing through. If water can’t flow, it can cause all the problems we’ve discussed, like leaks and foundation damage. 

Preparing for winter:

By cleaning your gutters in the fall, you’re preparing your home to face the winter storms and snow we see in the winter in Colorado. Clogged gutters can lead to ice dams which cause water to back up and damage your roof, ceilings, and walls. Clear gutters mean a smoother path for snow and ice to melt and drain away, preventing this damage. 

Based on our team’s experience, regular gutter maintenance in these two seasons can significantly reduce the risk of water damage and expensive repairs. So, grab that ladder and those gloves. If your physical limitations prevent safe ladder use, call in the professionals and give your home the care it deserves. 

Your step-by-step guide to gutter cleaning

Cleaning your gutters might seem like a big task, but it’s actually something most homeowners can do on their own with a little bit of guidance. Before anything else, safety is key. Consider your physical limitations before beginning. If, for any reason, you can not safely climb a ladder or have questions about your ability to do so with a bucket full of tools, call in a professional. Your safety should be your first concern; gutter cleaning is a reasonably affordable service. 

If you are comfortable with heights and safe ladder use, ensure you have a sturdy ladder that can reach your gutters comfortably. Always place it on solid, level ground. Having someone with you to hold the ladder steady while you work is a good idea. Never lean over the ladder’s sides, and don’t forget to wear gloves to protect your hands from sharp objects and a pair of goggles to keep your eyes safe. 

Infographic created by Custom Exteriors that shows each step required to clean your gutters

Step 1: Gather your tools

You’ll need a few basic tools before you start that will make the job smoother and quicker:

Step 2: Remove Debris

Following appropriate safety guidelines, climb up your ladder and start scooping out the leaves, twigs, and any other debris you find in your gutters. You can use your gloved hands, a garden trowel, or a gutter scoop to do this. Gutter scoops are a tool made to fit in and clear your gutters perfectly. They are available online and at your local home improvement store for under ten dollars. Put your debris in your bucket or the tarp you have laid below your work area. This is a messy job, so be prepared to get dirty. If the leaves are dry and loose and you are comfortable getting onto your roof, a leaf blower is a quick and effective method to clear the leaves. 

Step 3: Flush the gutters

Once you have cleared your gutters of all the visible pieces of debris, it’s time to flush out the gutters with your hose or pressure washer. If you use a pressure washer, start with low pressure and gradually increase your pressure to the lowest setting required to verify the water drains properly and flows freely. High-pressure water can cause extreme damage to your home. Flushing your gutters will help clear out any smaller bits and check that water can flow freely through your gutters and downspouts. If water backs up, there might be a clog in the downspout that you need to clear. 

Step 4: Check for Clogs in Downspouts

If you notice that water isn’t flowing freely, you may have a clog in one of your downspouts. Sometimes, tapping gently on the side of the downspout can loosen the debris. In tougher cases, you might need to use a plumber’s snake or high-pressure water to clear the blockage. 

Step 5: Inspect for Damage

If you are already on your roof, it’s a great time to take a moment to look over your gutters and downspouts for any signs of damage, like holes, cracks, or sections that are pulling away from the house. These issues can lead to bigger problems if they’re not fixed. It’s also a good time to do a brief roof inspection while you have a closer look at the components. 

Step 6: Make repairs as needed:

If you find any damage, it’s important to fix it as soon as possible. Some repairs might be simple enough to do yourself, like sealing small holes or reattaching parts of the gutter that have come loose. For bigger repairs, you might need to call in a professional. 

Pro Tips for easier and safer Gutter cleaning

Tip 1: Use the Right Ladder: Invest in a sturdy, extendable ladder that reaches safely beyond the edge of your gutters. Another wise addition is a standoff stabilizer (also known as a ladder “horn” or “arm”). This keeps the ladder from resting directly on the gutters, which can cause damage such as denting or scratching. 

Tip 2: Wear Protective Gear:  Always wear gloves to protect your hands from sharp debris and edges inside the gutter. Safety glasses or goggles are also a must to protect your eyes from any flying debris. Also, depending on your level of comfort with heights, a harness can guard against injuries from falling. 

Tip 3: Use a Gutter Scoop: A plastic gutter scoop is the best tool for removing gunky debris. It is designed to fit perfectly inside most gutter systems and is nearly a foot long, making short work of clearing gutters. It’s also tough enough to scrape out compacted material but soft enough not to damage the gutter. 

Tip 4: Get a Garden Hose With a Spray Nozzle: After scooping out the debris, use a garden hose with a spray nozzle to flush the gutters. This helps you make sure water is flowing freely and draining away from your home properly. It also presents the opportunity to find any leaks that may need to be fixed before the rain/snow seasons. 

Tip 5: Clean from the Ground When Possible: Consider using gutter cleaning tools that can be operated from the ground, such as gutter cleaning wands or a shop vac with gutter attachments. This reduces the risk of falls. 

Tip 6: Secure Your Debris Bucket: Attach a bucket with a handle to your ladder with a lanyard or a hook for an easy way to keep debris close without having to go up and down the ladder too many times. You can also lay tarps under your work area instead of using a bucket and gather all debris at once.

Tip 7: Check the Weather: Plan your gutter cleaning on a day when the weather has been dry for a few days. Wet and soggy debris is heavier and messier to deal with. 

Tip 8: Work Safely and Methodically: Move the ladder frequently rather than overreaching. Overreaching can destabilize your ladder and lead to falls. Take your time and work in sections to stay safe. 

Tip 9: Inspect and Repair as You Go: Keep an eye out for any signs of damage or wear, such as cracks, holes, or rust. Small issues can often be repaired on the spot with gutter sealant or patches. 


Securing your home with regular maintenance

Regular gutter maintenance, along with routine exterior maintenance, offers long-term benefits that go far beyond curb appeal. Some of the immediate benefits of maintaining your home are: 

Lastly, keeping up with gutter and exterior maintenance gives you peace of mind. Knowing that you’ve taken proactive steps to protect your home means one less thing to worry about. You can rest easy during heavy rains and storms, confident that your home is well-prepared to handle whatever the weather throws its way. 

Just remember, the effort you put into maintaining your home’s gutters and exteriors pays off in the long run. Not only does it save you money by preventing costly damage, but it also maintains, and potentially increases, your home’s value, contributes to a healthier living environment, and provides peace of mind. So, take the time to schedule regular maintenance checks – its and investment in your home’s future and your own well-being. 

Infographic explaining the qualities of the 5 main paint sheens, flat, eggshell, satin, semi-gloss, and glossy

Choosing The Right Exterior Paint: A Comprehensive Guide For Homeowners

Choosing the right exterior paint:
A comprehensive guide

Painting the exterior of your home is no small feat. It’s a significant investment, both in time and resources. As such, selecting the right type of paint is essential, ensuring that your home looks stunning and remains protected against the elements.

Moreover, the paint you choose is the first line of defense against nature’s unpredictable weather – from scorching sun rays to icy cold snaps. A properly painted home can resist weather damage, mold growth, and even insect infestations. But the question remains: amidst the plethora of brands, finishes, and shades, how do you pinpoint the perfect paint for your needs? It is more than just picking a color you like. It’s also about understanding what works best for the material of your home, your climate, and the desired longevity of your new paint job. 

You are not alone if you’re feeling lost amidst the vast array of paint choices. This guide aims to simplify the process, providing you with the knowledge and tips you need to make informed decisions about your exterior remodel. You can then be confident that you have made the best decision for your home. 

Understanding the basics: Types of exterior paints

When repainting your home’s exterior, the first decision often revolves around the base of the paint. Essentially, paint falls into two primary categories: water-based, commonly referred to as latex, and oil-based, known as alkyd. 

Water-Based Wonders: Understanding Latex Paints

Water-based or latex paints have become increasingly popular in recent years. One of their standout qualities is the quick drying time, which allows for fast project completion. This rapid drying is especially beneficial if you’re painting in regions with unpredictable weather, as it reduces the chances of the paint being affected by sudden rain showers. Another advantage of latex paints is their easy clean-up process using just soap and water. Compared to their oil-based counterparts, they have a lower odor, making them a popular choice for many homeowners. However, while latex paint excels in many areas, it struggles to adhere to surfaces previously painted with oil-based paint. 

Oil-Based Insights: Delving into Alkyd paints

On the other hand, oil-based or alkyd paints bring a different set of advantages to the table. Their application is often smoother, resulting in a more uniform finish. The result often boasts a durable, glossy finish that stands the test of time. This durability is why many professionals and homeowners opt for oil-based paints for areas exposed to significant wear and tear. Furthermore, oil-based paints adhere well to various surfaces, ensuring a long-lasting paint job. However, they are not without their challenges. The drying time for oil-based paints is considerably longer, which might stretch the duration of your painting project. Clean-up is also more involved, requiring mineral spirits instead of the simple soap and water solution that latex paints allow. Additionally, the pungent odor they produce might be off-putting to some people. 

infographic about the pros and cons of oil based paint

Both latex and alkyd paints have their benefits and disadvantages. Your choice between the two should factor in your home’s specific needs, the region’s climate, and your personal preferences, especially concerning drying time and odor. 

The importance of Finish: making the right choice

When we talk about painting our homes, color is often the first thing that comes to mind. However, the finish and sheen of the paint are equally important. This aspect determines how the paint reflects light, affecting its appearance and how it stands up to daily wear and tear. Each finish has different properties, catering to different needs and styles. The sheens available in paint are:

Infographic explaining the qualities of the 5 main paint sheens, flat, eggshell, satin, semi-gloss, and glossy

Flat/Matte: The timeless classic

A flat or matte finish is known for its non-reflective properties. This means it doesn’t bounce back much light. Because of this, flat pain has a very muted and soft appearance. A matte finish might be the best choice if your home is older with a story to tell with its imperfections. This is because it is excellent at masking minor blemishes or irregularities on the surface. However, while it’s great at hiding those little flaws, it’s also more susceptible to stains and might require careful cleaning. 

Eggshell: The middle ground

Venturing into a slight sheen, we have the eggshell finish. As the name suggests, it’s reminiscent of the subtle shine on an egg’s shell. This finish is a step up from flat in terms of washability. It strikes a balance, offering some of the concealing properties of matte paints while being easier to clean. So, eggshell could be a great candidate if you’re thinking about painting larger areas like siding. 

Satin: The reliable choice

Satin is a favorite among many homeowners. This finish provides a gentle gloss, which makes surfaces appear more vibrant while not being overly shiny. Its appeal doesn’t stop at aesthetics; satin finishes are known for their durability and ease of maintenance. They are forgiving with cleaning, making them a practical choice for exteriors that are exposed to regular environmental elements. 

Semi-Gloss: The Bright spark

Stepping into a more reflective territory, the semi-gloss finish is all about vibrancy. It reflects light more efficiently, making surfaces stand out. If you have specific architectural features or areas like doors and trim that you’d like to highlight, semi-gloss is a good choice. Its bright nature not only amplifies beauty but also offers excellent durability. 

Glossy: The Bold Statement

The glossy finish is the way to go for those unafraid of making a bold statement. It’s the most reflective of the bunch, providing a shiny, mirror-like appearance. Its high sheen is accompanied by impressive durability. However, with great shine comes great responsibility. A glossy finish accentuates imperfections, making preparation even more critical. 

Choosing the right finish for your home is about understanding its characteristics and aligning them with your home’s needs and desired aesthetic. Then, with this knowledge in hand, you are well-equipped to make informed decisions. These choices will beautify your home and ensure it remains charming for years to come. 

Insider tips for the best paint selection

A beautiful paint job

1. The foundation of painting: Surface preparation

Before diving right in, it’s essential to address the surface that will be painted. A clean, smooth surface can make a world of difference. If there are cracks, fill them in. If there’s old, peeling paint, give the surface a good scrape. And always remember to clean the walls from dust and dirt. 

2. Tune into yor home's needs

Every home is unique, and so are its needs. For instance, a house in a dun-drenched area might benefit from paint with UV protection. Similarly, homes in wetter climates might need paint with mold resistance. By understanding your home’s specific challenges, you can choose paint that beautifies and protects. 

3. The magic of test patches

It’s tempting to pick a color from a swatch and imagine it’ll look exactly the same on a large exterior wall. But, light shadows and surrounding elements can change how a color appears. So, a smart trick is to paint a small test patch on the wall. You can then observe it during different times of the day. This way, you ensure the color looks great under all conditions before committing and painting your entire exterior that color. 

4. Quality over Quantity

It might be tempting to save a few dollars by opting for cheaper paint, but this might cost more in the long run. Higher-quality paints often mean better coverage, longevity, and resistance to the elements. It’s an investment in ensuring your home looks fabulous for extended periods. 

5. Seek expert advice

Lastly, don’t underestimate the value of professional advice. Local paint stores or a local painting company often have experts who understand the unique challenges of your region. They can provide invaluable recommendations tailored to your specific needs. 

Wrapping it up: A painter's parting words

In the world of painting, knowledge truly is power. The proper preparation, paired with a good understanding of your home’s needs, paves the way for a paint job that is not only beautiful but stands the test of time. Remember, it’s not just about color but about making choices that add value, protection, and beauty to your home. With the insights provided, your home’s next coat of paint is sure to be its best yet. 

Ladder safety infographic made by Custom Exteriors

Ladder Safety In Exterior Maintenance

Ladder safety infographic made by Custom Exteriors

Ladder Safety In Exterior Maintenance

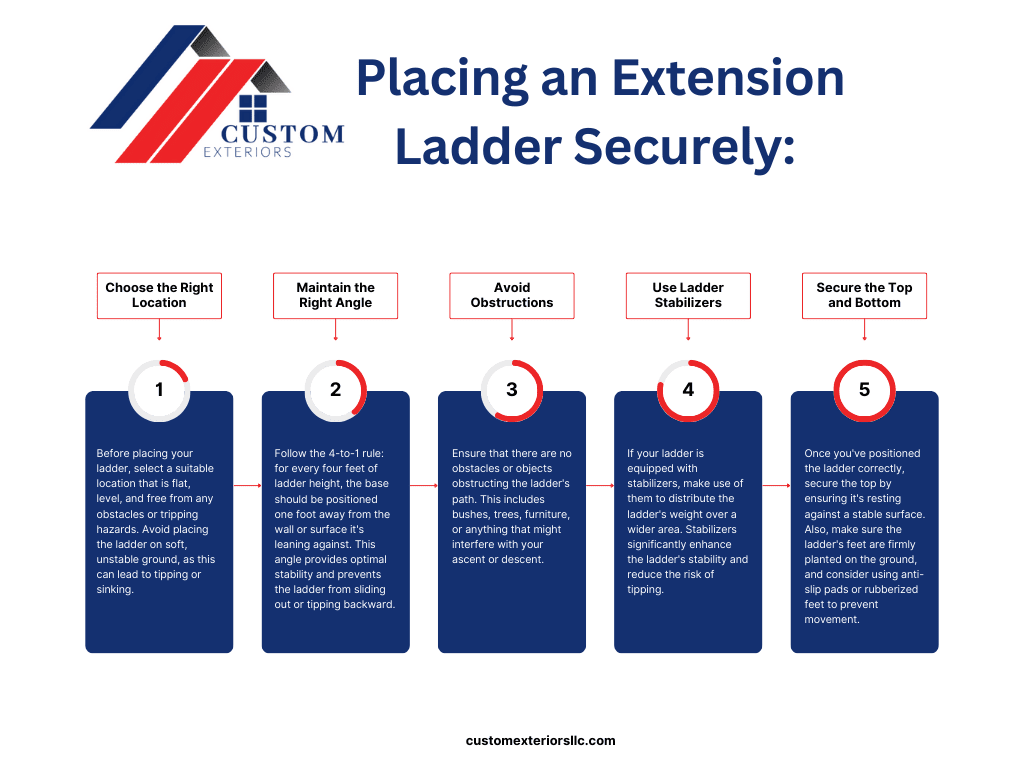
We understand that exterior home maintenance tasks can sometimes take you to greater heights – quite literally. Whether you’re tackling roof repairs, cleaning gutters, or painting that hard-to-reach trim, using a ladder is often a necessary part of the process. However, as much as we prioritize the beauty and value of your home, we prioritize your safety even more.

In this article, we’ll be your guides through the vital aspects of ladder safety in exterior home maintenance. From selecting the perfect ladder for the job to ensuring you’re equipped with the knowledge to inspect, place, and use it correctly, we’ve got you covered. We’ll take you step by step through the essentials, including optional safety equipment and the importance of being aware of your surroundings.

What we will cover: 

At Custom Exteriors, we believe that a beautiful home starts with a safe home. Let’s discuss the ins and outs of ladder safety to make sure you’re equipped with the knowledge and confidence to tackle your exterior home maintenance tasks with peace of mind. 

"More than 22,000 people across the U.S. are injured while using ladders each year. Approximately 65% of those ladder fatalities came from moveable ladders."   ~U.S. Bureau of Labor Statistics

Selecting the Appropriate Ladder for Maintenance at heights: Making Safety a Priority

The importance of ladder selection cannot be overstated when tackling tasks that require the use of a ladder, like accessing your roof for inspection or cleaning your gutters. The right ladder improves your efficiency and keeps you safe throughout the process. So, how exactly do you choose the right ladder for roof access and gutter cleaning?

Ladders come in various types, each designed for specific purposes. An extension ladder is a go-to choice for roof access and gutter cleaning due to its versatile design and adjustability. Extension ladders are designed to extend and retract, allowing you to reach different heights easily. Extension ladders are duty-rated from light duty to extra heavy duty. They are generally built with either two or three sections that are able to extend and increase the length of the ladder. These sections are called “Fly Sections.”

Factors to consider when choosing an extension ladder for roof maintenance

Factors to Consider When Choosing an Extension Ladder

Height and weight matters

One crucial factor is selecting an extension ladder of the appropriate height. The ladder should be tall enough to comfortably reach the roof or gutter area without requiring you to overextend yourself. Overreaching on a ladder can lead to instability and an increased risk of falling. The ladder should extend past the roof approximately three feet rather than right at the roof line

It’s important to make sure the ladder you choose can support your body weight and any additional weight from the tools and equipment you’ll be carrying. Extension ladders typically come with a working load capacity rating. Select a ladder that exceeds your combined weight and the weight of your tools. Remember that roof and gutter maintenance can require heavy tools and high-pressure water when choosing the ladder for your home. 


Material Choices

Extension ladders are commonly available in aluminum and fiberglass. Aluminum ladders are lightweight and rust-resistant, while fiberglass ladders are non-conductive but generally heavier. Choose the material that best suits your needs and environment. When choosing which material best suits you, consider your personal strength limitations, surrounding hazards (like electrical lines), and the ladder’s intended use. 

A ladder with sturdy construction and solid locks helps protect you while working at heights. Features like swivel feet and rubberized bases provide better stability on different surfaces.


safety and storage

Look for extension ladders with safety features like rung locks, non-slip rungs, and stabilizing mechanisms. These features enhance stability and prevent accidents.

Lastly, consider the portability and storage requirements of the ladder. Extension ladders can be long when fully extended, so ensure adequate storage space. There are models available that compress for storage and transportation, but extended height may be smaller, which may not work for some homeowners. 

Selecting the appropriate ladder is the foundation for successful and safe roof access and gutter cleaning. A ladder that is appropriately sized, capable of supporting your weight and equipment, and equipped with necessary safety features will significantly reduce the risks associated with working at heights. Remember, choosing the right ladder is an investment in your safety and peace of mind. Prioritize safety and ensure that each time you use the ladder, you can apply some simple steps to help increase your safety level while working at heights. .


Inspecting an extension Ladder

Before you start any exterior home maintenance project, establishing a rock-solid ladder safety foundation is crucial. This step involves two critical aspects: performing a thorough ladder inspection and mastering the art of securely placing your extension ladder.

Before climbing a ladder, always check the following: 

Inspections lead to safe repairs


When it comes to ladder inspection, start by checking the ladder’s structural integrity. Examine its rails, rungs, and joints for any signs of rust, cracks, or damage. Ensuring that the rung locks and spreaders are functioning correctly is important because these components contribute to the ladder’s stability while in use. Don’t overlook the stabilizers and feet – they play a significant role in preventing slippage and wobbling.

At Custom Exteriors, we emphasize the significance of these ladder safety steps. Our goal is to empower you with the knowledge to approach your exterior home maintenance tasks confidently, knowing that you’ve laid the groundwork for a safe and successful experience. 

How to inspect a ladder for safety

Mastering the Art of Placing an Extension Ladder Securely

Infographic made by Custom Exteriors to explain the basics of setting up an extension ladder

At Custom Exteriors, we are passionate about upgrading your exteriors and beautifying your exteriors – we’re equally passionate about your safety. Placing a ladder might seem like a straightforward task, but it’s a critical step that sets the tone for a secure and successful exterior home improvement project

Placing a ladder properly goes beyond simply propping it against a surface. It involves strategic decisions that directly impact your safety while working at heights. Here’s why it matters:

Safety steps to safely place an extension ladder

Climbing with Confidence: Safe Climbing Techniques for Extension Ladders

How to safely climb an extension ladder

When it comes to exterior home maintenance, mastering the art of climbing an extension ladder is essential. At Custom Exteriors, we’re dedicated to enhancing your home’s appearance and ensuring your safety throughout the process. Let’s explore the proper techniques for climbing an extension ladder safely. 

In the previous steps, we learned how to properly place your extension ladder, avoid obstacles, and the best ways to start with a stable foundation. As you can see in the photo above, when setting your ladder, ensure it extends past the roof level by several rungs to ensure safety by being able to exit the ladder onto the roof. 

As you begin climbing, always maintain three points of contact with the ladder – two hands and one foot or two feet and one hand. This balanced approach minimizes the risk of tipping. Keep your face on the ladder at all times. Avoid the temptation to twist or turn your body, as it can lead to instability. Remember to ascend or descend one rung at a time, using deliberate and controlled movements. Rushing can compromise your balance and safety.

As you climb, position your hips between the ladder’s side rails as you climb. This technique helps maintain your center of gravity and enhances stability. Lastly, always keep your body within the ladder’s side rails. Overreaching can cause the ladder to become unbalanced, leading to accidents.

Optional Safety Equipment: increasing the safety of your project

At Custom Exteriors, safety is our top priority, which extends to every aspect of your home improvement journey. By following these safe climbing techniques and considering optional safety equipment, you’re equipping yourself with the tools to tackle exterior tasks confidently. Some optional safety equipment you may consider to enhance your safety while maintaining your home include

Ladder stabilizers provide a broader support base at the top of the ladder, reducing swaying and wobbling. Ladder stabilizers are especially useful when working near corners or edges. 

Standoff arms create a gap between the ladder and the wall, preventing damage to the surface and offering better stability, especially on uneven surfaces. 

Ladder mitts, or cushioned pads, provide extra grip between the ladder and the surface it rests against. They help prevent scratches and improve traction. 

Consider using a safety harness and fall protection equipment for tasks requiring prolonged ladder use. Each homeowner should assess their physical limitations, decide if they can do this maintenance, and follow all appropriate safety measures. 

Surroundings Awareness: Ladder Safety in Exterior Maintenance

When it comes to exterior home maintenance, the safety of your surroundings is as critical as your ladder skills. Let’s explore why being aware of your surroundings while working with a ladder is essential to safety.

Whether you’re cleaning gutters, repainting, or conducting roof repairs, being vigilant about your surroundings is a non-negotiable aspect of safety. We hope this guide has helped make your exterior home maintenance safer. Our goal is to ensure that you’re equipped with the knowledge and tools to create a secure and transformative home improvement journey. Stay tuned as Custom Exteriors provides more expert insights and we continue to explore ways to improve your safety and make your projects both rewarding and risk-free.

Exterior home of residential maintenance by Custom Exteriors

Are Home Maintenance Plans A Smart Investment?

Exterior home of residential maintenance by Custom Exteriors

Every homeowner knows that there are times when homeownership isn’t all it’s cracked up to be. In addition to all the great things about owning your home, homeownership also comes with some hassles. Would you rather watch your favorite football team on a Sunday afternoon or clean your gutters? I suppose it depends on who your local football team is, but regardless, the tasks needed to keep you home in good, working condition aren’t typically the most fun.

This brings to mind a few critical questions. Would having a maintenance plan in place for my home be worth it? Does it make sense for me to do my own maintenance? How hard is exterior maintenance? How do I prepare my home for winter weather? What should be included in an exterior home maintenance plan?

We will answer all of these questions and more. So, let’s take a thorough look at what it takes to maintain your home’s exterior. With this knowledge, you can make an informed decision about whether or not you need an exterior maintenance plan.

In anticipation of that, let’s take a moment to remember that the most important part of exterior maintenance is safety. Many tasks involved in exterior maintenance are at heights, on a ladder, and involve complicated systems. Before attempting any exterior maintenance, ensure you are capable of using a ladder safely, are comfortable at heights, and understand the requirements to keep the systems being inspected in working condition.

What should regular exterior maintenance include?

Depending on your location, the exterior of your home is often exposed to harsh elements, including the hot sun, snow, heavy rains, strong winds, and more. Unfortunately, mother nature can take a real toll on your home. 

With this in mind, what should be regularly inspected and maintained on the exterior of your home? 


Let’s start with your roof—that underappreciated part of your home that protects everything that matters. It stops those “refreshing” showers in their tracks and takes an occasional beating from large hail or strong winds. As such, it is imperative that a thorough roof inspection be completed bi-annually, looking for missing or damaged shingles, cracked caulking, and other signs of damage.

Your windows, siding, and paint are as important as the roof. They are also part of the first round of protection on your home. More than this, they are everyone’s first impression of your home. Unfortunately, due to constant exposure to the elements, they tend to collect dirt, develop cracks, or become damaged. 

Lastly, an often overlooked piece of home maintenance is your gutters. While you are much more likely to notice damage to your siding or peeling paint if your gutters are not maintained, they can cause real damage, including mold, wood rot, and foundation issues. 

So, with the components of exterior maintenance identified, let’s take a brief look at what kind of maintenance each system requires, hazards to be aware of, and if exterior maintenance is something you can do yourself! 

What maintenance does a roof require?

Exterior roof maintenance by Custom Exteriors

Your roof is your first line of defense against whatever Mother Nature brings its way. Your roof makes up a large portion of the first impression of your home as well. With such an important task, let’s look at what maintenance means for your asphalt shingle roof. When conducting a roof inspection, the main points that should be assessed for damage include: 

"A roof maintenance program can save up to 50 percent over the life of a 30-year roof compared to replacing it every 15-20 years."    ~   Roofingcontractor.com

Does Roof Maintenance Help Save Money?

Maintaining a roof bi-annually is essential to keeping this important system in good condition. Regular maintenance prevents minor issues like cracked caulking or a damaged shingle from turning into significant issues. Even a minor roof issue can cause interior water damage, mold, or wood rot. Additionally, regular maintenance helps homeowners save up to 50% over the life of their roof by maintaining and extending its life rather than replacing it every 15 to 20 years.

The first step in maintaining this essential system is performing visual inspections at least bi-annually. This inspection is imperative as it helps identify any signs of possible damage. Cracked shingles or shingles damaged by hail may only be noticeable during this inspection. During the inspection, shingles should be assessed for any signs of curling, blistering, cracked or missing shingles, or debris covering the roof. This is also a great opportunity to inspect flashings, vents, skylights, caulking, and any siding or trim above the roofline.

Another imperative system to address during regular inspections is your gutter system. Your gutters should be inspected and cleaned at least twice a year. At this time, gutters must be cleared of debris, leaves, and sticks to ensure proper drainage. Additionally, ensure that your gutters are properly sloped and all downspouts are directed away from the foundation to reduce the chances of pooling water around your foundation. 

This is an opportune time to clear the roof of any organic growth or overgrown tree limbs. Look for moss, algae, or mold growth signs and remove them immediately if discovered. This is also a great time to trim any trees or bushes overhanging the roof. By being proactive, you can prevent damage from falling debris during windstorms. 

roof maintenance requirements

Next up, you should complete a thorough inspection of your roof flashings. Roof flashings are the metal edgings around your chimney, vents, and skylights. It is essential to check these flashings for signs of damage or rusting. Properly sealed flashing is crucial for preventing leaks. This is also a great time to inspect the caulking around vents, pipes, and other roof penetrations. Cracked and damaged caulking is a common source of roof leaks. 

Lastly, a quick visual inspection of the attic to look for signs of water staining, condensation, mold, or mildew. Improper attic ventilation can create serious problems with mold, mildew, and spongy roof decking and even cause your HVAC system to work hard, resulting in a shorter lifespan for your HVAC components. In the end, you should inspect every component of your roof prior to each severe weather season. 

Why is gutter maintenance important?

Are your gutters draining properly? Are they causing pooling water along your home’s foundation? These are essential questions that should be revisited regularly to prevent what could be catastrophic damage to your home. 

Gutters protect your home’s foundation and exterior walls by channeling rainwater away from the structure. But here’s the twist: when gutters get clogged with leaves, twigs, and debris, they can cause major problems! Regular gutter maintenance is essential to ensure proper water flow and prevent clogs. By clearing debris and checking for any signs of damage or blockages, homeowners can maintain the efficiency of their gutter system and safeguard their property from costly water-related problems. Keeping gutters in optimal condition is a wise investment in your home’s long-term health and integrity. Because of this, gutter maintenance is the unsung hero behind a dry, happy home. 

It is just as important to regularly ensure that your gutter system is adequately sloped and that downspouts have an adequate distance from the home’s foundation for drainage. These simple check-ins can prevent mildew or mold growth, damage to your foundation, and interior water leaks. 

As an exterior contractor, we run into issues caused by improper gutter maintenance from time to time. We have seen interior water damage, mold, and even cracking concrete and structural issues. Gutter maintenance is one of the most important parts of keeping your home in top shape. 

Lack of gutter maintenance creating mold issues discovered by Custom Exteriors during a siding replacement

Windows, Siding, And Paint

Maintaining the windows, siding, and exterior paint of your home is crucial to preserving its beauty, structural integrity, and overall value. These exterior elements are essential for the visual appeal of your home and serve as protective barriers against the elements. Regular maintenance ensures they can perform their functions effectively, providing comfort and security for you and your family. Here’s why investing time and effort into window, siding, and paint maintenance is a wise decision:

exterior maintenance

One significant benefit of proper maintenance is enhancing your home’s curb appeal. A well-kept, updated exterior creates a positive first impression and increases the overall value of your property. It makes your home stand out in the neighborhood and even more appealing to potential buyers if you ever decide to sell.

Moreover, your home’s exterior faces constant exposure to harsh weather conditions, UV rays, rain, snow, and wind. Routine maintenance helps protect windows, siding, and paint from deterioration. By catching problems quickly, you prevent water intrusion, rot, mold growth, and fading due to sun exposure. 

Additionally, maintenance contributes to the comfort and well-being of your family. When you maintain quality windows and siding, you help prevent drafts and air leaks, creating a cozy living environment. Properly maintained paint prevents moisture from seeping into walls and ceilings, preserving indoor air quality and safeguarding against potential health hazards like mold growth.

Taking care of your home’s exterior also ensures the longevity of materials. Let’s be honest: exterior repairs are not cheap. Regular inspections and touch-ups help extend the lifespan of windows, siding, and paint, maximizing your investment. By preserving the structural integrity of these elements, you can avoid premature replacements and save money in the long run.

Addressing maintenance proactively ensures you can take pride in your home without constant worries about exterior damage. Regularly scheduled maintenance means knowing your home is well-protected and taken care of. That kind of peace of mind is hard to beat.

Are Exterior Maintenance Plans Worth It?

Exterior maintenance is undeniably mandatory for homeowners. Protecting your investment and ensuring the longevity of your property requires regular care and attention to critical components like the roof, siding, windows, gutters, and paint. But the question remains: are maintenance plans worth it for everyone?

The answer lies in understanding your individual needs, abilities, and preferences. Here are some factors to consider when deciding whether a maintenance plan is the right choice for you:

While exterior maintenance is essential for all homeowners, determining if a maintenance plan is worth it depends on your unique circumstances. Assessing factors like time availability, expertise, budget, approach to maintenance, and long-term investment goals can guide you in making an informed decision. Whether you choose a maintenance plan or DIY care, the ultimate goal remains the same: ensuring your home stays in optimal condition, reflecting your pride of ownership for years to come.

Custom Exteriors offers cost-effective exterior maintenance solutions to Colorado and Wyoming residents seeking professional services for their exterior maintenance needs. You can learn more about this service by contacting Custom Exteriors

Roof replacement by Custom that was covered by an insurance claim

Roof Replacement Insurance Estimate

Roof replacement by Custom that was covered by an insurance claim

Navigating Roof Replacement and Insurance Claims

Your home has just been damaged by severe weather. In most cases, this will likely mean navigating not just a roof replacement but also an insurance claim. If you are in this situation and feeling a little overwhelmed, you are not alone. Because most Colorado residents will experience a severe weather event in their lifetime, understanding this process is important whether you’re a homeowner, a business owner, or a property manager. Unfortunately, identifying roof damage, documenting it, and navigating your insurance claim is often difficult. With decades of experience in the industry and a team of insurance specialists, we plan to simplify the insurance-backed roof replacement process. Having an understanding of this process is essential for making informed decisions.

Roof replacement alone, an essential aspect of property maintenance, can be an intimidating task. This becomes even more of an issue when combined with the hassles of an insurance claim. Homeowners need to know their insurance policy specifics, the extent of damage, and the world of roofing materials and labor costs. Navigating this process is much less stressful with understanding insurance terminology, documentation requirements, and inspection procedures. This can easily overwhelm even the most seasoned property owner.

Why is it important to understand this process? In short, it empowers you. Knowledge of insurance-covered roof replacements lets you communicate effectively with insurance adjusters and roofing contractors. It also allows for a better understanding of policy specifics. It also ensures you’re aware of unexpected costs and discrepancies in coverage. This makes the process smoother, and the property owner feels more confident in their decisions. So, let’s gain knowledge that empowers you to protect your property and investment with knowledge and clarity.

How Insurance Timelines Shape Your Roof Replacement

What is considered a "Timely Manner"?

When it comes to protecting your property, time is of the essence. Insurance providers operate under the principle that prompt action leads to protection. Homeowners should make a practice of reporting damage within specific timelines. This will ensure your insurance coverage remains intact. It is a best practice to inspect for damage after any severe weather event. 

Most insurance companies operate on a timeline that allows a year as the window for reporting damage from your date of loss. This timeline plays an important role in determining your coverage. If you surpass this one-year mark, the likelihood of your insurance company covering the damages declines considerably. At this point, the door to coverage starts to close. This highlights the importance of acting quickly.

Why insurance companies care when you file your roof replacement claim

There are several reasons why insurance companies impose this requirement, including:

Unveiling three vital steps for significant impact

When it comes to insurance-covered roof replacements, a lot of planning and strategic actions can make all the difference in securing complete coverage. This section discusses the three steps required for a successful insurance-covered roof replacement based on our experience. Each of these steps, though seemingly small, has the potential to impact your project’s outcome significantly.

Step 1: Document the Damage

Before starting any roofing project, documenting the extent of the damage is the first step. Armed with your smartphone or camera, either you or your roofing contractor should photograph the affected areas from multiple angles. Visual documentation is a powerful tool for showing the actual damage to both your insurance company and potential roofing contractors. These images are clear evidence of the state of your roof prior to repairs, strengthening your position in the claims process.

Documenting Hail damage roof repair

Step 2: Contact your insurance provider

Once you’ve documented the damage, your next move is to get in touch with your insurance provider promptly. Initiate the claims process by submitting the information you’ve gathered. Provide a detailed account of the damage, accompanied by the images you’ve captured. Your proactive approach to reporting the damage can accelerate the claims process and create a smoother experience.

Step 3: Choose a reputable roofer

Selecting the right roofing professional can significantly impact the quality of your replacement project. Look for a reputable roofer with a track record of excellence and integrity. A skilled roofing contractor will not only provide an accurate idea of the condition of your roof, but will also provide a clear and concise estimate. They should also be able to negotiate effectively with your insurance company. Their expertise ensures that the repairs align with industry standards and codes and your insurance coverage, minimizing the potential for discrepancies.

By following these three steps—documenting damage, contacting your insurance provider, and selecting a reputable roofer—you’re setting yourself up for a successful insurance-covered roof replacement. Remember, it’s the thoughtful attention to detail and strategic actions that pave the way for a seamlessly executed project that maximizes both your coverage and peace of mind.

your key to Preventing future property damage

It’s a fact that your roof and its components protect your home. When you see small problems with it, those are signals you should pay attention to. If you take action when you see these signals, you can often stop bigger issues from happening. But if you ignore these signals, even if they seem small, it can lead to more serious problems. 

Issues that may arise when roof repairs are left unchecked

Taking care of roof damage immediately is crucial for your home’s safety, comfort, and how long it lasts. Even minor issues can become big headaches if you don’t fix them. For instance, a tiny leak can become a huge water problem that harms your home’s structure and causes mold, which can be expensive to fix.

The longer you wait, the more you’ll probably have to pay. Remember that your insurance company has a deadline for reporting damages if you want to get your roof repaired or replaced through your insurance. So, acting quickly saves you money and keeps things smooth with your insurance.

Issues that may arise when roof repairs are left unchecked

Fixing roof problems isn’t just about making things better now. It’s also about ensuring your property stays good in the long run. When you fix minor issues, you prevent more significant problems from showing up. So, even if it’s just a tiny crack or a leak, repairing it early can help your property stay strong and not have problems later.

In the end, paying attention to roof problems is like getting a heads-up. It’s a way to ensure your property stays in good shape and has no unexpected troubles. So, let’s learn more about how to take care of our properties and keep them safe for the future.

replacement cost value = Actual Cash Value + Depreciation

1. actual cash value

Actual cash value, or ACV, is a method insurance companies use to determine the value of an item damaged or lost in an insurance claim. 

The actual cash value of an item is determined by considering its original purchase price, age, condition at the time of the loss or damage, and the current market value of similar items. Depreciation is taken into account because most items lose value over time due to wear and tear, obsolescence, or other factors. 

It is important to note that insuring your property for its ACV only may result in a lower insurance premium, but it also means that you may receive less money in the event of a claim. With an ACV policy, you will be responsible for the difference between the determined actual cash value of your damage and the cost to restore it to pre-damage conditions. 

2. depreciation

Depreciation is the reduction in the value of an item over time due to factors such as wear and tear, obsolescence, and aging. It is an essential concept in insurance because it affects the amount of money you can receive from an insurance claim. 

When an item is insured, the insurance company may consider depreciation when determining value. Depreciation can be calculated in different ways depending on the type of item being insured. 

It’s essential to understand how depreciation works when purchasing insurance and filing a claim, as it can affect the amount of money you receive from the insurance company. If you have any questions about how depreciation is calculated, you should talk to your insurance agent or read your insurance policy carefully to understand the terms and conditions. 

2. replacement cost value

Replacement cost value, or RCV, is the amount of money it would take to replace an item with a new one of similar quality and functionality. It determines the maximum amount of money you can receive from an insurance claim. 

When you purchase insurance, you may be asked to choose between insuring your property for its replacement cost or its actual cash value. If you choose to insure your property for its replacement cost, the insurance company will pay you the total cost of replacing the item with a new one, regardless of age or depreciation. 

It’s important to note that insuring your property for its replacement cost may result in a higher insurance premium, but it also means that you can receive more money in the event of a claim. Reviewing your policy carefully is essential to understand any limits or exclusions. 

roof replacement insurance payment timeline

In this section, we discuss key terms that play a vital role in understanding your coverage: deductibles, Actual Cash Value (ACV) payment, and Replacement Cost Value (RCV) payment. Whether you’re a homeowner or a business owner, these terms hold the key to making informed decisions when it comes to your roof replacement project.

Your Deductible

Think of a deductible as your initial contribution towards a covered insurance claim. It’s the amount you agree to pay out of your own pocket before your insurance company steps in. When it comes to roof replacements, your deductible is subtracted from the total cost of the repairs or replacement. Choosing a deductible that suits your financial situation is important, as it affects your insurance premium and the amount you’ll need to cover before your insurance kicks in.

ACV Payment

Actual Cash Value (ACV) is how insurance companies calculate the value of what you’re claiming for. They consider factors like the original purchase price, the item’s age, its condition at damage time, and current market values. ACV takes into account depreciation. This means items lose value over time due to wear and tear or other factors. If you have an ACV policy for your roof replacement, keep in mind that you might receive less money in case of damage, as you’ll be compensated for the current value of your roof, factoring in depreciation. When you receive and ACV check, it will be for the depreciated value of your damages. If you have an RCV policy, you will later receive the final payment after repairs are completed. 

RCV Payment

Replacement Cost Value (RCV) payment provides a more comprehensive coverage option. With RCV, your insurance company covers the cost of replacing your damaged roof with a new one of a similar kind and quality without considering depreciation. This means you’re more likely to receive a higher payout that can better match the cost of restoring your property to its pre-damage state. While RCV insurance might come with higher premiums, it can be a reassuring choice for those seeking more complete coverage. 

If you have an RCV policy, once all the repairs are complete, you will receive a final check. This will be for the remaining amount held back when the roof was depreciated. Once repairs are complete, you should be reimbursed for all costs except your deductible. 

In conclusion, as you embark on your insurance-covered roof replacement journey, remember that understanding deductibles, ACV, and RCV payments is vital. By grasping these concepts, you’re equipping yourself to confidently navigate the claims process and ensure that your property’s protection aligns with your needs and financial situation. Feel empowered to make decisions safeguarding your investment while keeping you prepared for any unexpected twists.

insurance summary for northern colorado roof replacement

The front page of your insurance claim,
where everything you need to know is

The front page of your insurance policy contains critical information that you should review and keep handy in case you need to file a claim. This information includes your policy and claim numbers, when the damage was sustained, and all the necessary details for your insurance adjuster. 

When you file a claim, your insurance company will use the information on the front page of your policy to process your claim quickly and efficiently. Your policy number and claim number are unique identifiers that help your insurance company access your policy and claim information promptly.

In addition to your policy and claim numbers, the front page of your policy should also include the date of loss, which is the date when the damage occurred. This information is critical because it helps insurance companies understand the timeline of events leading to your claim.

The front page of your policy should also include information about your adjuster, such as their name, contact information, and the inspection date. This helps you stay informed on your claim and lets you contact your adjuster if you have any questions or concerns. 

In summary, the information on the front page of your insurance summary is critical in a claim. By reviewing and keeping this information handy, you can help ensure that your claim is processed quickly and efficiently and that you receive the compensation you are entitled to. 

insurance summary for roof replacement

The repair pages,
where you talk numbers

The page or pages of a roof replacement estimate that discusses the amounts and what will be replaced are typically called the scope of work or the line item estimate. This page will list all of the individual items that will be replaced or repaired during the roof replacement, along with the cost for each item. 

The scope of work will typically include a detailed breakdown of all the materials that will be used in the replacement, such as shingles, underlayment, flashing, and other necessary components. Each material will be listed with the corresponding quantity and cost so you can see exactly what is being used and how much it will cost. 

In addition to the materials, the scope of work will include the cost of labor and any additional services, such as debris removal and disposal. Each service will be listed with the corresponding price, showing how much labor and services will cost. 

It’s important to review the scope of work carefully to ensure that all of the necessary repairs and replacements are included and that the costs are reasonable and in line with industry standards. If you have any questions or concerns about the scope of work, it’s always a good idea to discuss them with your contractor or insurance adjuster to ensure that fully understand the estimate and what you will be paying for. 

roof replacement insurance summary

where your deductible comes into the equation

In this estimate, depreciation was not taken. However, you can see the line item for the depreciation deduction if it were to be taken. Your deductible and how it affects this process should have been noted on the repair page. 

Every insurance policy has a deductible. Your deductible is a predetermined amount of money a property owner is responsible for if they file an insurance claim. Your insurance company covers any expense over that deductible amount.

When payment is made on your insurance claim, it will work like this. Your initial ACV payment will be made “less the deductible.” Once the ACV is determined, payment is made in the total ACV amount minus your deductible (typically from $500 to $2500), as that is the portion of the claim you are responsible for. 

Often, this is where the claim could be more straightforward for property owners. When they see the term “less deductible,” they think their deductible has already been accounted for. That is not correct. The deductible is part of the estimate as a whole. So, your ACV + your deductible check + depreciation check = replacement cost value. The insurance company owes everything above and beyond the deductible amount. So, the property owner pays $500 or $1000 (or whatever their deductible is), and the insurance company covers all repair costs above that amount. 

Example 1:

A rcv policy with a $1000 deductible

Most homeowners have RCV policies where their insurance company will pay for the total of repairs minus their deductible. 

Let’s say a homeowner suffered roof damage during a hail storm. They have a $1000 deductible. Their asphalt shingle roof had standard architectural shingles, which have an average lifespan of 30 years; however, they were ten years old. Upon inspection, the roof needs to be replaced, and the cost to replace the roof will be $15,000. 

Since the roof is ten years old, approximately one-third of its useful life has passed. In this case, the roof would be depreciated by 33% or $5000. This means that the current actual cash value or ACV is $10,000. When this is paid to the property owner, they will receive the ACV payment in full less the deductible. So, when the ACV check is issued to the homeowner, it will be $9000, with the customer contributing their $1000 deductible. The ACV check + the homeowners deductible = the total ACV amount. 

This leaves $5000 of the remaining replacement cost value or RCV remaining. Once the repairs are complete, the depreciation check will be released in the total repair amount. 

The ACV check from the insurance company (less the homeowner’s deductible amount) + homeowners deductible + depreciation check = replacement cost value (total claim amount).

In this example, the homeowner would have received a $9000 ACV check (the total ACV amount – the deductible) and a depreciation check for $5000. To restore this roof to pre-storm conditions, this homeowner is out-of-pocket $1000.

Example 2:

AN Acv policy with a $1000 deductible

Occasionally, property owners have an ACV policy only. Sometimes, this is in an attempt to save money, but sometimes it comes from needing a clearer understanding of what an ACV policy means. 

The same homeowner suffered roof damage during a hail storm, but they have an ACV policy this time. They have a $1000 deductible. They have a standard architectural shingle roof with an average lifespan of 30 years. However, they were ten years old. Upon inspection, the roof needs to be replaced, and the cost to replace the roof will be $15,000. 

Since the roof is ten years old, approximately one-third of its useful life has passed. In this case, the roof would be depreciated by 33% or $5000. This means that the current actual cash value or ACV is $10,000. When this is paid to the property owner, they will receive the ACV payment in full minus the deductible. So, when the ACV check is issued to the homeowner, it will be $9000, with the customer contributing their $1000 deductible. The ACV check + the homeowners deductible = the total ACV amount. 

This is where things start to change. It still leaves $5000 of the replacement cost value or RCV. However, because this homeowner has an ACV policy only, They will not receive any additional insurance payments. 

In this case, the homeowner would receive a $9000 ACV check ($10,000 ACV amount – deductible), and the remaining costs would be due from the homeowner. In this case, the property owner would be out-of-pocket $6000 to restore their roof to pre-storm conditions. 

MULTI-FAMILY ROOF INSPECTIONS

The Roof Replacement Estimate Process

Understanding the roof replacement estimate process

your insurance covered roof claim starts at inspection

With decades in the roofing industry, our roofing experts came together to demystify the process of insurance-covered roof replacements. 

In the first part of our three-part series, we covered what to expect during the inspection process at your property. This includes expectations such as: 

When property owners have the necessary knowledge to establish realistic expectations, the process of roof inspection and its subsequent steps becomes easier to navigate.

It is crucial to understand that the procedure for a storm-related property inspection can differ based on the unique circumstances of the storm and the property involved. Nevertheless, most roof inspections should adhere to the same fundamental principles.

COMMERCIAL ROOF INSPECTION
local roof inspection
What to expect during a roof inspection

why are
roof replacement estimates
confusing & complicated ?

Technical Jargon

Roofing professionals may use technical terms that are ufamiliar to the average person. This can make it difficult to understand exactly what work is being proposed and what materials will be used

Variability In Pricing

Roofing estimates can vary widely in price depending on several factors, such as the size or shape of the roof, type of materials used, and the complexity of the work, which can make comparison difficult.

Complicated Systems

Depending on the type of roof, the estimate may be more complex or harder to understand. For example, flat roof replacements require different materials and techniques than standard roofs.

Unexpected Costs

Some roofing estimates may not include all the costs associated with the work. Some items such as permits, disposal fees, or code upgrades won't have pricing before work begins.

are you working with a reputable, local roofing contractor?

Sometimes your roof replacement estimate is confusing on purpose.

Shhhhh, it's a secret.

Imagine completing the process of inspecting your roof, only to receive an estimate for roof replacement that provides a single dollar amount with no further details. Unfortunately, some roofing companies offer estimates to customers that lack transparency and fail to clarify what exactly is included in the given number.

If a roofing company presents you with a “total only” estimate, it’s a clear sign that it’s time to seek out a trustworthy roofing contractor elsewhere. Unethical roofing companies employ various tactics to confuse homeowners with their estimates, deliberately leaving out essential information about the services and materials involved, as well as their respective prices. This approach is often used to sneak in additional charges for services that may not have been rendered or to camouflage exorbitant pricing for a particular service or product.

What's Covered?

Another problem with total-only estimates is the ambiguity they create regarding the repairs carried out on your property. When the initial repairs are not clearly outlined, it can complicate future warranty claims due to the absence of documented details for each completed item.

Ideally, you should collaborate with a trusted local roofing contractor who can offer a transparent scope of work, upfront pricing, and warranty terms that are easy to comprehend. This way, you can ensure that you have a comprehensive understanding of the repairs conducted, and you’ll have the necessary documentation to support any future warranty claims.

What's Wrong With This Picture?

why you don't want to work with a roofing company that provides "Total Only" estimates

When completing repairs on your property, it is essential to understand how much you will be paying and what you are paying for. Choosing a roofing company that doesn’t itemize its estimates or provides total-only estimates can lead to a lack of transparency in the project’s scope and cost. 

Without an itemized estimate, you may not be able to see the cost breakdown of materials, labor, and other expenses. This lack of clarity can make it challenging to understand whether you are getting a fair job price. 

Additionally, an itemized estimate can help you identify potential cost-saving measures or alternative materials that could bring the project’s overall cost down. Without this information, you may pay more than you need to. 

Most importantly, some unscrupulous roofing companies use the unitemized estimate to pad their estimate and inflate pricing. You may end up being charged for labor or material that was not used on your job. 

In summary, it is crucial to work with a contractor who provides a detailed, itemized estimate for a roof replacement to ensure transparency and to make informed decisions about the project’s scope and cost. 


line item estimate_Redacted.pdf

What a roof replacement estimate should look like

roof estimate

a Clear vision of your roof replacement project

A properly done roof replacement estimate should be comprehensive and provide all the necessary information about the project. It should be transparent, detailed, and easy to understand. By providing all the necessary information upfront, the estimate will help you make an informed decision about the project and ensure the work is completed to your satisfaction. Some key elements that a well-done roof replacement estimate should include are:

If you are in need of a roof replacement, it is essential to get an accurate and comprehensive estimate for the project. Occasionally, the damage is discovered after the old roofing materials are removed. In a situation like this, or one where the local building codes require upgrades to pass final roof inspection, these costs should be brought to the attention of the property owner prior to the project getting underway. Informing property owners at the time of the estimate, that code upgrades or space/damaged decking could cause the price of the estimate to increase if discovered when roofing materials are removed, allows them to set realistic expectations for the possible costs associated with the roof replacement. 

Additionally, prices for permits will be determined at the time the permit is pulled and is generally added to the estimate once the amount is known. If your roof is an insurance claim, your insurance company may cover the costs of code upgrades and permitting, depending on your insurance coverage. 

Roof replacement estimate abbreviations:

Saving space, one letter at a time

The unit portion of a roof replacement estimate pertains to the specific measurement or quantity of roofing materials or components required to complete the project. Typically, the estimate specifies this as a distinct amount or measurement, such as the number of squares of roofing material or the linear footage of a flashing.

Breaking down the estimate into specific units allows the roofing contractor to provide a more precise assessment of the materials needed and the associated costs. This breakdown helps property owners grasp the scope and expenses of the project more effectively.

For instance, when estimating the cost of a new roof, a roofing contractor may provide a detailed breakdown of the required materials and their corresponding units. This could include the number of shingle squares, linear footage of drip edge, quantity of vents, and sheets of roofing underlayment.

To save space, these measurements are often abbreviated. Some common abbreviations you might encounter in a roof replacement estimate include:

  • SQ: Square, which is the unit used to measure the area of your roof.
  • LF: Linear Foot, a measurement in a straight line.
  • SF: Square Foot, equivalent to a square with one-foot sides.
  • BD: Bundle of Shingles, where the number of shingles in each bundle may vary.
  • LFV: Linear Foot of the Valley, measuring the length of the roof valley.
  • BX: Box, as many roof replacement supplies are sold in boxes.

You may also come across other abbreviations in your estimates, such as OSB (Oriented Strand Board) or IWS (Ice and Water Shield). It is crucial for a reputable local roofing company to provide property owners with the necessary knowledge to understand their property repairs thoroughly.

understanding roofing terminology

insurance covered
roof estimates

While we have covered the basics of the roof replacement estimate process, how does that process change if your roof is covered by insurance? That’s up next. 

Next up
understanding your insurance estimate