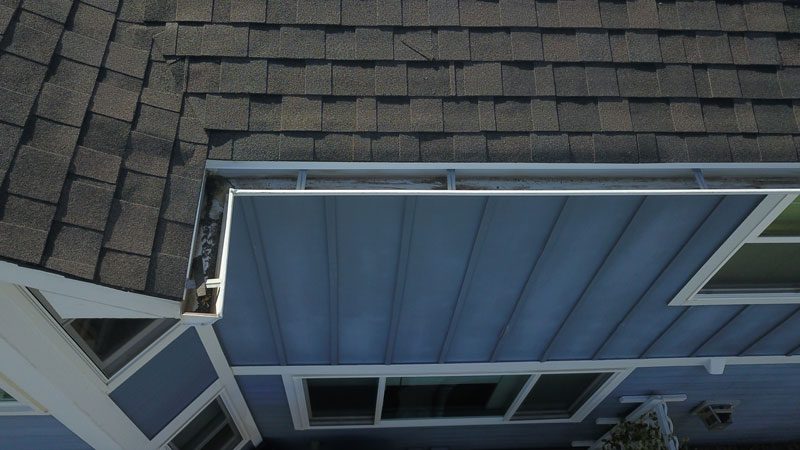
Hail damage discovered by Custom Exteriors during an inspection of a hail damaged roof in Northern Colorado

Hail Damage Roof Repair Tips from an Expert Hail Damage Roofing Contractor

Hail damage to roof discovered during roof inspection in Northern Colorado by hail damage roofing contractor, Custom Exteriors

Tips from a hail damage roofing contractor: Ensuring Effective hail damage roof repair

As a Colorado native and a roofing company, we know all too well that hail damage in Colorado can be severe. Most in the roofing industry remember the hail storm that hit Jefferson County in May of 2017, causing $2.3 billion in property damage in Jefferson County alone. I remember it vividly. We were beginning to grow the company we had opened in 2015. My husband left to visit Cuba for a birthday and figured early May would be a safe time to go without the risk of major hail. Wrong. On May 8, 2017, the Denver Metro area was pummeled with baseball-sized hail, becoming the most damaging storm in Colorado, forcing the closure of the Colorado Mills Mall for months. It is also the second-most expensive hail storm in U.S. history. Long story long, we were swamped and overwhelmed, and the head of our roofing department was in Cuba. 

While this was one of the most stressful times in my recent work history, I often consider how people’s homes were destroyed with broken windows, exterior damage everywhere, and interior water damage. Some homes and businesses even became uninhabitable. That storm taught us the importance of customer service and communication when dealing with hail damage roof repair and the time-consuming process of restoring homes and businesses to their pre-storm condition. Since that year, we have made changes to our systems and staffing to ensure that, as a hail damage roofing contractor, we are not adding to the stress these homeowners are already experiencing. 

Colorado’s frequent hailstorms, often accompanied by high winds, can cause significant damage to your roof, siding, windows, and gutters. We fully understand the financial impact of hail damage on Northern Colorado homeowners because we have experienced it personally. In 2023 alone, hailstorms caused approximately $600 million in damages across Colorado, a good portion of which affected our communities. This underscores the urgent need for homeowners to be prepared for such events.

Over the last few decades, we have seen storms that leave little to no damage. We have also seen storms so severe they often require extensive repairs on multiple exterior systems including your roof, windows, gutters, and siding. This highlights how crucial it is for homeowners to have a roofing and exteriors contractor they can trust – and a solid understanding of the insurance claim process. We’re going to try and provide you with both by the end of this article.

Finding a hail damage roofing contractor

I limped through those days while Mike was in Cuba, and it was extremely stressful. I could have provided better service, looking back. Since then, the Custom Exteriors roofing team has become a leading hail damage roofing contractor across Colorado, implementing strategies based on our experience to help create a stress-free roof replacement. Here are the things you should look for in a contractor if you need to replace your roof due to hail: 

Infographic created by Custom Exteriors about six steps to a successful hail damage roof replacement contractor choice

Verify A Local presence

Anyone who lives along the Front Range in Colorado knows about storm chasers. If you haven’t had a significant hailstorm in your neighborhood yet, storm chasers are roofing contractors who follow severe weather events, such as hailstorms, to solicit business from vulnerable homeowners. While not all storm chasers are unscrupulous, many engage in questionable practices. We have even seen these “contractors” collecting payments from entire neighborhoods and vanishing.

A legitimate, local roofing contractor should have a local office and a permanent business address. Ask for their physical address and verify it. Storm chasers often set up temporary offices or use P.O. boxes, making it hard to track them down later if issues arise. Check if the contractor has a local phone number and a record of operating in your area for several years. Another simple step is checking your local BBB. Most reputable roofing companies will be registered with their local BBB. 

Check Licensing and Insurance

The contractor needs to be properly licensed and insured to work in your city. Most local jurisdictions require licensing through them. To obtain a license, the contractor will typically need to have passed the ICC (International Code Counsel) test on roofing, be able to provide verifiable experience and provide licenses through other jurisdictions. Roofing contractors will also have to provide proof of both workmans compensation and general liability insurance to the city. Despite this, ask for proof of insurance and verify it with the insurance provider. Legitimate contractors will be fine providing this information, while less established and trustworthy contractors might be evasive or provide incomplete documentation.


Look for reviews and references

Reputable contractors will have positive reviews and references from local customers. Check online review platforms like Google, Yelp, and their social platforms. Ask the contractor for references and follow up with past clients to hear about their experiences. If a contractor has multiple negative reviews, this could reflect poor business practices and a lack of customer service. 

Be wary of high-pressure tactics

Because we are a local, licensed, reputable roofing contractor, we don’t need you to sign now! We want you to take your time and be completely comfortable with the scope of work, the associated cost, and our ability to complete your roof replacement successfully. We ask our customers to look at our online reputation and our portfolio of completed jobs. We are confident that this review will show Colorado homeowners that we are the most qualified roofing contractor for their roof replacement. There is no need for high-pressure sales tactics when your local reputation precedes you.  

Door-to-door salespeople often use high-pressure sales tactics, urging you to sign a contract immediately to take advantage of “limited-time” offers or scare tactics about urgent repairs. A reputable contractor will perform tarping if necessary, give you time to make an informed decision, provide a written estimate, and explain the work that needs to be done.

Regarding those “limited-time” offers, Colorado law prohibits roofing contractors from waiving insurance deductibles as a marketing tactic. This means that homeowners must pay their deductible as outlined in their insurance policy, and contractors cannot offer to cover this cost to entice business. This law is intended to prevent fraud and ensure that claims are handled properly and ethically.

Examine the Estimate and contract closely

Additionally, Colorado law requires that contractors provide written contracts detailing the scope of work and costs, ensuring transparency.

Before signing any agreement, carefully review the contract and the estimate. Unscrupulous contractors will often try to provide “total only” estimates. These estimates do not break down services and materials but only give a total amount for your roof replacements. This allows them to add costs never incurred or inflate pricing on services rendered without justification to the homeowner. Your hail damage roof replacement estimate should include detailed information about the scope of work, materials to be used, start and completion dates, payment terms, and warranties. Avoid contractors who ask for large upfront payments or who are vague about their terms.

Check with local authorities

Contact local building authorities or state licensing boards to verify the contractor’s credentials. These organizations can provide information about the contractor’s licensing status, any complaints against them, and their reputation for passing and closing out their permits in the community.

By following these steps, you can protect yourself from storm chasers and inexperienced contractors. A little due diligence can go a long way in safeguarding your home and ensuring that any repairs are done professionally and to your satisfaction.

Most local cities have an online portal for citizens to access licensing and permit information. The City of Greeley does a great job with its Etrakit system. It is easy to use, and with a few clicks, you can verify contractor licenses and permits pulled for your address. 

Filing an insurance claim after hail damage to your roof

Hail damage discovered by Custom Exteriors during an inspection of a hail damaged roof in Northern Colorado

Sometimes, like in the photo above, hail damage to your roof is large enough that you can likely identify the damage from the ground. However, there have been many instances where the roof looked intact from the ground, and upon further inspection, our team identified enough hail damage to justify a hail damage roof claim. Either way, once you and your roofing contractor have identified the need to file a claim for a hail damage roof replacement, the following steps should guide you through the process. 

As a local roofing contractor, we remind our customers that your insurance company has a timeline for claim eligibility. If you wait too long, they won’t cover your damages. This timeframe is often one year from the date of loss. So, if your roof was damaged by a recent hailstorm, filing an insurance claim in a timely manner can help you cover the roof replacement costs. If you miss that window, you may be responsible for your roof replacement cost. 

Assess the damage before filing a claim

The first step after a hailstorm is to inspect your property for damage. Safety comes first, so if the storm is severe, ensure there are no immediate hazards like loose shingles or broken glass. Also, remember that a roof inspection requires properly using a ladder and the ability to work at heights safely. If you have any questions about your abilities, hire a pro. If you complete the inspection, take detailed notes and photographs of all visible damage you can see from the ground. Pay special attention to the roof, but don’t neglect other areas like gutters, siding, windows, and other structures on your property. Most reputable roofing companies offer roof inspections at no cost, so this task is better left to the professionals. They know exactly what is expected during a roof inspection for an insurance claim. They can help negotiate with your insurance to ensure you are compensated adequately to return your home to its pre-storm condition. 

Review Your Insurance Policy

Every season, while completing hail damage roof replacements, we never fail to run into a homeowner who unknowingly has an ACV policy. Because homeowners are sometimes unaware of their actual coverages with more concentration of monthly savings, they end up with a roofing policy that only pays a portion of the replacement. Whatever portion of the roof was depreciated will not be reimbursed upon the completion of the roof replacement like a standard RCV policy would. 

Before filing a claim, it’s crucial to understand what your insurance policy covers. Policies vary significantly; you need to know your coverage limits, deductibles, and any specific exclusions. Many Northern Colorado jurisdictions require code upgrades such as replacing spaced decking or adding drip edge. If you don’t have a code upgrade clause, you may be on the hook for the costs of these upgrades. The City of Fort Collins requires upgrading to Class 4 shingles, making some code upgrades reasonably costly. Understanding what is and isn’t covered before the storm will help set your expectations for the claim process and potential out-of-pocket costs.

Contact Your insurance company

Notify your insurance company about the potential damage as soon as possible. As we discussed, many insurers have specific time frames within which you must report damage to qualify for coverage. Provide them with all the necessary details and documentation you gathered during your initial inspection or from your roofing contractor. 

Schedule inspections: Insurance adjuster and roofing contractor

Your insurance company will likely send an adjuster to inspect the damage. Be present during the inspection to ensure that all damage is noted. This is also an opportunity to ask questions and understand the adjuster’s assessment process. Provide them with any additional information or documentation they might need. We make a practice of meeting the insurance representative on the job to ensure all of the damage we located is included in your claim. 

Your roofing contractor will also complete an inspection that will help with claims process. Here are a few steps you should expect from them:

  1. Inspection and Assessment: A thorough inspection assesses the damage’s extent. Your roofing contractor and insurance representative will document the inspection through photos, videos, and notes. 
  2. Documentation: Detailed documentation, including photographs and notes, is crucial. This helps provide evidence for insurance claims and ensures all damage is accounted for. The photos and documentation will be made available to you for review.   
  3. Temporary Repairs: If the damage is severe and immediate repairs are necessary to prevent further damage, roofers might perform temporary fixes. This could include covering holes with tarps or applying sealant to stop leaks.

Get a roof replacement estimate

Infographic created by Custom Exteriors detailing 5 things you should look for in your hail damage roof replacement estimate

While waiting for the adjuster, getting an estimate from your roofing contractor is wise. These estimates will give you a sense of the repair costs and can be useful in negotiations with your insurance company. Make sure the contractors are experienced in handling insurance claims and can provide photographs and detailed, itemized quotes.

The estimate should be clear and concise, covering each aspect of the project in detail. It is important to remember that in Colorado, it is against the law for a homeowner to profit from an insurance claim. With this in mind, rather than focusing on the cost, focus on the contractor and their ability to complete your roof replacement. Pricing will be negotiated between the insurance company and the roofing company. Your out-of-pocket costs will be the same whether you choose the best contractor in town or the fly-by-night guy from out of state. With this in mind, use the contractor you like the most, not just the cheapest. 

File Your Insurance Claim

With your contractors’ estimates in hand, you can formally file your insurance claim. Submit all required documentation and ensure that your claim form is complete and accurate. Keep copies of everything for your records.

Once your claim is processed, your insurance company will make a settlement offer. Review this offer carefully and ask for input from your roofing contractor for any questions. If it adequately covers the necessary repairs, you can hire a contractor to fix your roof. You can negotiate or appeal the decision if you believe the offer is too low. At Custom Exteriors, we help our customers negotiate with their insurance companies and ensure their home is fully restored when we complete repairs. 

Complete The repairs

After agreeing on a settlement, sign a contract and hire the contractor to do the repairs. Ensure the work is completed to your satisfaction before making the final payment. Keep all receipts and documentation related to the repairs, as you may need them for future reference or additional claims.
Here is what to expect from your roofer during this time:

  1. Total Roof Replacement or Repair: Contractors should be careful not to damage your siding and landscaping during this process, keep open communication about the next steps, and thoroughly clean up the site afterward.
  2. Repair or Replace Damaged Roof Flashings and Gutters: Roofers should also repair or replace damaged flashing and gutters. Flashing around chimneys, vents, and skylights can be particularly vulnerable to hail, and repairing these areas is crucial to prevent leaks.
  3. Passing a Final Inspection: Once repairs are completed, a final inspection by your insurance company and/or city or county municipality ensures that all damage has been addressed and that the roof is in good condition. This also provides an opportunity to make sure the repairs meet both the homeowner’s and insurance company’s standards.

Stay Prepared

Hailstorms are a recurring issue in our area, so staying prepared is essential. Regular maintenance and inspections can help identify potential problems before they become major issues. Additionally, keeping your insurance policy up to date and understanding your coverage will ensure you’re ready for any future incidents.
Filing a roofing insurance claim after hail damage can be a complex process, but having a trusted partner and taking it step by step can help you navigate it successfully. By assessing the damage, understanding your policy, and working closely with your insurance company and Custom Exteriors, you can ensure your home is repaired with good materials and workmanship.

Infographic created by Custom Exteriors to explain the process they use when inspecting a roof

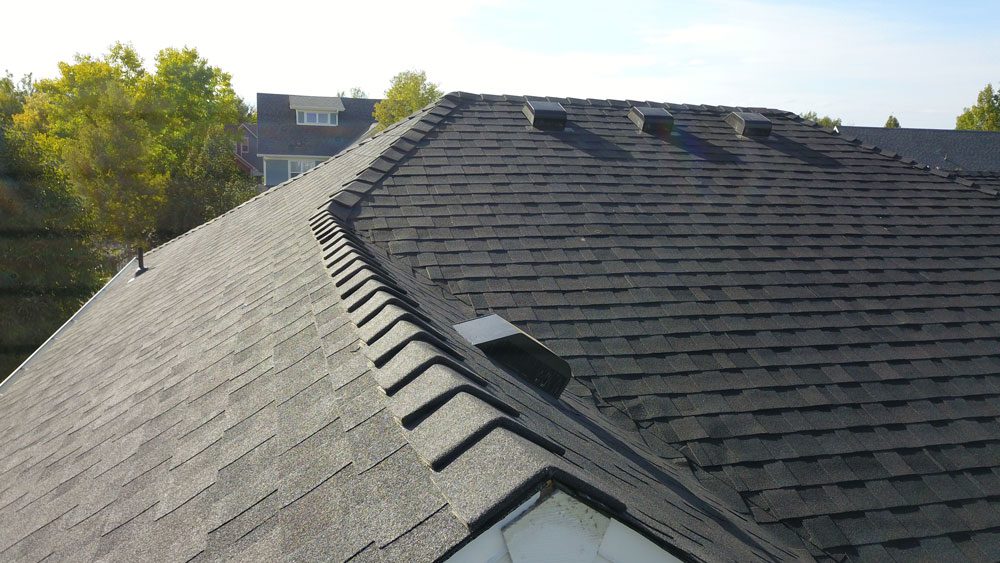
Important Tips For Roof Maintenance

Important tips for roof maintenance

Your roof is one of the most important systems of your home, and we aren’t just saying that because we are roofers. Your roof protects you and your family from Colorado’s extreme weather conditions year-round. Every season brings the potential for damage, from the strong hail storms we see in the summer to the heavy snow the winter occasionally brings. That doesn’t even consider the UV rays created by our 300+ days of sunshine. As local Colorado natives with decades of roofing experience, we have seen firsthand the impact our severe weather can have on our roofs.

If this experience has taught us anything, it is that regular roof maintenance is key to ensuring a long life and proper performance. Too often, we see roof leaks and other roof damage that could have been prevented if regular roof maintenance had been completed. From inspecting for damage to addressing minor repairs promptly, taking proactive steps can save you from costly, preventable damage. In this article, we’ll explore three essential tips for maintaining your roof, helping you extend its lifespan, and allowing it to protect your home for years to come. 

"Proactive roof maintenance costs an average of only 14¢ per square foot versus an average of 25¢ per square foot for reactive roof maintenance. Additionally, proactively maintained roofs last an average of 21 years compared to a 13-year average lifespan for roofs that only receive reactive maintenance."  ~ Buildings.com

Regular roof inspections by Custom Exteriors

Regular roof inspections

Roof inspections should be conducted at least once or twice a year, ideally in the spring and fall. This schedule sits on the shoulders of Colorado’s severe weather season. By inspecting your roof before hail season and before the threat of standing snow on a roof in the winter, you should be able to catch any roof damage early and help prevent costly repairs. During a roof inspection, professional roofers thoroughly inspect the roof and all its components, including shingles or roofing materials, flashing, vents, gutters, and the overall structural integrity of your roof. 

During your professional roof inspection, the roofer will look for signs of damage or wear during a roof inspection. This can include cracked or missing shingles, areas of discoloration or moss growth that could be signs of moisture problems, damaged flashings, sagging areas that could mean underlying structural issues, and debris buildup in gutters or on the roof surface. 

Another item they check during a roof inspection is the condition of the caulking and seals surrounding vents, pipes, skylights, and other penetrations, looking for signs of potential leaks. They will then assess the overall ventilation system to ensure proper airflow and moisture control. Identifying and addressing roof damage quickly can prevent leaks and water damage – very expensive repairs. 

Roof inspections by Custom Exteriors: Our roof inspection process

Roof inspections require a certain level of skill, knowledge, and physical abilities. Due to the inherent risks associated with roof inspections, we encourage our customers to use a professional for regular inspections. 

However, if you are going to inspect your own roof, the steps below encompass the residential roof inspection process by Custom Exteriors. There are some simple things to look for that can catch potential issues early and ensure the roof remains in good condition. 

Safety First:

A fall from your roof can result in serious injury and death. With that in mind, prioritize your safety over everything else. Roof inspections are typically not a DIY project. However, if you have the proper athletic ability, non-slip shoes, and safety equipment, including a safety harness, you may be able to complete your roof inspection. Make special considerations if your roof is steep or high, as falls can happen more easily. 

If you are doing your own roof inspection, choose a sturdy ladder and practice standard ladder safety precautions when using it. Choose a day with good weather, little to no wind, and clear visibility. It’s always a good idea to have an assistant on the ground to “spot you” in case of an emergency. 

Exterior Inspections:

You can DIY a roof inspection from the ground using binoculars or a remote control drone. This allows you to get a closer look at the condition of your roof from the safety of the ground. We start our inspections by walking around the exterior of your home and visually inspecting the roof from the ground. We look for visible signs of: 

  1. Missing, Cracked, Or Curled Shingles
  2. Areas Of Discoloration
  3. Debris Build-up

During this time, we will also inspect other home systems. During times of severe weather, particularly hail, many exterior systems are prone to damage, including your windows, siding, gutters, and even your personal exterior property. Our HAAG-certified roofing inspectors will check your windows for signs of damage to the screens or the frames. (Screens are a great DIY project! Learn how to replace your screens with us!) They will look for signs of damage to your siding or paint, gutters, A/C unit, and your personal property. 

Check Gutters and downspouts:

Inspect gutters and downspouts for clogs, debris accumulation, or signs of damage. When conducting a fall inspection, it’s a great idea to wait until your leaves have fallen to ensure your gutters are clear and can drain any heavy snow experienced during the winter. Clogged gutters can lead to ice dams. An ice dam freezes on the home’s eave with colder temperatures, sealing the melting water above and creating potential roof leaks. Your gutters must be clear and functioning properly before severe weather. The next section of the article covers gutter maintenance. 

Inspect Flashing, Seals, Caulking, and interior penetrations:

We then check the flashings around the chimneys, vents, skylights, and other roof penetrations for signs of loose or damaged flashing, cracked seals and caulking, or gaps that could allow water infiltration. 

It’s also important to check the vent pipes for any signs of damage, such as cracks, gaps, or deterioration. Check that vent pipe boots (the flashing around vent pipes) are in good condition and properly sealed to prevent water leaks. 

Lastly, if safely possible, we inspect your attic for signs of water leaks, moisture, or mold growth. We look for water stains on the ceiling, damp insulation, or visible light through the roof boards, which could indicate roof damage. During this interior inspection, we can usually see the roof decking. Identifying if you have spaced roof decking and the insurance coverage to cover it before it is removed can prevent stress during your roof replacement. 

Document any roof damage:

During each portion of our inspection, we take notes, photographs, and videos of any issues found during the roof inspection. This documentation can be helpful when discussing repairs with your homeowner’s insurance and roofing professionals

Schedule a professional for roof repairs:

While some homeowners can perform a roof inspection themselves, it’s a good idea to schedule a professional roofer for any repairs. Having a professional inspection at least once a year or after severe weather, such as hail, is recommended. Professional roofers have the expertise and tools to conduct a thorough inspection and address any repairs immediately. 

Infographic created by Custom Exteriors to explain the process they use when inspecting a roof

By regularly inspecting your roof and quickly addressing minor issues, you can increase its lifespan and avoid expensive repairs or replacements in the long run. If you’re ever unsure or uncomfortable inspecting your roof yourself, don’t hesitate to contact a qualified roofing professional for help. This is an excellent opportunity to build a working relationship with a trusted local professional in case you ever need a full roof replacement. 

The role of gutter maintenance in proper roof care

Here is a step-by-step guide on gutter cleaning to get you started: 

  1. Safety Precautions: Safety should be your first priority with all exterior maintenance. Before beginning, make sure you have the physical ability to complete the project safely. You should know and practice good ladder safety and always have someone spot you while using a ladder, especially if you’re working at a considerable height. If you doubt your ability to complete this project safely, it’s best to leave it to a professional with the experience and equipment to complete it safely and efficiently. 
  2. Gather Your Tools: Before starting, gather work gloves, a bucket or trash bag, a gutter scoop or trowel, a garden hose with a spray nozzle, and safety glasses. You will also need a sturdy ladder placed on stable ground and extended sufficiently to reach past the gutters comfortably. 
  3. Start At The Downspout: Begin near the downspout and work your way along the length of the gutter. Use the scoop or trowel to remove leaves, twigs, and debris from the gutter channel. Place the debris in your bucket or trash bag. 
  4. Clear Blockages: If you find any clogs or obstructions in the gutter or downspout, use the gutter scoop, a plumber’s snake, or a garden hose to dislodge and remove the blockage. Once you have cleared the blockage, test that the water can flow freely through the downspout. 
  5. Flush The Gutters: Once you’ve cleared the debris, use a garden hose with a spray nozzle to flush out the gutters. Start at the end farthest from the downspout and work your way towards it. This helps wash away remaining debris and check for proper water flow. 
  6. Check Downspouts And Extensions: Inspect the downspouts and extensions for any clogs or blockages. Use a hose to flush water through the downspout and ensure it drains away from your home’s foundation. 
  7. Inspect The Gutters And Roof: While cleaning, inspect the gutters and roof for signs of damage or wear. Look for loose or damaged gutters, missing or damaged shingles, and any areas where water may be pooling or leaking. 
  8. Dispose Of Debris: Avoid dumping debris near storm drains or in areas that could cause drainage problems. Dispose of the gutter debris responsibly. 
  9. Schedule Regular Maintenance: To prevent future clogs and water damage, schedule regular gutter cleaning at least twice a year, preferably in the spring and fall. Consider whether gutter guards or screens reduce debris build-up and impact maintenance needs. 

Following these steps can help ensure that your gutters remain clear and functional, protecting your home from water damage and maintaining the roof and exterior. 

Find a Local roofing company you can trust and enjoy the benefits of proper roof maintenance.

Infographic created by Custom Exteriors explaining 5 benefits of regular roof maintenance

The benefits of regular roof maintenance can be both financial and aesthetic. However, you need a trustworthy roofing contractor to see any of these rewards. Using a professional roofing contractor for your roof maintenance, repairs, and inspections offers numerous benefits in addition to not having to do it yourself! Professional roofing contractors have the expertise, experience, and knowledge required to inspect and assess the condition of your roof. They can identify potential issues, such as damaged shingles, leaks, or structural weaknesses, which may not be apparent to an untrained eye. 

Another key benefit of hiring a professional roofing contractor is the quality of workmanship and materials used. Contractors have access to high-quality roofing materials and tools that may not be readily available to homeowners. So, whether replacing damaged shingles, repairing flashing, or addressing ventilation issues, professional roofers will ensure your repairs are done correctly and up to industry standards. Local roofing professionals know building codes, regulations, and safety practices.

Establishing a relationship if you’re hit by hail and need a full roof replacement is also a great idea. Local roofing companies often provide warranties and guarantees on their work that you may not otherwise get. If issues arise after repairs or maintenance, reputable contractors will stand behind their work and are responsive to address any concerns. 

Overall, partnering with a professional roofing contractor for your roof maintenance, repairs, and inspections is an investment in your roof’s long-term health and performance. 

Sunroom created by adding windows to an existing room

The Perfect Sunroom: Transform Your Home With Light

Sunroom created by adding windows to an existing room

The perfect sunroom: transform your home with natural light

As an exterior remodeling company based in Colorado, we are no strangers to the desire to increase the exposure to Colorado’s 300+ days of sunlight. We’ve added French doors, bay windows, and skylights. However, our favorite window installation is always the creation of a sunroom. The surrounding light creates a welcoming environment, and you want to be there! 

Unfortunately, the cost of adding an actual sunroom often prohibits it. Extensive construction usually results in costs quickly skyrocketing. On the other hand, many areas of your home can easily be transformed into your dream sunroom at a fraction of the cost. Throughout the years, we have helped our customers turn dining areas, porches, and more into the relaxing retreat of a sunroom. Adding well-planned window walls and patio doors can create the same warm and welcoming vibe that a sunroom addition would. 

So, are you considering a sunroom? Maybe just daydreaming about it? Colorado is known for abundant sunshine, making it an ideal location for outdoor enthusiasts, nature lovers, and those who appreciate the beauty of our clear skies and sunny weather. We’re going to cover the functional uses based on your lifestyle, plus other things to consider, such as location and direction. 

What is a Sunroom?

Sunrooms are versatile spaces that connect to the outdoors while protecting homeowners from our quickly changing Colorado weather. They are essentially enclosed rooms with skylights, large windows, or glass walls designed to capture sunlight and create a bright, airy environment. 

Sunrooms are popular for their ability to extend living space, serve as a relaxing retreat, and offer panoramic views of scenic landscapes. Some of our favorite benefits a sunroom offers are: 

The average cost of a sunroom addition runs from $20,800 to $72,600. It is noted that a small, converted sunroom could cost as little as $5000 to create, and an expansive, luxury sunroom could cost up to $140,000.       ~ The Spruce

Popular Uses for sunrooms

1. Sunlit Lounge Area:

A sunroom provides an inviting space to relax and enjoy natural sunlight throughout the day. It can be finished with plants, and comfortable seating such as sofas, armchairs, and ottomans. It creates a cozy lounge area ideal for reading, socializing, or just enjoying the outdoor views while unwinding. 

2. Indoor Garden or Greenhouse:

Sunrooms are excellent for housing indoor plants, creating a mini garden, or even functioning as a small greenhouse. The abundant natural light and controlled environment make them ideal spaces for growing a variety of plants, from decorative houseplants to herbs, flowers, and even small vegetables. 

3. Dining Area:

Many homeowners use their sunrooms as a bright and airy dining space. It provides a refreshing alternative to traditional dining rooms, allowing occupants to enjoy meals while feeling connected to the outdoors. Adding a dining table and chairs transforms the sunroom into a charming breakfast nook or an elegant dining area for family gatherings and entertaining guests. 

4. Home Office or workspace:

With the popularity of remote work and telecommuting, sunrooms make excellent home offices or workspace areas. The natural light promotes productivity and creates a pleasant environment for work-related activities. Setting up a desk, ergonomic chair, filing, and storage solutions can turn the sunroom into a productive and inspiring workspace. 

5: Entertainment Room:

Sunrooms can be transformed into entertainment rooms, hosting activities such as game nights, movie screenings, or casual gatherings. Installing a media center with a television or projector, comfortable seating arrangements, and storage for games or entertainment equipment can make the sunroom a popular spot for relaxing and socializing. 

6: Fitness or yoga studio:

Utilizing the sunroom as a fitness or yoga studio capitalizes on the open, well-lit space. It provides a naturally energizing environment for exercise equipment, yoga mats, and calming plants and decor, enhancing a sunroom as a dedicated wellness space. 

7. Reading or hobby room:

Sunrooms offer a peaceful retreat for pursuing hobbies or just relaxing. It’s also a great space for crafting, painting, or hobbies like photography. Because of the abundance of natural light, the visibility and atmosphere are perfect for creativity or quiet relaxation. 

8. Seasonal Retreat:

Seasonal retreat sunroom in Colorado

In Colorado’s climate, sunrooms can be used as year-round retreats. They can transition from a warm and cozy space in fall and winter, with the heat from our sunny days and the addition of heaters or a fireplace, to a breezy, open area in spring and summer, with ceiling fans or air conditioning. This flexibility allows homeowners to enjoy the sunroom year-round, adapting it to different seasons and weather conditions. 

Ultimately, the use of a sunroom depends on your individual preferences, lifestyle needs, and how the space is customized and furnished to suit your family’s unique needs!

Create a custom sunroom by remodeling with new windows

With the right window replacement contractor, several existing rooms in a home can be transformed into sunrooms with some modifications. Our favorite sunroom installations have been in rooms with three exterior walls that were turned into three window walls! When executed properly, this creates a panoramic view that is stunning. With that being said, you can create a bright, beautiful sunroom in any area with two or more exterior walls. Some common areas Custom Exteriors has helped convert to a sunroom include: 

1. Porch or Enclosed patio:

An existing porch or enclosed patio is a natural candidate for conversion to a sunroom, and we see it frequently. By adding insulation, proper flooring, and large windows, skylights, or glass walls, you can create a comfortable and inviting sunroom space while maintaining a connection to our beautiful outdoors. One of our favorite styles in this design includes a floor-to-ceiling, wall-to-wall, collapsible glass door. When closed, it provides as close to unobstructed as possible, and, when open, it literally opens an entire wall to nature. You can’t really beat that when trying to blend with the stunning landscape we enjoy in Colorado. 

2. Any room with two or more exterior walls:

If your family room, entryway, or living room has ample natural light and access to outdoor views, it can be renovated into a sunroom. A cozy breakfast nook or dining area adjacent to a kitchen can be converted into a sunroom, creating a charming space for enjoying meals with plenty of natural light. Adding skylights to these rooms can also help add the feel of a true sunroom. 

3. a Home addition:

Building an addition specifically designed as a sunroom is a popular option locally for homeowners looking to add a sunroom to their existing home. This allows you to customize the size, orientation, and features to meet your specific style and needs. When you create a space that is tailored to your preferences and lifestyle, you are often able to achieve the ideal sunroom for your family. 

Infographic created by Custom Exteriors explaining 3 areas that are perfect for the addition of a sunroom

Which direction should my sunroom face?

The best direction to face a sunroom depends on the amount of sunlight you want and the use of the room. Here are some of the things our design experts consider when they are determining the ideal direction to face a sunroom:

1. Colorado's Climate and abundant sunlight:

During winter months, it’s beneficial to have a sunroom that faces towards the south to take advantage of the most sunlight and passive solar heat. South-facing sunrooms receive sunlight throughout the day, helping to naturally warm the space and reducing heating costs. However, during summer, direct south-facing sunlight can lead to overheating, so shading options like awnings or blinds may be necessary. 

2. Views and landscape:

Consider the views and outdoor landscape surrounding your property. Facing the sunroom toward attractive views such as gardens, open spaces, mountains, or scenic landscapes improves your home’s overall curb appeal and enjoyment of the space. Take privacy considerations into account as well, especially if neighboring properties are nearby. This can also be dealt with by adding attractive blinds or window coverings. If there was ever a place to try out the remote control and electric window shades, it’s a sunroom. 

3. Functionality and use:

The intended use of your sunroom will also affect its orientation. For example, if the sunroom will primarily serve as a dining area or breakfast nook, an east-facing orientation allows for pleasant morning sunlight and a cozy atmosphere for breakfast. West-facing sunrooms receive afternoon and evening sunlight, making them suitable for relaxation areas or sunset views, but they can become warmer in the afternoon. 

4. Architectural Considerations:

Consider factors such as roof overhangs, window placement, and insulation to maximize energy efficiency and comfort in the sunroom throughout the year. 

5. Balanced Lighting:

Depending on your preferences, a compromise orientation such as southeast or southwest facing can provide balanced lighting throughout the day. This approach ensures that the sunroom receives sunlight during different times while minimizing excessive heat gain or glare. 

One last tip..

One last tip if you are considering a sunroom – check with your HOA (if you have one) and make sure you’re following their guidelines. 

When we install windows or skylights for sunrooms, Custom Exteriors always follows local building codes and regulations. Make sure your contractor follows codes regarding sunroom construction and orientation requirements. Some areas may have specific guidelines or restrictions related to sunroom placement and orientation based on environmental factors and building codes. 

Remember, the beauty of a sunroom lies in its versatility. It’s a space that can be tailored to your unique needs and preferences, balancing practicality and aesthetics. Whether you envision it as a cozy reading nook or a vibrant entertainment area, a sunroom can be a year-round haven. If you’re considering this project, reach out to one of our design specialists at Custom Exteriors. We’re a local contractor with extensive experience, ready to help you make informed decisions that perfectly suit your needs and location. 

Roof replacement by Custom Exteriors

How To Match Your Roof With Your Home’s Exterior Color Scheme

How to Match Your roof with your home's exterior color scheme

My husband and I have been in the roofing and exteriors business since 2014 and have worked in home improvement for over 30 years. We’ve seen a lot of roofs get replaced, not just in Colorado but all over the country, especially when we’ve helped after hurricanes on the Gulf Coast. Even with all this experience, we still learn something new with every roofing project about how the right roof can truly transform a home.

As roofing contractors, we know that homeowners aren’t usually excited about getting a new roof. But your roof does more than just keep out the weather—it also covers about 40% of what people see when they first look at your home. The outside of your house is often the first thing people notice, and picking the right roof color can make a big difference in how your home looks.

So, how do you pick the right roof color? This choice will affect how your home looks for many years, so it’s important to choose carefully. In this guide, we’ll show you how to match your roof with the colors of the rest of your house. Our goal is to help you make a choice that looks good and adds to your home’s strength, value, and appearance.

Understand Color Theory

Having replaced roofs on every color house there is, it became quickly clear that you need a basic understanding of color theory to ensure your color scheme looks seamless. The color theory is a valuable tool when choosing a color scheme. It explains what colors look good together and why. 

Infographic to explain the color theory as it relates to an exterior remodeling color scheme

The basics of the color theory are simple. Colors are divided into three categories: primary (red, blue, yellow), secondary (green, orange, purple), and tertiary (combinations of primary and secondary colors). When creating an exterior color scheme, it’s helpful to know which colors complement each other. Complementary colors are opposite each other on the color wheel, like blue and orange or red and green. These combinations are visually striking and can bring a vibrant look to your home. We have absolutely seen red, green, blue, and white roofs. While most modern homes stick to brown or black, roofs are available in a variety of colors. This is particularly true for metal panel roofs, as they are available in almost every color. With this in mind, it’s helpful to know which colors complement each other. 

Analogous Colors

Analogous colors are those that sit next to each other on the color wheel, sharing a common hue that makes them blend perfectly. This group includes three colors that are side by side, like blue, blue-green, and green or red, red-orange, and orange. When these colors are used together, they create a serene and comfortable look because of their close relationship in the color scheme. 

When choosing a roof replacement with these colors, you can create a very subtle and harmonious appearance. We have seen dark green roofing paired with lighter shades of green throughout the siding and the trim or a grey-blue roof, with shades of blue making up the color palette of the home. 

When designing a color scheme using analogous colors: 

Infographic made by Custom Exteriors with an example of a analogous color scheme for exteriors

As you can see from the example above, using analogous colors in roofing and siding projects not only makes the color choices easier but also makes sure your house looks great. This approach allows for a calm and cohesive exterior appearance. 

It’s important to consider the saturation and brightness of your color choices as well. Saturation refers to how intense or vivid a color is, while brightness refers to how light or dark a color is. A roof that is too bright or saturated might overwhelm your home’s exterior, while a more muted color of the same tone can tie things together beautifully. 


Assessing Your current exterior

Choosing a roof color that blends well with your existing home color scheme involves careful consideration. Because your exterior plays a huge role in your home’s first impression, it’s a decision that shouldn’t be taken lightly. Here’s how you can systematically approach the process: 

  1. Assess the Current Colors: Start by observing the main colors on your home’s exterior, including the siding, doors, windows, and trim. Remember, lighting can significantly alter color perception, so it’s best to view the colors at different times of the day. 
  2. Understand Undertones: Look at the undertones in the existing colors. For example, a beige might have a pink, yellow, or green undertone. These undertones are crucial for properly matching colors. Your roof color should complement these undertones, not clash with them. 
  3. Consider the Visual Impact of a Roof Color: The roof can make up to 40% of your home’s visible exterior, making its color a significant factor in your curb appeal. A roof color that complements the main color scheme can transform your home, making it appear balanced and integrated. For example, if your home has warm beige siding with yellow undertones, a brown or warm gray roof can be a perfect match. 
  4. Use Color Swatches: Obtain color swatches for potential roof materials and compare them alongside your home’s exterior in natural light. This is the most effective way to ensure the colors work well together. Most roofing materials are available through your local roofing company in 2-foot sample sections. 
  5. Factor in Material and Texture: Remember that the material and texture of the roofing will influence its color and appearance. A shiny metal panel roof will reflect more light and could appear lighter than it is. On the other hand, standard asphalt shingles absorb light, which sometimes makes them appear deeper in color. 
  6. Reflect on Curb Appeal and Resale: Consider how your color choices might affect curb appeal and potential resale value. Neutral colors tend to appeal to a wider audience and may be a safer choice if you plan to sell your home in the future. Colored roofs such as blue, green, or red create a distinct look that may not appeal to everyone. 
  7. Test in Different Conditions: If possible, look at your chosen roof material and color in various weather conditions and times of day. A color might look dramatically different on a sunny day versus an overcast day. Local roofing contractors may have examples of completed roofs in your community to get a picture of the larger scope. 

92% of Realtors suggested sellers improve curb appeal before listing their homes for sale, making a proper exterior renovation design a valuable asset. ~ Realtor.com

Choosing the right roof colors

Over the course of our careers, we have seen just about every color of roof! Choosing that color is an important decision, with several factors to consider. Factors that could impact the overall curb appeal of your home include: 

1. Consider your Climate:

The color of your roof can influence the temperature inside your home. Light-colored roofs, such as white or gray, reflect sunlight, which can help keep your house cooler in warm climates. While this can be a smart choice if you live in an area with a lot of sunlight (like Colorado), however, most people stay away from white roofs because of their appearance and lean more towards lighter grays or tans. With that being said, we have seen some great examples of “cool roofs” in a commercial setting with white membrane roofs or metal roofing. On the other hand, dark-colored roofs absorb heat, which might be beneficial in colder climates as it can help melt snow and ice off your roof more quickly. 

2. Look at your home's style:

The architecture of your home should guide your color choice. Traditional homes often look good with classic colors like black, gray, or brown. Modern homes, however, can look great with bolder colors or shingles with a lot of variation. One of my favorite roofs we ever did was a deep red metal panel roof up against a primarily off-white, modern home. It was stunning. 

Your roof color should complement the colors of your home’s exterior, such as the siding, doors, windows, and even the landscaping. A roof that complements these elements will pull your home’s look together nicely. For example, a gray roof can look beautiful on a house with blue siding, or a tan or brown roof can complement a home with earth-toned walls. On the other hand, we have seen customers pair a cool-toned white roof with a warm-toned, bold color, and the end result was less than impressive. 

3. Look at the neighborhood:

Check out the roofs of nearby homes. While you don’t need to match them exactly, choosing a color that fits in with your neighborhood can help your home blend in or stand out, depending on your preference. Some neighborhoods throughout Northern Colorado, for instance, only have tile roofs. If your neighborhood has a specific style that is present throughout, this may make your roof replacement decision easier. 

4. Think about longevity:

Trends come and go, but a roof lasts for decades. Rather than just picking something trendy, choose a color that you will still like years from now. Choosing a roof color that could blend with varying color schemes is a good idea. You will likely repaint the exterior of your home at least once during the life of your roof. It only makes sense to choose a versatile color. 

5. Check for HOA Guidelines:

Check their guidelines if you live in a community with a homeowners’ association (HOA). Some HOAs have roof color rules, so choosing a color that complies with those rules is important. Many HOAs, my own included, also have rules about the materials that can be used for a roof replacement. We had to lobby to add a small section of metal roofing over the covered patio. It’s an expensive replacement if they make you change it. 

6. Factor in the roof material:

Different roofing materials, like asphalt shingles, metal, or tile, can come in various colors. So it is important to consider how the material you choose will look in your desired color. Grey can vary drastically between metal panels and asphalt shingle roofs. Some roofs’ reflective designs also impact the color, so it’s important to view potential roof replacement materials in the outdoor light throughout the day. 

7. Consider Energy Efficiency:

Some roofing materials and colors are designed to be more energy-efficient, helping to reduce your home’s energy costs. Metal roofs, for instance, allow for additional insulating panels to be installed under the roof for extra insulation. Look into options that can help improve your home’s efficiency while still providing the look you want. 

Infographic made by Custom Exteriors to give 7 tips on how to choose the right roof color for your exterior remodel

Accent Features and Finishing Touches

As we discussed earlier, your roof can make up about 40% of your home’s exterior. That makes your roof a significant and noticeable part of your home, so choosing the right color is important. A roof is a major investment, so having to replace it because you used an unapproved color could be a very expensive mistake. It costs over $10,000 to replace most residential roofs, and that number can quickly skyrocket with increased sizing or custom material choices. 

When you complete an exterior remodel, everyone considers roofing, siding, windows, and paint, but some important accent features can make or break an exterior remodel. These finishing touches can significantly impact your home’s curb appeal. So what are they? 

1. Choose the Right Trim: Trim acts like a frame around your home, outlining windows, doors, and other areas. Selecting the right color for your trim can highlight your house’s unique features. Typically, you want a trim color that contrasts slightly with your siding to make your home’s lines stand out. For example, the illustration shows a home with muted shades of yellow and beige and bright white as a striking trim color. Be careful when choosing dark trim colors, such as black or navy, as they can overshadow other colors quickly. Additionally, some of our favorite exterior paint color schemes include several accent colors, highlighting architectural features and creating contrast. 

2.Update Your Front Door: Your front door can be a focal point of your home’s exterior. Painting it a vibrant color can draw attention to your entry. Depending on the colors of your siding and roof, colors like red, blue, or even yellow can work well. While researching valuable exterior home improvements, we recently determined that a study by Zillow found that a black door can add nearly $6500 to your selling price. 

3. Consider Window Frames and Shutters: Window frames and shutters offer additional opportunities for incorporating accent colors. You can match these to your front door for a cohesive look or choose an accent color that fits with your home’s overall color scheme. This not only adds visual interest but also boosts the curb appeal of your exterior. Window shutters are available in almost every color and have several styles that make them a great fit for most architectural styles, including shutters for a modern exterior

4. Add Lighting Fixtures: Good lighting can transform the exterior of your home and increase its safety and security. Choose fixtures that match the style of your home, and then work with a professional electrician who can ensure they are placed in the best spot. Exterior lighting should be used to light areas like the front door, walkways, and unique landscaping or architectural features of your home. 

5. Landscaping Touches: Finally, consider the role of landscaping in finishing your home’s exterior. Well-maintained landscaping, flowering plants, and even decorative stones can add color and texture to your property. Think about adding planters near the entrance or along the driveway, filled with plants that complement your exterior color scheme. 

Each of these finishing touches, when carefully planned and chosen, works together to create a gorgeous exterior. The goal is to create a harmonious look that reflects your style and works perfectly with the architectural style of your home. 

The benefits of a well designed exterior

Choosing the right color for your roof and coordinating with your home’s exterior color scheme is a decision that can influence your home’s value and curb appeal. The impact of these color choices touches on both financial returns and practical benefits. 

Homes with well-thought-out exterior colors, including the roof, can sell for more. Moreover, according to the National Association of Realtors, investing in a new roof can not only improve the look of your home but also bring a return of 107% on its cost at resale. This statistic shows just how significant the roof is in the overall value of your property. 

On a practical note, the choice of roof color can affect your energy costs. Lighter-colored roofs reflect sunlight, which helps in keeping your home cooler during warmer months. The U.S. Department of Energy supports this, stating that cool roofs can save homeowners between 7-15% in total cooling costs. This not only helps reduce ongoing expenses but also makes your home more attractive to potential buyers who are conscious of energy efficiency and environmental issues. 

Because cool roofs can reduce the roof surface temperature by up to 100 degrees Fahrenheit, they can reduce annual air conditioning use by as much as 15%.  ~ U.S. Department of Energy

A well-chosen roof color not only adds to your curb appeal but can also significantly impact your energy costs. Whether you are updating your roof to improve its appearance, restoring damage from a storm, or preparing it for sale, remember that the color of your roof can play a significant role in the appearance of your exterior remodel. 

By implementing careful planning with the information learned today, you can create a rewarding investment in your property—an investment that makes your home more attractive to you, your visitors, and potential buyers alike. If you are in Colorado, contact Custom Exteriors today to meet with one of our exterior design specialists and make your home the envy of the neighborhood!

Infographic created by Custom Exteriors about the lifespan of a commercial roof with and without maintenance comparing TPO MOD BIT EPDM BUR and METAL

Saving Money On Commercial Roof Replacement
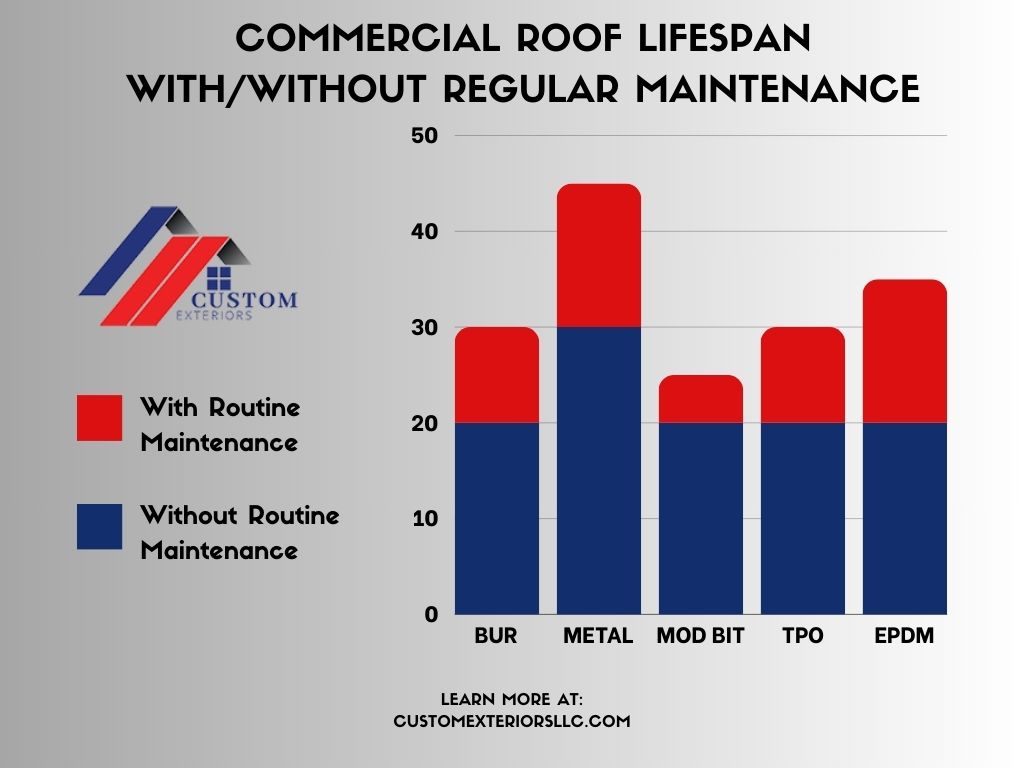
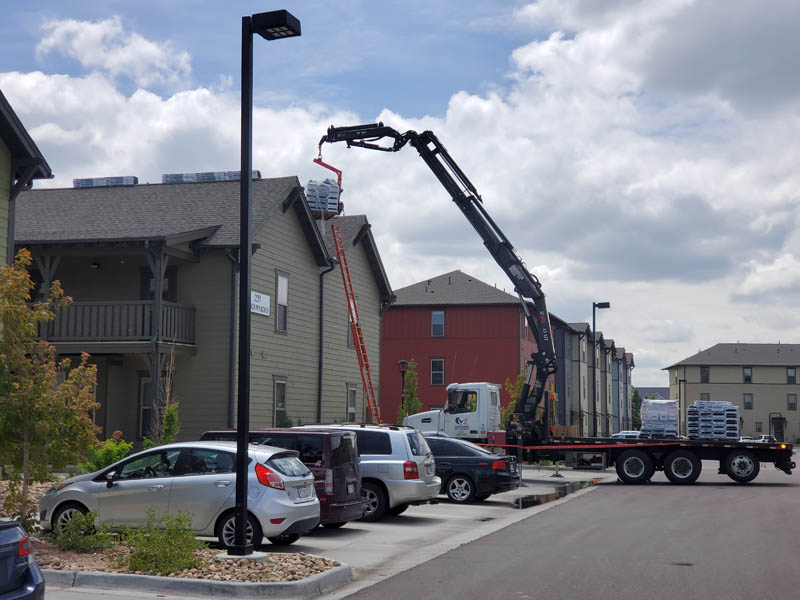
Commercial roof maintenance savings opportunities

How to save money on a commercial roof replacement

As commercial roofing contractors and commercial real estate owners, we understand the importance of cutting costs when performing routine maintenance or upgrades. Minimizing costs associated with our building maintenance is a critical part of your business operations, whether you like it or not. For many commercial building owners, the demands of managing your business make up a substantial portion of your daily tasks. The last thing on your mind is likely planning for major renovations and long-term regular maintenance. 

However, if you have experienced any of the many consequences of improper roof maintenance or lack of a needed replacement, you know how quickly those costs can escalate. Maintaining your roof is a significant investment that protects your assets, employees, and daily operations. It can also wreak havoc on operations and your budget if you don’t make strategic planning and maintenance a part of your management strategy. 

Every building owner should consider the financial implications of a roof replacement, including the cost, the cost of not replacing, and ongoing maintenance costs. Industry studies indicate that preventative maintenance and timely repairs can extend a roof’s lifespan by up to 50%. Savings like that can significantly improve your bottom line. Yet, when replacement becomes inevitable, knowing how to manage it with minimal financial impact can have huge implications on your business operations. 

At Custom Exteriors, we are committed to helping you maintain a successful business by protecting your property with our exterior services. We want you to experience a roof replacement that causes minimal impacts on operations and limited downtime. Today, we hope to share some tips that can help you make informed decisions, balancing cost-efficiency with the long-term value and safety of your commercial property. 

Explore your insurance coverage

We are Colorado natives and local property owners. We have replaced many roofs on our personal homes and investment properties in our adult lives. Guess how many of those roof replacements were not caused by damage from severe weather? That’s right, zero. It’s no secret that Colorado and the surrounding states are prone to severe weather, including times of large hail, hurricane-force winds, and even tornados. 

So, for many property owners in our area, the challenge isn’t just keeping a roof over their property; it’s dealing with the effects of our severe weather season. Colorado’s harsh weather, mainly hail and wind, means that for local properties, roofs often need replacing before their time. If you notice signs that you may need a roof replacement, the first step is a thorough roof inspection. Some signs that might indicate your roof needs to be inspected include: 

Once you have determined you do, in fact, need to replace your roof, the first step is knowing what your insurance policy covers. Your agent should be able to explain your coverages and limits. However, if your roof is damaged from natural causes, the right insurance coverage could mean the difference between paying a deductible and paying for an entire commercial roof replacement. Commercial policies vary widely, so knowing and understanding your policy is important. 

Filing a Claim: Steps and Documentation

Before filing a claim, it’s important to consider the implications. When you file a claim on any insurance policy, it gets added to CLUE (The Comprehensive Loss and Underwriting Exchange), which is used to determine your rate. With that in mind, depending on your coverage and anticipated rises in premium costs, an insurance claim may not make sense. Every business is unique, so this decision varies depending on your circumstances. 

If you have determined that a claim is beneficial in your circumstances, knowing how to file a claim can help speed up the process and make sure you are compensated adequately to restore your building to its pre-storm condition. Here are some tips: 

  1. Act Quickly: As soon as you notice signs of damage, contact your insurance company. Most insurance companies have a timeline for claim reporting. Waiting too long might make it harder to file a claim down the line. 
  2. Document Everything: Take clear photos and videos of the damage from different angles. If you are working with a professional roofing contractor, they will provide these during their inspections. This visual evidence is key to supporting your claim. 
  3. Keep Records: Have a copy of your insurance policy handy, along with any record of previous roof maintenance or inspections. If you’ve had your roof checked regularly, it shows you’ve taken care of it, which can help your claim.

If your insurance covers the damage, you could save significantly on roof replacement costs. Given the frequency of severe weather in our area, having the right coverage is important. When the weather does its worst, you want to be covered and prepared. With the right coverage, it won’t cost you as much to fix. 

Tax Credits and Incentives

Some roofing projects might qualify for tax credits or incentives. So, when replacing your roof or any other part of your building, choosing energy-efficient materials could earn you money back from the government. Some programs that your business may qualify for include: 

  1. Energy Efficient Commercial Building Deduction (Section 179D): This tax deduction allows building owners to claim a deduction for part of the costs of installing energy-efficient systems, including roofing. The roof must be part of an energy-efficient building envelope that meets specific criteria set by the Department on Energy.  
  2. Colorado Credits and Rebates: The state of Colorado also offers tax credits and rebates for energy-efficient or green roofing installations. If you qualify, this is designed to encourage local property owners to invest in sustainable building practices that also lead to significant energy savings.  
  3. Historic Preservation Tax Credits: If your building is designated as a historic structure, you might be eligible for tax credits related to preservation and rehabilitation efforts, such as roofing.

Consult a tax professional

Tax laws can be complex, and incentives change over time. That’s why it’s important to talk to a tax professional before filing for any of these credits. They can help you understand what specific benefits you can apply for and how to claim them. They will know the ins and outs of each of these programs and likely have information on other options for your unique circumstances. 

This approach can lead to significant savings, making your roofing project more affordable while also contributing to your building’s energy efficiency. 

For property placed in service in 2023 and after, the Energy Efficient Commercial Buildings Deduction can amount to up to $1.00 per square foot. ~Internal Revenue Service

The importance of regular maintenance

Proactive maintenance is the number one way to save money on your roofing costs. A well-maintained roof can last up to 50% longer and save on repair costs. Roofing Contractor did a study on commercial roofing back in 2012. While the prices have no doubt increased, some staggering statistics still hold true today. 

During the course of the study, they found that 80 percent of roofs need to be replaced prematurely. They also found that roof maintenance programs, which are tax-deductible, cost about 1 to 3 percent per year of the expected replacement cost. In return, however, they noted that consistent roof maintenance can save up to 50% over the course of your roof’s life. This maintenance helps take care of small issues before they become something larger and, by default, extends the lifespan of the roof. 

It’s important to note that roofs can leak for weeks or months before there are visible signs. Over several months, water can do a lot of damage and amplify the repairs needed to get your business up and running again. 

Ripped roof membrane found during routine roof maintenance by Custom Exteriors

How maintenance extends roof life

Regular maintenance helps catch small problems before they turn into big, expensive ones. For example, in the photo above, our HAAG-certified roofing inspector noticed this small breech in the roof membrane. Our team was able to make a repair on-site that day, preventing what could have turned into water damage or worse. 

Routine inspections may reveal missing or damaged shingles, damage to membranes, caulking, or flashings. Without this check, those minor issues would turn into leaks, water damage, and more significant problems that might require an entire roof replacement sooner than expected. 

While commercial inspections are complex, the basics are: 

Infographic created by Custom Exteriors about the lifespan of a commercial roof with and without maintenance comparing TPO MOD BIT EPDM BUR and METAL

Regular roof maintenance has significant financial benefits. By addressing small issues before they become big issues, you effectively extend the life of your current roof and lower maintenance costs. You can increase energy efficiency and even lower operational costs. Over time, these savings add up, making the investment in regular maintenance well worth it. 

Timing your replacement during off-peak seasons

It’s no secret that roofers are typically in high demand during the summer months in Colorado. Our severe weather often creates more replacements and repairs than most can handle. This can cause price increases due to labor and material shortages and limit the choices of who can replace your roof. During these peak seasons, reputable roofing companies tend to book solid. This leaves the option of another (possibly less reliable) roofing company or a significant delay in starting your project. 

On the other hand, consider scheduling your roof replacement on the shoulders of severe weather season. If you schedule before the roofing season begins or after the majority of the repairs are completed, you will have a better selection of contractors and possibly pricing. 

When using this plan, remember that roof replacements can take time. If they are covered by insurance, that will extend your timeline. Materials will need to be chosen and delivered, which can take weeks. To make the most of off-peak season advantages, start planning your roof replacement well in advance. Reach out to roofing contractors months before you want the work done. This gives you time to review your estimate and choose the right contractor without feeling rushed. 

Consider roof coatings as an alternative

Sometimes, a full roof replacement might not be necessary. Roof coatings can serve as a cost-effective alternative. They offer a way to extend the life of your existing roof without the hefty price tag of a complete roof replacement. 

Roof coatings are specially designed products that are applied directly to the surface of your existing roof. They are thicker than paint and come in acrylic, silicone, and polyurethane. When used properly, they can repair minor damage, prevent leaks, and improve the overall function of your roofing system at a fraction of the price. 

Roof coatings are a great option to: 

On a typical summer afternoon, a clean white roof that can reflect 80% of sunlight will stay 50 degrees cooler than a grey roof that can only reflect 20% of sunlight.  ~ EnergyStar.gov

Final Thoughts: Leveraging savings in Commercial roofing

Managing properties means managing expenses without compromising quality. From understanding how to leverage insurance coverage, especially in Colorado, to investigating tax credits and incentives for energy-efficient roofing options, there are many ways to try to save some money when replacing a commercial roof. 

Of all the subjects discussed, from our experience, the most effective savings is regular maintenance. When you factor in the extended lifespan of a well-maintained roof, with the lack of many major repairs and the possible increase in energy efficiency, bi-annual maintenance should be on every building owner’s radar. Remember, the goal is to achieve a durable, efficient roofing system that meets your needs while matching your budget. With careful planning and the right approach, you can make informed decisions about your biggest assets. 

Exterior upgrades for rental properties showing a roof being replaced on a multi-family buidling

Educating Tenants on Exterior Maintenance: A Property Managers Guide

Commercial roof maintenance by Custom Exteriors, a commercial roofing company

Educating Tenants on Exterior Maintenance:
Tips for Property Managers

My husband and I own an exterior maintenance company and a handful of rental properties. Because of this, we understand firsthand the role exterior maintenance plays in maintaining property value and keeping tenants satisfied. This unique perspective provides us with the knowledge to help address property managers’ challenges in educating tenants on exterior maintenance and the important role it plays in keeping their properties in top shape. 

When a clogged gutter caused water damage to the ceiling of one of our rental’s front porches, it not only cost us thousands of dollars in repairs but also consumed a significant amount of our time. 

For us, this experience showed us the importance of proactive maintenance and effective communication between property owners, managers, and tenants. If we had conducted routine maintenance on that property, we would have never encountered the issues we did. They could have also been avoided if our tenants had a clear line of communication with us about anything that seemed out of the norm for the property, i.e., overflowing gutters. These simple steps could have helped us avoid both the financial burden and the inconvenience of extensive repairs. 

We aim to share our expertise and experience in hopes of helping owners and property managers educate their tenants on the role you both play in a properly maintained exterior. By implementing the tips and strategies we have put into place personally, property owners can not only save money on costly repairs but also streamline the maintenance process. Ultimately, this will improve the overall experience for both you and your tenant. 

Why exterior maintenance matters for rental properties

As business and rental property owners, we completely understand that busy schedules and work obligations take up much of our time. They can certainly take precedence over tasks like cleaning the gutters of your rental property. After all, with just our family and work obligations, it sometimes feels like there isn’t enough time in the day. This doesn’t even consider the time it takes to manage rental agreements, maintenance requests, and everyday property management tasks.

However, neglecting exterior maintenance can have serious consequences, including: 

Damage due to failing caulking discovered by Custom Exteriors while painting their home

The Cost of Neglect: why Exterior Maintenance Matters

As exterior remodeling contractors, we have seen the severe consequences of neglecting exterior maintenance. A common but dangerous issue we often encounter is mold or mildew. This can happen when the caulking used to seal the seams around your windows or other penetrations fails, as shown in the photo above. When caulking around windows, doors, and siding begins to deteriorate, it allows moisture to penetrate the property’s exterior. 

Over time, this moisture can cause wood to rot, mold growth, and even damage the siding. The danger in this situation is that mold often grows under the siding. In extreme cases, entire sections of siding and OSB may need to be replaced, resulting in significant expenses for property owners. 

We have also witnessed similar damage caused by neglected gutter maintenance. Without regular maintenance, gutters become clogged with debris and cannot properly channel water away from the property. This can result in water seeping into the walls and foundation, creating an ideal environment for mold to thrive. This lack of gutter maintenance then compromises the property’s structural integrity and creates health risks to the occupants. 

Proactive Protection: How exterior maintenance can save you money

Because of the many potential issues created by neglecting exterior maintenance, it should be a top priority for property owners. Your tenant also plays an important yet straightforward role in exterior maintenance: communication. By setting clear expectations and encouraging open dialogue, property managers can help tenants play an active role in identifying and reporting maintenance issues. Whether it’s loose shingles, a dripping faucet, or a crack in the siding, tenants should feel comfortable notifying their landlord or property manager of any irregularities they notice on the property. 

We sense the collective sigh that every landlord just let out. We know it isn’t realistic to expect a tenant to notify you or even notice many times. So, in addition to tenant communication, property owners should also take proactive measures to ensure the ongoing maintenance of their exterior systems. Conducting biannual inspections during the shoulder seasons of severe weather can help identify potential issues before they escalate. 

According to the NAHB, about 10.8% of a home's total operating expenses are associated with regular maintenance and routine repairs. By specifying average annual operating costs across the county, the NAHB can provide a reasonable idea of projected maintenance costs for your area. 

Clear communication tips for owners and property managers

Effective communication is an important part of successfully managing a property. However, with our busy lives, our property managers’ busy schedules, and our tenants’ schedules, communication can be difficult. If you expect effective communication with your tenants, you need to make it easy for them. For instance, some tenants may not want to have a conversation on the phone, whereas other tenants may prefer a phone call as their method of communication. 

We learned this from a local marketing company we used for Custom Exteriors. What stood out to me right from the start was their approach to communication. At the beginning of our relationship, they took the time to ask me about my preferred method of communication. I chose text messaging as I am a bit of an introvert, and I find texting convenient. I also like that it allows for quicker communication than some other methods. This simple act of asking for my preference made the entire communication process better. It also highlighted the importance of understanding and accommodating people’s communication preferences. 

Similarly, when managing rental properties, it’s important to recognize that tenants may have different communication preferences. Because of this, communicating with them may be easier if you utilize their preferred method. By asking tenants about their preferred communication method early on, you can use this method to tailor your communication and hopefully encourage communication. 

Protect your property with clear expectations

Setting clear expectations that your tenants contact you if anything changes about how the property looks or works is important. Whether it’s a leaky faucet, a cracked window, or a loose shingle, tenants should understand the importance of letting you know quickly. The best way to accomplish this is by having an easy and effective way to do so. When tenants move in, explain to them the importance of timely communication. This information often helps prevent minor issues from escalating into costly repairs. 

Additionally, property managers and owners should provide tenants with multiple ways to report maintenance issues. This may include providing contact information for emergency situations, creating an online portal for non-urgent requests, or posting signage with instructions for reporting issues. By making it easy for tenants to communicate maintenance concerns, property managers can ensure that issues are addressed promptly and efficiently. 

Educating tenants on seasonal maintenance tasks

While some tenants may be experienced in home maintenance tasks, it’s important to recognize that not everyone possesses the same level of knowledge or expertise. Many tenants simply may not be aware of how to keep the property in good condition. In our experience, a significant number of tenants are willing to work with you to help maintain the property if they are informed and know how to do so. 

By providing them a list of expectations for exterior maintenance and who is expected to complete the task (you, them, or an outside contractor), you significantly increase your chances of preventing neglect. A basic example of some important tasks looks like this:

1. spring Maintenance

2. Summer Maintenance

3. Fall Maintenance

4. Winter Maintenance

Every list will be unique, based on your particular property and the level of maintenance it requires. But, by providing tenants with a comprehensive list of seasonal maintenance tasks and clear instructions on how to perform them, you can significantly increase the chances they will actually get done.

Depending on your circumstances, this may translate into an outside company doing your exterior maintenance, or maybe you have the time and ability to complete the tasks personally. We are of the opinion that it is irrelevant who completes the tasks as long as they are getting done. On that same property with the leaking gutter, routine maintenance on our part would have also noticed the large sheets of OSB on the grass in the backyard before it killed it. Remember, in addition to protecting your home, it provides you the opportunity to personally lay eyes on the property and possibly save yourself some expenses down the line. 

Ultimately, the success of seasonal maintenance efforts relies on effective communication, clear expectations, and a collaborative approach between landlords and tenants. By working together, we can ensure that rental properties remain safe, well-maintained, and a place that tenants are proud to call home. We encourage you to continue prioritizing exterior maintenance for the benefit of everyone involved. Whether that looks like an exterior maintenance plan or dedicating a Saturday to your rental once a quarter, your bottom line will reflect your efforts! 

Signs of worn paint include damage like shown in this photo. It may be time to repaint if your home looks like this

5 Warning Signs It’s Time To Repaint (And How To Make It Last Longer)

Table of Contents

5 warning signs it's time to repaint (And how to make it last longer)

When my husband and I were young, we bought a home built in 1891. Saying it was a fixer-upper is an understatement. It needed just about everything refurbished or replaced. In other news, we had no money and were unknowingly starting the sometimes frustrating and always lifelong journey of home improvement. So, with a limited budget and a lack of any tangible skills, we debated how we could make the most significant impact with the smallest financial implications. We landed on an exterior paint job. Through a lot of trial and error and many mistakes made, the end result was beautiful. It also made all the difference in the world in regards to the first impression our home made. 

That being said, your home’s exterior does more than make up that coveted term “curb appeal.” It also protects your interior from everything the severe Colorado weather has to offer. While your exterior paint is a great way to personalize your home with your unique style, it also protects many essential systems, including your siding. Over time, even the best paint job will show signs of wear and tear, indicating it’s time for a refresh. 

Recognizing these signs early can save you money on costly repairs down the line. In this article, we’ll guide you through five clear indicators that your home’s exterior needs repainting: 

Our aim is to provide you with expert advice to help you identify these signs and understand the best steps to take next. Whether you’re a first-time homeowner or have been managing properties for years, the guide will help protect your investments. Our goal is to provide beautiful and functional exteriors and protect you against future damage. 

Fading exterior paint

1. Fading Exterior Paint

With an average of 300 days of sunshine a year, Colorado residents are familiar with the issue of fading paint, particularly on the south side of our properties, which are hit with those strong rays all year round. 

Fading paint is a common issue that most homeowners will have to deal with eventually. Including sun exposure, there are various reasons your paint may be fading. Some of the causes of fading exterior paint include: 

Sun exposure:

Our experience shows that sun exposure is the leading cause of fading exterior paint, at least in Colorado. The sun’s UV rays can be incredibly harsh. They are particularly damaging to the elevation of your home, which receives direct sunlight for the majority of the day. 

UV light has the power to break down the chemical bonds in paint, causing it to lose its color and vibrancy. Fading is most noticeable in darker shades of paint, which tend to absorb more light and heat than lighter colors. Over time, this continuous exposure can result in a noticeably uneven appearance. Typically, sun-facing sides fade faster than those in the shade. 

Quality of Paint:

When choosing exterior paint, the quality plays a significant role in how well it withstands the elements, including sunlight. As an added benefit, higher-quality paints are also known to withstand impact better. Most of us have experienced a hail storm in our area in the last few years. Our inspectors find that some homes’ paint is substantially more impacted than others, and we attribute this to quality exterior paint. 

Lower-quality paints may not have been formulated with the necessary UV-resistant chemicals or high-grade pigments designed to combat the sun’s damaging effects. As a result, these paints fade sooner. On the other hand, high-quality paints are specifically designed with UV inhibitors and superior pigments that help maintain their color and resist fading over time.  

Color Choice:

As we briefly touched on, the color of paint you choose for your home’s exterior also affects how quickly it fades. Darker colors, such as deep reds, blues, and blacks, are more prone to fading than lighter shades. This is because dark colors absorb more light and heat, accelerating the breakdown of paint pigments and leading to fading. While these colors may offer a bold and striking appearance initially, they require more maintenance and frequent repainting to keep them looking their best. 

Pro Tip: If you want the darker colors without the extra maintenance, consider using them as an accent in shaded areas such as your front porch. It’s a great location for a black entry door or dark-colored window shutters. 

Weather Conditions:

Exterior paint battles the sun and all the other weather conditions in your area. Extreme weather, including heavy rain, snow, and high humidity, can wreak havoc on paint. Water penetration is particularly damaging, as it can break down the adhesive bond that paint has to the surface beneath it. This not only leads to fading but can also cause the paint to peel, blister, and crack, compromising it and possibly causing expensive water damage. 

Incorrect Application:

How paint is applied to your home will significantly impact its lifespan and resistance to fading. Incorrect application methods, such as failing to properly prepare the surface, not allowing adequate drying time between coats, or paining during unsuitable weather conditions, can all lead to a weaker both. This lack of adhesion makes the paint more susceptible to the effects of UV light and weather, leading to faster fading. Proper application is crucial for a durable, long-lasting finish that protects your home for years. 

Tips to Minimize Exterior paint fading:

Keep in mind that fading paint isn’t just an eyesore. It can also be a sign that your paint is starting to deteriorate. As the paint fades, it may be less effective at protecting your home’s exterior from moisture. This can lead to moisture intrusion and issues like wood rot, mold, and mildew. Addressing exterior fading early can prevent more significant and costly damage in the future. 

Cracking or peeling exterior like this is a sign you need to paint your home. This was discovered during an exterior inspection by Custom Exteriors

2. Peeling or Cracking Paint

By the time your exterior paint is peeling or cracking, your exterior paint is failing. This issue is not only ugly but also a definitive sign of underlying problems that need your immediate attention. This is because one of the most common culprits behind peeling or cracking paint is moisture. Sure, other issues can cause it (aging paint often cracks and peels), but often, it results from water seeping under the paint. Water can seep under the paint layer through cracks, gaps, or untreated areas, causing the paint to lose its adhesion and start to peel off. This moisture can also lead to mold and mildew growth, worsening the issue. 

While moisture is a common cause of peeling paint, it can also peel due to improper installation. You risk peeling and cracking if your paint is applied over a dirty or glossy surface without proper preparation. Skipping surface prep and ensuring a clean, dry surface can lead to expensive repairs. When we work with customers who are replacing their home’s siding, we often recommend beginning the life of the siding with a pre-finished siding product to ensure the perfect foundation for a lifetime of exterior paint.

Over time, all paint will age and, if not maintained and refreshed, will eventually start to peel or crack. As paint ages, it loses its elasticity, making it unable to withstand normal expansion and contraction due to temperature changes. You can help prevent cracking or peeling paint by: 

According to Angi, water damage restoration costs an average of $3,643 but can be as high as $15,000, depending on the source and extent of the damage. 

Addressing peeling or cracking paint quickly improves your home’s appearance and protects it from the damage that moisture can cause. By taking the time to both replace the aging or damaged paint and address any underlying moisture issues, you are ensuring the protection of your home and creating a durable and lasting exterior paint job. 

Chalking from faded exterior paint

3. Chalking

If you run your hand along your exterior surface and it looks like you have chalked your hands for rock climbing, your paint is experiencing a condition called chalking. Chalking is a condition that occurs on the exterior surface of buildings where the paint has degraded to the point of forming a fine, powdery substance on the surface. This powdery residue can easily rub off on your fingers when you touch the surface. Chalking is a natural part of the paint’s aging process, but excessive chalking can indicate your paint failure needs to be addressed. 

Causes of chalking infographic created by Custom Exteriors

Chalking is primarily caused by these five factors: 

How to Prevent Chalking

Because chalking is a natural stage in your paint aging, you can’t really prevent it. However, there are ways to prolong the life of your paint, putting this condition at bay for as long as possible, starting when you paint your house to begin with. Choose a high-quality paint designed to resist UV radiation and environmental degradation. These paints contain higher-quality binders and pigments that are less likely to break down into a chalky residue. It also helps to follow the manufacturer’s paint preparation and application instructions. Avoid contractors who thin your paint, and ensure you apply the recommended number of coats to create a durable finish.

Additionally, the value of regular exterior maintenance can not be overstated. Periodic cleaning of painted surfaces can help remove accumulated dirt and reduce the impact of environmental factors on the paint. This can slow the chalking process. 

Recognizing the early signs of chalking and repainting before the condition becomes severe can prevent extensive surface degradation. The early signs of chalking include: 

By catching these early signs of chalking, you can take steps to clean and maintain the surface, potentially extending the life of future paint jobs. Chalking is a natural occurrence that can’t be avoided as it is caused by environmental factors. However, choosing the right paint and following best practices in application and maintenance can significantly reduce the likelihood and severity of chalking. It will play a role in keeping your home’s exterior looking better for longer. 

Water stains on wood

4. Stains or Water marks

Stains or water marks on your home’s exterior are indicators of potential problems that can compromise the integrity of your paint and cause much more significant issues. Water stains are often signals that the paint is not correctly repelling water. This can lead to water damage, mold, mildew, and other serious issues. 

You will often see water marks or stains for many reasons, including: 

Why it matters

Persistent stains and water marks not only immediately impact curb appeal, but they are also a good indication that your paint is failing. This failure can lead to a variety of issues, including rot, significant repair costs, and lowered curb appeal and value. 

High-quality exterior paint provides a waterproof barrier that repels water and prevents moisture penetration and the resulting stains. After addressing the underlying moisture issues, a new paint job will cover those old stains and degraded areas, significantly improving the appearance of your home. 

Stains and water marks should be seen as red flags, prompting immediate action. If you can not identify and correct the moisture issues, it’s time to call in a professional exterior maintenance contractor. 

Damage due to failing caulking discovered by Custom Exteriors while painting their home
Water damage caused by lack of caulking

5. Wood rot or shrinking caulking

The pictures above are from a job that Custom Exteriors was called in on. As you can see, the side of the window with damaged and rotted wood has a significant amount of mold. However, notice that the other side of the window (which just had cracked caulking) also presents clear signs of water damage and mold. A lack of regular maintenance and paint/caulking caused significant additional repair costs. 

Wood Rot

Wood rot occurs when water breaks the wood down, reducing its strength and structure. Unprotected wood is particularly susceptible to wood rot. 

  1. Causes: Wood rot is primarily caused by persistent moisture exposure, often due to failing paint that no longer repels water effectively. Poorly maintained gutters, downspouts, and flashing can also contribute by allowing water to gather on wooden surfaces. 
  2. Signs: Look for discolored patches that may be softer to the touch, flaking, or crumbling wood. Sometimes, the wood may appear darker or have a spongy texture. 
  3. Consequences: If left untreated, wood rot can spread, compromising the structural integrity of your home. It can lead to expensive repairs, especially if load-bearing structures are affected. 

Shrinking/Cracked Caulking

When siding is installed, caulking is used to seal gaps. That includes around windows, doors, and any other openings to prevent air and moisture from entering your home. Over time, caulking can dry out, shrink, and crack, leading to several problems. 

  1. Causes:  Exposure to the elements, particularly UV light, and temperature, can cause calking to lose its elasticity and contract. 
  2. Signs: Visible gaps, cracks, or shrinkage in the caulking around windows, doors, and other seams are clear indicators. You might also notice drafts or moisture in affected areas. 
  3. Consequences: Besides leading to water damage, deteriorating caulking can affect your home’s energy efficiency by allowing heat to escape in the winter and enter in the summer, resulting in higher energy bills. 

Addressing the Issues with a new paint job

A new paint job, when done correctly, can address and prevent further wood rot and damage to caulking. Before painting, inspect your home for signs of wood rot and replace any compromised wood. Remove old, failing caulking, and reapply a high-quality, flexible caulk to seal gaps effectively. 

Once the underlying issues are addressed, choose a high-quality exterior paint and apply it using exterior painting best practices. 

By taking these signs seriously and investing in a comprehensive exterior paint job that includes proper surface prep and the use of high-quality materials, you can protect your home from further damage and make it beautiful at the same time! 

A home that stands the test of time

Maintaining the exterior paint of your home is a crucial step. It’s important for the curb appeal of your home and also for its structural integrity. The signs of needing a new paint job – ranging from fading and peeling paint to more severe issues like wood rot and damaged caulking are clear indicators that it’s time to act. Ignoring these signs can lead to more significant, costly repairs down the line. 

Your home is one of your most significant investments. Taking proactive steps to maintain its exterior will ensure its performance for years to come, improve your curb appeal, protect against structural issues, and contribute to overall energy efficiency. 

Door and garage door remodeling

7 Smart Exterior Upgrades That Add the Most Value To A House

Table of Contents

7 Smart exterior upgrades that add the most value to a house

Let’s be realistic: when you decide to spend money upgrading your home, your exterior is generally not high on the list of possible projects. We find that odd, not because we have dedicated our careers to exterior remodeling, but because it is literally the first impression of every one of your guests. So when we discuss exterior remodeling, in addition to boosting your home’s curb appeal, we are talking about making smart investments that actually pay off. And by ‘pay off,’ we mean adding real, tangible value to your house. 

When trying to choose the best exterior upgrades for the money, the talk should be about projects that will make your house look amazing and slap that higher price on your home. 

Smart exterior remodeling isn’t just throwing cash at every new color or siding trend; instead, it’s about choosing smart upgrades. Upgrades that look great work hard behind the scenes and boost your home’s curb appeal and value. It’s a practical, financially responsible investment that pays off in the long run. As you will see, investing in your home’s exterior is one of the smartest moves you can make for your property’s future. Let’s find out exactly what you should do to increase your home’s value and curb appeal!

1. High-quality siding replacement

When choosing a home exterior improvement project that adds to your curb appeal and also adds real value to your property, a high-quality siding replacement easily takes the number one spot. The exterior of your home is the first impression every guest gets when they arrive at your home. On most homes in our area, the largest portion of that exterior is made up of siding! With decades of experience in the construction and remodeling world, we have rarely seen an exterior remodeling project with as much impact as a well-designed siding replacement project. 

Whether we are talking about stained cedar siding paired with black accents, creating a modern masterpiece, or the intricately designed and painted siding accents on a historical home, your siding makes (or breaks) your exterior. 

Siding replacement by Custom Exteriors

The financial wisdom in siding replacement

According to industry reports, siding replacement has one of the highest ROI among home improvement projects. A 2019 Cost vs. Value report states that, on average, homeowners can expect up to an 80 percent return on their siding investment, depending on the material used. 

Professional siding replacement can also have a dramatic impact on your home’s curb appeal. It’s no secret that first impressions are important. Worn or dated siding can deter potential buyers, and the negative impact on your home’s first impression can distract from even the most beautiful interiors. In addition to the financial and aesthetic gains, new siding also provides many other benefits, including: 

Curb appeal for any style

Replacement siding is available in many styles and colors. Fiber cement, vinyl, wood, and engineered wood siding all come with great returns on your investment. With so many materials and styles of siding available, there is a siding product that pairs perfectly with your project. Whether you are looking for a cost-effective vinyl siding replacement or are creating a modern masterpiece with panel-style siding, the options are endless. 

In addition to the increased curb appeal, most modern siding replacements come with or can be paired with energy-efficient options designed to increase your home’s insulation significantly. We recently completed a complex of homes in our Colorado mountains. During the replacement process, the community opted to unlay the siding with house-insulating panels. This small addition made a huge difference in meeting the energy goals in their community. 

Additionally, the government often offers incentives for energy-saving home improvements, which can contribute to overall savings. These incentives can significantly increase the benefits of a siding replacement project. 

As exterior remodeling contractors, it is our professional opinion that siding replacement isn’t just a cosmetic upgrade. It is a strategic investment that can improve energy efficiency, boost curb appeal, and offer a high ROI. Due to these factors and the dramatic impact siding can have on your property, we put it on the top of the list for exterior improvements that add the most value to your home. 

2. Energy-efficient window upgrades

Let’s talk about windows. They are the home improvement projects that people know they need to do, but the expense often hinders the progress. Many homeowners we have encountered can actually feel a draft when they are near their windows. Our clients have expressed that their energy bills are climbing during extreme temperature season and that there are signs of condensation in the panes, which are signs that their windows are an issue. But, with so many choices of new windows, how do you choose the right replacement window

The benefits of energy-efficient windows

Firstly, energy-efficient windows play a huge role in keeping your home comfortable and your bills low. Modern replacement windows are designed to keep your home comfortable regardless of the outside temperature and your energy bills low. Quality windows are designed to prevent heat from escaping during the winter and keep cool air inside during the summer. Because of this important task, quality windows can save you up to 25%-30% on heating and cooling energy use. Other benefits of energy-efficient windows include: 

Infographic created by Custom Exteriors highlighting the benefits of new windows

How to save money and make the right choice for your home

Every reputable window company will tell you the heart of the value of replacement windows is a long game. While many of the benefits, such as increased home value, are immediate, the real benefit of new windows accumulates over time. The reduction in energy costs adds up over time, and many of our customers find that their windows pay for themselves over time with the savings they accumulate. So, they’re basically free, right? 

When picking out the style of windows, choose windows that complement the other features of your home. It’s also important to select windows verified by the NFRC. This means they have been tested for their energy-saving properties. You’ll see labels with terms like U-factor, which measures how well a window insulates, or Solar Heat Gain Coefficient, indicating how much solar heat the window lets in. The lower these numbers, the better the window will perform. 

Even the best window can’t do its job if it isn’t installed correctly. Ensure a professional window installation to make full use of the windows’ features – otherwise, you might not get all the benefits, and it could void the warranty. 

By being a smart homeowner and choosing energy-efficient windows, you’re taking control of your comfort and your energy bills and even doing your part for the environment. Replacement windows are a sensible yet powerful update for your home and a move that will pay off in more ways than one. 

3. Modern roof replacement

Replacing an old or worn-out roof might not be as exciting as a kitchen makeover, but it’s one of the smartest investments you can make. Let’s explore why a new roof gives a great return on investment and should definitely be a part of your exterior remodel plan. 

Asphalt shingle roof replacement by Custom Exteriors, a Northern Colorado roofing and exteriors company

A new roof is a smart investment

While there is debate on the actual ROI of a roof replacement, estimates vary from 68% to 109%, one thing is sure. Your roof serves as the only line of defense from above for everything our severe weather throws at it. Even if the ROI were 1%, it would still be a sound investment simply due to the protection it provides. Over time, an old roof can get damaged, leading to roof leaks and water damage. A new roof protects you from this damage and can save you the substantial costs associated with it. 

Custom Curb appeal

When someone looks at your home from the street, your roof is one of the most significant parts of your exterior. Whether you like it or not, your roof impacts your home’s first impression. If you ever decide to sell, potential buyers will often judge the condition of your home based on that first impression. A new roof can increase your home’s resale value, making it a practical upgrade that pays off. 

Let’s not forget the customization options that make your roof stand out. You aren’t stuck to a traditional asphalt shingle roof. Metal panels and synthetic shakes are fantastic materials that deliver on looks and durability. Metal roofing comes in many colors and styles. Panel roofs, designed with metal panels, are known for giving your home a sleek, modern look and come in a variety of styles and colors. It’s also known for being incredibly durable and long-lasting. Metal roofs can last up to 70 years!

Investing in a new roof during an exterior remodel is an opportunity to improve your home’s protection, style, and value all at once. With the addition of custom touches like metal panel accent sections, you’re also giving your house a unique focal point. So, when planning your next remodel, remember that a new roof could be your best investment!

4. new doors and garage doors

Door and garage door remodeling

When choosing an exterior remodeling project for your home, you want something that immediately impacts both ROI and curb appeal. New entry doors, patio doors, and garage doors are not just functional but can be show stoppers visually. Studies indicate that replacing your front door with a steel entry door can return an astounding 101% ROI. Other advantages of replacement entry, garage, and patio doors include: 

According to Angi, you can expect an average return on investment for a garage door replacement at 94%. 

Replacement entry doors come in many styles, materials, sizes, and colors. They are one of the simplest exterior remodeling projects, as a quick coat of paint on your front door can change the look of your entire exterior. It’s clear that when you are searching for an affordable but impactful remodel, a front door refresh might just be your quickest way to increased home value. 

5. Deck or Patio addition

We get it. Home improvements can be expensive. They are also about as much fun as watching paint dry (which we can arrange for you if you are into that.) But, when it comes to getting bang for your buck, constructing a deck or laying down a patio is actually loaded with unexpected benefits. 

For starters, a deck or patio can significantly increase your home’s value. A deck has an impressive ROI of 106%! That is an obvious no-brainer.  Not only are you increasing your home’s value, but you are also adding serious curb appeal and extra living space. A well-designed deck or patio creates a whole new area to enjoy at a fraction of the cost of an actual addition. While you’re at it, close that patio off with some windows or add window to an existing room to create a stunning sunroom

According to Homes.com, adding a new deck will recover 106% of its value when the house is sold. The estimated cost of the project was $9,450, and the estimated added value was $10,000, making it a clear choice for remodeling ROI.

Increased Function at a fraction of the cost

It’s no secret that a full-blown home expansion is pricey. However, a deck or patio allows you to gain living space, but not at the expense of actual living space. With this in mind, adding a deck or patio is a smart move for both function and budget. It costs less than an addition but still creates a comfortable space for your family to enjoy. 

A deck or patio looks great, provides an additional area to enjoy, and is a strategic move that pays off. Literally. Your new deck provides many benefits beyond just an increase in home value including:

A deck offers many tangible benefits, from financial gain to the intangible joys of spending time in the great outdoors. Making this addition to your home promises countless days of enjoyment and relaxation. 

6. Gutter replacement, repair, & Maintenance

Gutters play an important role in home maintenance, yet they are often overlooked until problems arise. Maintaining, replacing, or repairing your gutters is a strategic move that prevents costly damage. This simple exterior maintenance task helps keep the value of your home high and avoid the significant expenses associated with foundation repairs and water damage. 

Routine gutter maintenance is not optional. It’s also not an exaggeration to say that the health of your home depends on functional gutters that effectively channel rainwater away from your home. Without properly functioning gutters, you risk issues like basement flooding, eroded landscaping, weakened siding, and mold or mildew. All of those problems come with an expensive repair bill. The picture below is an example of what a lack of gutter maintenance can do to your home. Our crews located this while replacing the siding on a property, and it drastically increased the cost of the renovation. 

Lack of gutter maintenance creating mold issues discovered by Custom Exteriors during a siding replacement

Beyond just maintenance

There are gutter options like copper and other specialty gutters that create a dramatic look for your home’s exterior and help raise the value of the home at the same time. Copper gutters, for example, age beautifully over time, acquiring a patina that can make your home stand out in the best way possible. Our crews just finished a gutter installation where the homeowner chose black gutters and downspouts. It created a dramatic impact and added a sleek, modern look to a home that was actually built in the 1970s.

Your gutters may not seem like a glamorous addition to your home. However, they can be a visual focal point with a bold choice like copper or black. Regardless, the diligent maintenance and timely replacement of your gutter system is imperative to the structural integrity and appearance of your property. 

7. Exterior light solutions

According to Homes.com, adding a new deck will recover 106% of its value when the house is sold. The estimated cost of the project was $9,450, and the estimated added value was $10,000, making it a clear choice for remodeling ROI.

Exterior lighting is a valuable exterior upgrade

Exterior lighting is an often underrated but crucial upgrade. The right lighting can dramatically improve the look and feel of your home, not to mention enhancing your home’s security. Whether it’s path lights leading up to your front door, floodlights for security, accent lighting to showcase an accent wall, or your favorite landscaping, each will improve the appearance, security, and value of your home. Our favorite ways to add value while creating an inviting and functional outdoor space through lighting are: 

1. Layered Lighting:

Layered lighting systems can be an in-depth and sometimes expensive task. It is achieved by utilizing a mix of ambient, task, and accent lighting to create depth and interest in your yard and on the exterior of your home. 

Ambient lighting provides overall illumination (wall-mounted lights, post lights, and ceiling lights.) This kind of lighting is used to provide broad illumination to an outdoor area. Task lighting focuses light on specific areas for security purposes. Task lighting examples include pathway lighting, security lighting (often on motion sensors,) and accent deck lights. Accent lighting is used to highlight features of your property or landscape and draw attention to specific points. Exterior accent lights include spotlights, garden lights, lights integrated into walls or steps, and underwater lighting.

2. Pathway Lighting:

Some exterior projects aren’t difficult or expensive. One of those is pathway lights. While you won’t achieve the impact of a layered lighting system, you will see a dramatic improvement in both your exterior safety (providing a clear, well-lit path to your door) and your curb appeal. A well-lit walkway adds a welcoming glow that guides guests to your door. 

The great thing about pathway lights is they are relatively inexpensive and an easy DIY project. Installing solar lights is honestly as easy as driving the provided stake into the ground and setting the light. While low-voltage systems are slightly more difficult, they are still fairly simple to install and generally just plug into an exterior outlet. 

3. Accent Lighting:

Use spotlights, floodlights, or in-ground lighting to draw attention to specific features such as trees, sculptures, or architectural details in your home. This style of lighting not only shows off the best features of your home, it also adds some drama and interest to your exteriors. 

4. Dimmer, Controls, & Color Temperatures:

Incorporating dimmers, timers, and motion sensors allows you to control the intensity and timing of your lighting. This flexibility helps set the mood for different occasions and can increase security and your home’s energy efficiency. 

Choosing the right color temperature for your bulbs can dramatically 

5. Replace outdated lighting

One of the quickest and most affordable ways to upgrade your exterior lighting is to replace dated fixtures with new, stylish choices. Light fixtures are a great way to express your personal tastes and quickly update the look of your home. One thing to consider prior to replacing light fixtures is that our experience shows that when you replace your dated light fixtures with a modern finish, that bright gold door handle is going to look even worse. So, just be aware that it is possible that by replacing your light fixtures, you may create some additional remodeling tasks. 

Choosing the right lighting setup involves considering both the functional aspects, like security and visibility, and the visual aspects. The goal is a balance that meets your needs, fits your budget, and upgrades your exterior appearance at the same time. It’s a relatively simple upgrade that can make a huge impact in the way people see your home. Because of this, you could see a substantial return on your investment. 

According to HGTV, transforming your exterior walkways, landscaping, and patios with outdoor lighting boosts curb appeal and the value of your home. It is the most cost-effective exterior home improvement project for homeowners. 

Get started on your custom exterior

Seven exterior projects that increase your homes value infographic designed by Custom Exteriors

In wrapping up, we circle to the essentials: quality siding, energy-efficient windows, a durable roof, a welcoming deck, impactful doors, well-maintained drainage systems (gutters), and exterior lighting improvements. In our decades of experience in exterior remodeling, these seven exterior upgrades stand out as wise investments. They go beyond curb appeal and substantially boost your home’s value and personal enjoyment. 

As homeowners, we all want a stylish, welcoming space to enjoy. Strategic upgrades to our exteriors ensure our property continues to rise in value and create a beautiful space for us to enjoy in the present. 

Each of the seven renovations discussed has its own benefits and charms, so envision your dream home. Choosing one of the seven renovations we have discussed to accomplish it is an investment in your home’s value and the enjoyment of a relaxing sanctuary at home.